Version 1.0 - Last Updated: 15 Jul 2026
SIS LLE guidance
CoC CSV import
The previous chapters explained how to submit Change of Circumstance notifications (CoCs) manually on SIS.
This works well for individual students and smaller groups.
However, if you have many undergraduate students who need CoCs, you may want to submit these in bulk instead.
You can do this by uploading a csv file into SIS. You can use a CoC file to submit CoCs for:
- Suspension
- Resumption
- Withdrawal
- Transfer
- Fee and Credit
- Change of End Date
You must first create a csv file with the relevant CoC information. You can find instructions on how to create the file in the LLE Change of Circumstances Bulk CSV Process technical specification on the HE Gateway. You can also email the Partners Support Desk to request a copy.
The file encoding must be UTF-8, no other variation.
The records of your csv file should be ~ separated for each data item. A file submitted through the CoC Import page must contain a minimum of 1 and a maximum of 1,000 CoCs. There is no limit to the number of files you can submit.
The headers in the file will differ depending on the CoC type you want to import. For example, a file uploading a list of Withdrawal CoCs will need to include the following headers:
- CoC type
- HEP code
- Academic year
- Application ID
- SSN/CRN
- SLC course code
- Course Year
- Taught Credits
- Taught Tuition Fee Charged to Student (£)
- Placement Credits
- Placement Tuition Fee Charged to Student (£)
- Foundation Credits
- Foundation Tuition Fee Charged to Student (£)
- Study Abroad Credits
- Study Abroad Tuition Fee Charged to Student (£)
- Date of last attendance
- Withdrawal reason
- Further Explanation
For the exact header names, formats and further information please see the CoC CSV Bulk Upload Technical Specification in the HE Gateway.
- Once you have the CSV file ready, go to the SIS Homepage and select CoC Home.
- Select Import CoC.
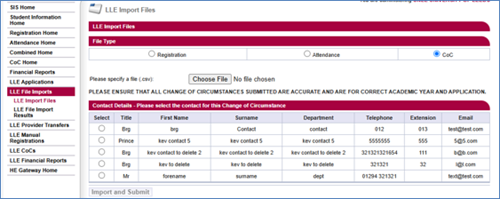
- Select Choose File to find the file you want to upload.
- Use the radio buttons to select your username from the list under Contact Details.
- Select Submit to import the file.
You should check your Attendance Worklist to confirm Attendance Codes when a reassessment takes place.
You can find more information on checking for previous attendance confirmations in the attendance confirmation section of this guide.
Print this chapter