Version 1.0 - Last Updated: 08 Jul 2025
Student Information Service user guide
This guide will help you to use the Student Information Service (SIS), available through the HE Gateway. This page lists the chapters in each section of the guide.
Introduction
What is the Student Information Service?
The Student Information Service (SIS) gives you access to a wide set of student data. This becomes visible once an application has been approved or is approved but awaiting signature.
You can access SIS through the HE Gateway.
- provide student finance information to confirm which students have applied for fee loans support
- confirm student registration at the beginning of a course to release maintenance payments
- confirm ongoing attendance to release tuition fee payments
- process Change of Circumstance (CoC) notifications throughout the academic year
SIS has 6 sections. You can find all these under the SIS tab of the HE Gateway.
The functions you can use depend on your level of access. See SIS access and user roles for more information.
SIS Home
The SIS Home page is the first page you'll see after you select SIS Home from the HE Gateway homepage.
All SIS users can see this page, but the menu tabs here will only show the areas of SIS that your user level lets you access.
View Student Information
This section of SIS lets you view detailed student information once the student’s application is approved or approved but awaiting signature.
Confirming Registration
Students who need registration confirmations will appear on the registration confirmation worklist in this section. You can confirm registration individually or in bulk by a file import. Registration confirmations will release maintenance payments to students.
Confirming Attendance
Students who need attendance confirmations will appear on the attendance confirmation worklist in this section. You can confirm attendance individually or in bulk by a file import. Positive attendance confirmations will release tuition fee payments to you.
Combined Worklist
You can use the combined worklist to submit registration confirmations and the first attendance confirmations at the same time. This will release maintenance payments and the first instalment of the tuition fee loans.
Change of Circumstance (CoC)
You can use this section to notify the student’s award authority of any changes to their study plan.
Financial Reports
This section contains financial reports, such as:
- the tuition fee balance report
- the outstanding online declaration report
- the tuition fee remittance report
It also contains a list of students with blocked maintenance payments.
View Short Course Students
This section of SIS lets you view detailed student information once the student’s application is approved.
Short Course Provider Correction
You can use this section to notify the student’s award authority of any changes to their study plan.
Short Course Financial Reports
This section contains financial reports, such as:
- the tuition fee balance report
- the tuition fee remittance report
- the negative balance report
Getting started
The SIS User Administrator at your university or college can create user accounts and allocate roles to staff. When the administrator sets up your account, you'll receive a username and password. You must keep these details safe and not give them to anyone else.
You can sign into the HE Gateway from any page on the HEP Services website.
You must ensure that the information about your university or college is up to date and accurate on SIS. This will give us the correct details when we assess students, so we can make accurate fee payments to you.
SIS access and user roles
There are different user roles on SIS, with varying access rights. There is no limit on the number of roles a user can have. You must have at least one member of staff with the SIS User Administrator role so they can set up other users.
If you're the SIS User Administrator and are setting up a new user on the HE Gateway, you'll first need to assign them the HEI User role. This will give them access to the system. You can then assign any number of other roles.
Student information will be available within 24 hours after an application is approved or approved awaiting signature.
Student Information Service User Administrator
This role lets you set up any number of additional users on SIS. A User Administrator can also expire the accounts of any users who no longer need SIS access.
Student Information Advisor
This role gives you read-only access to the information of all students on SIS and the ability to export student information. You will not be able to make any changes to a student’s account.
HEI Attendance Administrator
This role lets you see the attendance worklist and confirm student attendance. You can do this individually or in bulk by file import.
Registration Administrator
This role lets you see the registration worklist and confirm student registration. You can do this individually or in bulk by file import.
Combined Confirmation Administrator
This role lets you see the combined worklist and submit registration confirmations and first attendance confirmations.
Change of Circumstance Administrator
This role lets you see the Change of Circumstance (CoC) worklist and submit CoC notifications. It also lets you submit bulk CoCs by file import.
Change of Circumstance Advisor
This role gives you read-only access to all CoC notifications your university or college has saved and submitted.
SIS Report Advisor
This role gives you read-only access to the following financial reports:
- tuition fee balance
- tuition fee balance forecast
- outstanding online declarations
- blocked maintenance payments
- tuition fee remittances
HEP SC User Administrator
This role lets you set up any number of additional Short Course users on SIS. A User Administrator can also expire the accounts of any users who no longer need SIS access
HEP SC Advisor
This role gives you read-only access to the information for Short Course students on SIS and the ability to export student information. You will not be able to make any changes to a student’s account.
HEP SC Attendance Administrator
This role lets you see the attendance worklist and confirm student attendance.
HEP SC CoC Administrator
This role lets you submit Change of Circumstance (CoC) or Correction notifications.
HEP SC Report Advisor
This role gives you read-only access to the following financial reports:
- remittance report
- tuition fee balance report
- negative balance report
Information for academic staff
Student finance is available to help undergraduate students with the cost of fees and living for approved higher education courses. Students need to apply for this each academic year.
We make maintenance payments to students in three instalments each academic year. Students need a registration confirmation at the beginning of each academic year. You must submit this to trigger the release of the maintenance grant or loan and contribution to cost loans.
Tuition fee payments are made to your organisation in three instalments each academic year.
You must submit an attendance confirmation for all students each term. This releases the payment instalment for the liability period.
It's important that registration and attendance confirmations are accurate and on time.
You must follow our set of service standards. You must tell us as soon as possible if students:
- suspend their studies
- resume their studies
- withdraw from courses
If any information you give us is late or wrong, this can mean that:
- students may receive an overpayment of their Maintenance support, which will have to be paid back straight away
- your organisation receives an incorrect fee payment amount (and we may need to claw back funding)
- students owe an incorrect fee amount (this can mean they're liable for more loan than they should be, and are also charged additional interest)
- you risk breaching your obligation to adhere to the service standards
Your teaching staff must give administrators the information they need to manage student finance in line with our service standards. This includes register marks and any changes to a student’s enrolment status.
We track your performance on attendance confirmations and notifications of suspensions and withdrawals.
If you consistently fails to meet the service standards, this can jeopardise the funding available to you and your students.
Student information
Student Information Home
SIS has a Student Information area where you can see details about your students. You'll need to have Student Information Advisor access to view this area.
The student information appears on SIS once the application is approved or approved awaiting signature. (Applications only become fully approved once the student has completed and returned their declaration form.)
You can check that the details on a student’s application are correct early in the application cycle, before attendance and registration confirmation. These include:
- if bank details have been supplied
- if National Insurance numbers have been supplied
- bursary consent to share
- course, fee and credit information
If the bank details, National Insurance numbers, bursary consent to share, or any other personal details are incorrect or missing, the student will need to act. If the course, fee and credit information are incorrect or missing, you'll need to submit the relevant Change of Circumstance notification (CoC).
You can also use the Student Information area throughout the year to see detailed information about your students.
SIS will show student information for all approved applications for the upcoming academic year. This will include any reassessments or outstanding attendance confirmations from academic year 2006/07 onward. For applications with a status of Approved Awaiting Signature, this information will show from academic year 2013/14 onward.
View student information
Go to the Student Information Home menu and select View Student Information. This will open the student information filter.
There are 3 different searches you can use to find student information, each on its own tab:
The page defaults to the Student Search tab.
If you enter details on one search tab and then select another, the system will clear the details and you’ll need to enter them again.
All 3 tabs look at the same student data but will let you use different search criteria. You can find out more about the search fields in the next chapters of this guide.
Search options available on all tabs
Clear Filter and Results
This clears all fields and reverts to the initial view. If you have any search results open, these will also be removed.
Filter and Display Results
This searches all student details on the system, retrieves those that match your search criteria and displays them on screen.
Filter and Export Results
This searches all student details on the system, retrieves those that match your search criteria and lets you save these in an export file.
Student search
The list below shows the criteria you can use on the Student Search tab.
Academic Year
This defaults to the current academic year and is the only mandatory field you need to run a search.
Application Status
The application status of the students you're searching for. The options are Approved or Approved Awaiting Signature.
Mode of Study
The dropdown options are FT (full-time) and PT (part-time).
Customer Reference Number / SSN
These are unique student identifiers.
Date of Birth
You should enter this in dd/mm/yyyy format.
Fee Waiver
The dropdown options are Yes or No.
Forename(s)/Surname
You can use a wildcard search for these fields. For this, you must enter at least 3 characters along with the wildcard symbol (%). If you use one of these fields, you must also use the other.
Last Updated From/To
The date range you want to check for student information updates. If you use one of these fields, you must also use the other.
Current Attendance Status
The attendance status of the students you're searching for.
Registration Status
The registration status of the students you're searching for.
Current Year Start Date From/To
This field lets you filter on the current year start date of part-time students. You cannot use it if you set the Mode of Study field to FT (full-time).
Number of Records to Display
The number of search results per page. The default is 25, but you can change it to 50, 100 or 200.
Course search
The list below shows the criteria you can use on the Course Search tab.
Academic Year
This defaults to the current academic year and is the only mandatory field you need to run a search.
Application Status
The application status of the students you're searching for. The options are Approved or Approved Awaiting Signature.
Course Name
You can enter up to 41 characters and use a wildcard search. For this, you must enter at least 3 characters along with the wildcard symbol (%).
SLC Course Code
The unique course identifier.
UCAS Course Code
As provided by UCAS.
Course Start Date
The date when the course starts. You should enter this in dd/mm/yyyy format.
Method of Attendance
A dropdown with a choice of attendance methods.
Qualification
A dropdown with a choice of qualifications.
Campus
A dropdown with a choice of campus locations.
Course Type
A dropdown with a choice of course types.
Course Status
A dropdown that lets you search for open or closed courses.
Course Fee Rate
Enter the full course fee rate you're charging in this field.
Current Attendance Status
The attendance status of the students you're searching for.
Registration Status
The registration status of the students you're searching for.
Current Year Start Date From/To
This field lets you filter on the current year start date of part-time students. You cannot use it if you set the Mode of Study field to FT (full-time).
Level of Funding
A dropdown with a choice of funding levels.
Mode of Study
A dropdown with a choice of modes of study.
Number of Records to Display
The number of search results per page. The default is 25, but you can change it to 50, 100 or 200.
General search
The list below shows the criteria you can use on the General Search tab.
Academic Year
This defaults to the current academic year and is the only mandatory field you need to run a search.
Application Status
The application status of the students you're searching for. The options are Approved or Approved Awaiting Signature.
Domicile
A dropdown where you can select the domicile of the students.
Mode of Study
The dropdown options are FT (full-time) and PT (part-time).
Last Updated From/To
The date range you want to check for student information updates. If you use one of these fields, you must also use the other.
Valid NINO Held
A dropdown that lets you filter students who have or have not given us their National Insurance number.
Transferred Indicator
A dropdown that lets you filter students who have or have not transferred out of your university or college.
Bank Details Held
A dropdown that lets you filter students who have or have not given us their bank details.
Tuition Fee Payment Includes Loan Payment
A dropdown that lets you filter all student records where the tuition fee loan amount is or is not greater than zero.
Tuition Fee Payment Includes Grant Amount
A dropdown that lets you filter all student records where the tuition fee grant amount is or is not greater than zero.
Tuition Fee Payment Includes Amount Paid by Student
A dropdown that lets you filter all students records where the tuition fee amount payable by the student is or is not greater than zero.
Student Bursary Consent to Share
A dropdown that lets you filter students who have or have not given consent to share for bursary purposes.
Sponsor Bursary Consent to Share
A dropdown that lets you filter students whose sponsors have given consent to share for bursary purposes. If there are 2 sponsors, this will only show as Yes if both have given consent to share.
Attendance Status
The attendance status of the students you're searching for.
Registration Status
The registration status of the students you're searching for. This is only available for academic year 2012/13 and later.
Number of Records To Display
The number of search results per page. The default is 25, but you can change it to 50, 100 or 200.
Filter and display results
Once you've entered your search criteria, select the Filter and Display Results button to search all student details in the system. The search will retrieve those that match your criteria.
If you're signed in as a parent higher education provider (HEP), the search will return the details of all students at your university or college, as well as any associated child HEPs. If you're signed in as a child HEP, the system will return the details of all students at your university or college only.
The search results will appear in the bottom section of the page. They'll be ordered by surname.
The list below shows the fields you'll see for each student record.
SSN
Student Support Number. This also acts as a link to the View Detailed Student Information page for the selected student.
Full Name
The student’s name.
Date of Birth
The student’s date of birth.
Course Name
The student’s course name.
Course Location
The location where the course is studied.
SLC Course Code / UCAS Course Code
The SLC and UCAS course codes.
Mode of Study
The mode at which the student is studying.
TFL (Tuition Fee Loan Amount)
The tuition fee loan amount that the student has been awarded.
TFG (Tuition Fee Grant Amount)
The tuition fee grant amount that the student has been awarded.
TFW (Tuition Fee Waiver Amount)
The tuition fee waiver amount that the student has been awarded.
STP (Student to Pay)
The tuition fee amount that the student must pay.
Current Attendance Code
The attendance code entered for the student.
Current Attendance Status
The attendance status of the student.
Filter and export results
If you have HEI Student Information Advisor access, you can export the results of a student information search. You can do this directly from the filter without viewing the results first, or after viewing the results on screen.
- Go to the Student Information Filter page and select the Student Search, Course Search or General Search tab.
- Select the relevant filters, then select Filter and Export Results. This will search all student details in the system and retrieve those that match your criteria.
- Select the format for the export. You can choose between 3 formats:
-
- Summary Student Attendance Information
- Extended Student Information
- Summary Student Registration Information
- Select the filename for the export and the location where you want to save it.
You can also select Filter and Display to see the search results on screen. If you do this, there will be an Export button on the results page. Select this to export the results after viewing them on screen. This will take you to the Export page where you can follow steps 3 and 4 to export the results.
Extended student information export files
Extended student information export files include additional fields.
Customer Reference Number
This is our unique identifier for the student.
Bank Details Held
This shows whether we hold bank details for the student (yes or no).
Attendance Status
This is the current attendance status of the student:
- awaiting attendance confirmation
- attendance confirmed
- attendance confirmation not required
- attendance saved
- awaiting reassessment
Attendance Code
This is the attendance code you've confirmed for the student:
- A – in attendance or, after reassessment, that you agree with the change
- C – course mismatch
- F – the student is in attendance but you disagree with the fee
- L – the student is in attendance, the liability is disputed but you will resolve
- N – the student is in attendance, the liability is disputed but you will not resolve
- S – suspended
- X – not in attendance
Award Authority
The name of the award authority processing the student’s support application.
Student Bursary Consent to Share
This is a dropdown to filter on the students who have or have not given consent to share for bursary purposes.
Sponsor Bursary Consent to Share
This is a dropdown to filter on the students whose sponsors have given consent to share for bursary purposes. If there are 2 sponsors this will only show as yes if both have given consent to share.
Childcare Grant Indicator
This shows whether the student has applied for a Childcare Grant (yes or no).
NHS Bursary Indicator
This shows whether the student has applied for an NHS Bursary.
Cohort Year
The year in which a student is assessed for a period of continuous study.
Application Status
The status of the student’s application:
- approved
- approved awaiting signature
- cancelled
- deleted
These additional fields may not be populated for all students. For example, Bursary Consent, Childcare Grant Indicator, NHS Bursary Indicator and Cohort Year will be blank for Student Awards Agency Scotland (SAAS) students.
You may want to export specific attendance records for your systems. To do this, select the Attendance Status option from the search, then select Filter and Export.
For example, you may only want to export blank attendance codes. In this case, select Awaiting Attendance Confirmation from the Attendance Status dropdown.
Exporting files into Microsoft Excel
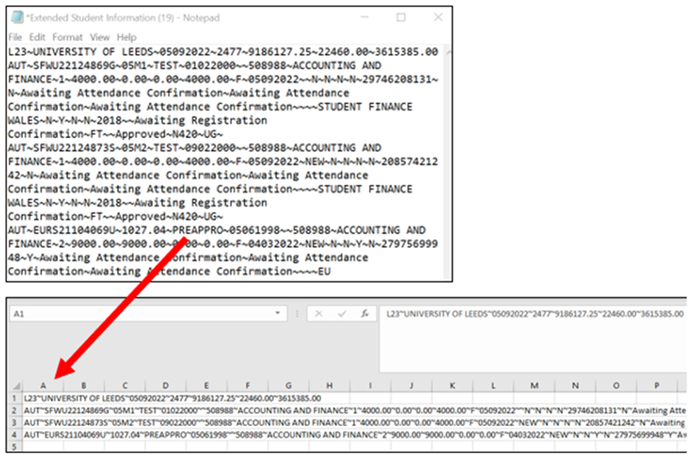
SIS export files are in a text format, with each field separated (or delimited) by a character called tilde (~). This format is not the most user friendly. This chapter will tell you how to export student data into Excel to allow for easier data analysis.
The example below uses the Extended Student Information Export.
- Open a new Excel spreadsheet. Open the text export file in Notepad. The file should be in text format and open in Notepad by default. Copy all and paste the text contents into your new Excel spreadsheet in cell A1. The contents will take up one column and several rows.
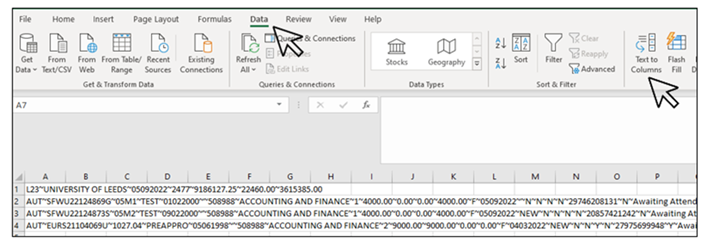
- Select the column header to select the entire column. Select the Data tab in the ribbon and then Text to columns under Data tools. This will open the Convert text to columns wizard.
- Alternatively, you can directly import a text file into Excel. Excel can handle files whose type is Text, Comma Separated Values (CSV) or Printer Text File. Once you open Excel, select Open, then Browse. Select All files or Text files in the File open dialogue, then find and select the file you want to import. If Excel recognizes it as a delimited file, it will open the Text import wizard which is similar to the Convert text to columns wizard.
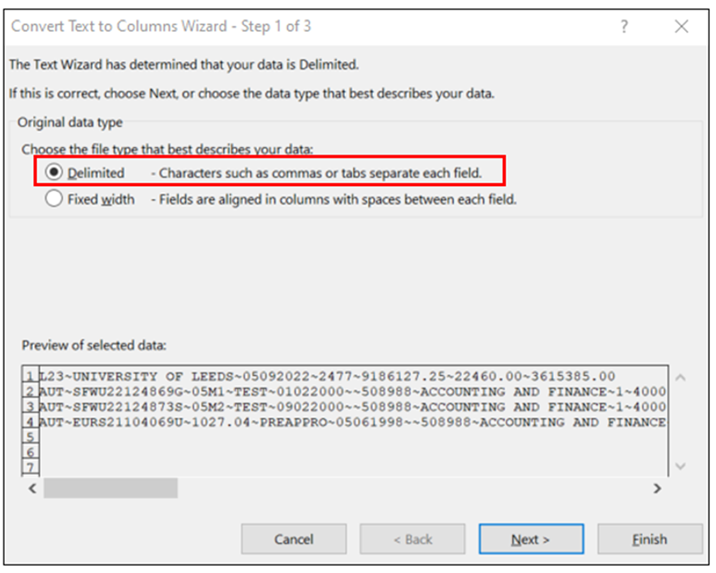
- In the wizard, select Delimited and then select Next.
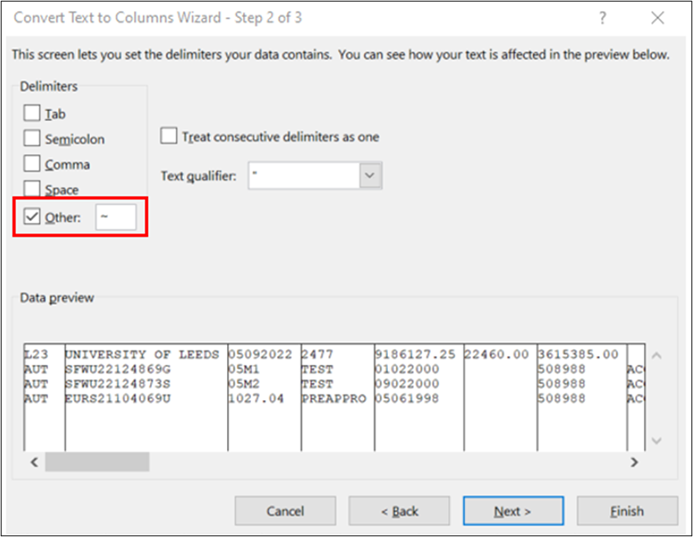
- Select the Delimiter for your file. In our example, this will be Other, with the tilde character (~) entered in the Text qualifier field. The Data preview window will give you an idea how the text contents get separated into columns. Select Next.
- In the final window, you get to set the data type for each column by selecting it in the preview. The default data format is General. Date and numeric values can also be handled here. You will not need to adjust the default General format.
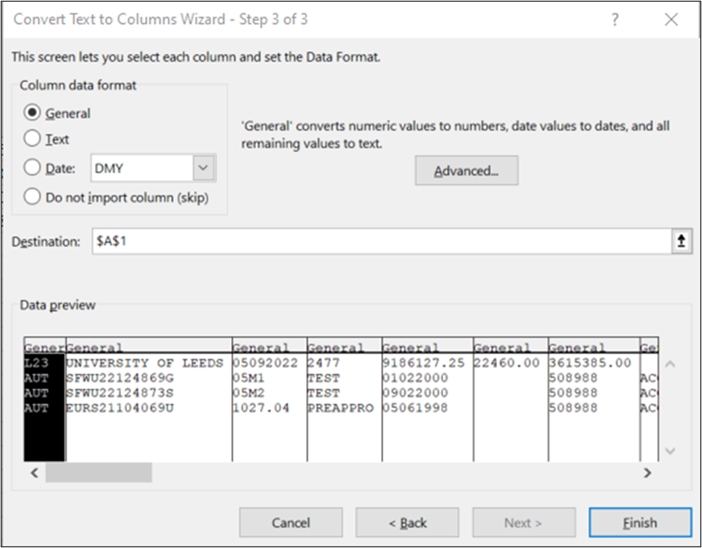
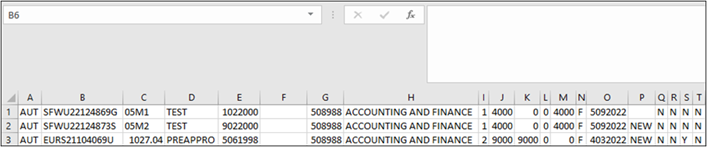
- Select Finish to exit the wizard. Your data will now be neatly arranged across columns in the spreadsheet.
Field headings
The export files do not contain header rows. Details of the field headings are:
| Column | Data | Description | Field type (max field size) - format | Mandatory | Example values |
| 1 | HEI Code | The identifier for the college. Either an HEP UCAS code or HEP SLC Code should be supplied | Alphanumeric (4) | Yes | MANU/M20" |
| 2 | HEI Name | The full name of the HEP as help by SLC | Alphanumeric (50) | Yes | University of Leeds |
| 3 | Schedule Issue Date | the date on which the export was created | Date (8) - DDMMYYYY | Yes | 11031980 |
| 4 | Number of Records | Number of students included in the export | Numeric (5,0) | Yes | 35000 |
| 5 | Total Tuition Fee Loan Payable | Total value of tuition fee loans requested by students | Numeric (11,2) | Yes | 59365.10 |
| 6 | Total Tuition Fee Grant Payable | Total value of grant payments that will be made on behalf of students | Numeric (11,2) | Yes | 5864.50 |
| 7 | Total Tuition Fee Student Pays | Total value of payments to be made by students to the HEP in question | Numeric (11,2) | Yes | 185000.25 |
| 8 | Course Start Period | Code indicating which period the course started in | Alphabetic (3) | Yes |
Allowable Values: |
| 9 | Student Support Number | The Student Support Number Identifier | Alphanumeric (13) | Yes | ABCD09123456A |
| 10 | Surname | Student's Surname | Alphanumeric (50) | Yes | Smith |
| 11 | Forename | Student's Forename | Alphanumeric (50) | Yes | John |
| 12 | Birth Date | Student's date of birth | Date (8) - DDMMYYYY | No | 11031980 |
| 13 | UCAS Number | UCAS Student Number | Alphanumeric (9) | No | 083917150 |
| 14 | Course Code | SLC_Course Code | Alphanumeric (6) | Yes | 123456 / XX99X |
| 15 | Course Name | The name of the course being studied by the student | Alphanumeric (41) | Yes | MATHS AND PHYSICS |
| 16 | Course Year | Year of course being which the student is studying | Numeric (1) | Yes | 3 |
| 17 | Course Fee Amount | The amount total of tuition fees which will be paid to the HEP. This value will be calculated as the sum of the tuition fee for each course at the HEP in the current academic year irrespective of the course or number of courses attended at that HEP. | Numeric (5,2) | Yes | 99999.99 |
| 18 | Tuition Fee Loan | The loan amount requested by the student that will be paid towards the course tuition fee amount. From academic year 2012 onwards the exported amount, for all students except contribution cohort students, will be calculated as the sum of tuition fee loan for each course at the HEP in the current academic year irrespective of the course or number of courses attended at that HEP. | Numeric (5,2) | Yes | 99999.99 |
| 19 | Tuition Fee Grant | The amount of grant that will be paid towards the course tuition fee amount. From academic year 2012 onwards the exported amount, for all students except contribution cohort students, will be calculated as the sum of the tuition fee grant for each course at the HEP in the current academic year irrespective of the course or number of courses attended at that HEP. | Numeric (5,2) | Yes | 99999.99 |
| 20 | Tuition Fee Student | The amount of tuition fees which will ne paid directly to the HEP by the student. From academic year 2012 onwards the exported amount, for all students except contribution cohort students, will be calculated as the sum of the tuition fee student for each course at the HEP in the current academic year irrespective of the course or number of courses attended at that HEP. | Numeric (5,2) | Yes | 99999.99 |
| 21 | Student Status | Latest Support Notification Status | Alphabetic (1) | Yes | Allowable values: F P S N |
| 22 | Issue date | Date of Issue from the Support Notifications | Date (8) - DDMMYYYY | Yes | 11031980 |
| 23 | New Record | Flag to confirm whether the details relate to a newly approved support notification | Alphabetic (3) | Yes | Allowable values: New Blank |
| 24 | Revision Indicator | Flag to indicate if this is a revision of an existing record | Alphabetic (1) | Yes | Allowable values: R N |
| 25 | Bursary Student Flag | Flag to indicate whether the student has had a bursary approved by the HEP through the HE Bursaries system | Alphabetic (1) | Yes |
Allowable values: |
| 26 | Valid NINO Flag | Flag to indicate whether the student has provided SLC with a valid National Insurance number or not | Alphabetic (1) | Yes |
Allowable values: |
| 27 | Disabled Distance Learner | Flag to indicate whether the student is a disabled distance learner | Alphabetic (1) | Yes | Allowable values: Y N |
| 28 | Customer Reference Number | SLC's unique identifier for the student | Alphanumeric(30) | Yes | 12345678912 |
| 29 | Bank Details Held Indicator | Indicates whether SLC holds bank details for the student | Alphabetic (1) | Yes | Allowable values: Y N |
| 30 | Attendance Status 1 | The current attendance status of the student details for period 1 | Alphabetic (40) | Yes | Allowable values: Awaiting attendance confirmation Attendance confirmed Attendance confirmation not required Attendance saved Awaiting reassessment |
| 31 | Attendance Status 2 | The current attendance status of the student details for period 2 | Alphabetic (40) | Yes | Allowable values: Awaiting attendance confirmation Attendance confirmed Attendance confirmation not required Attendance saved Awaiting reassessment |
| 32 | Attendance Status 3 | The current attendance status of the student details for period 3 | Alphabetic (40) | Yes | Allowable values: Awaiting attendance confirmation Attendance confirmed Attendance confirmation not required Attendance saved Awaiting reassessment |
| 33 | Attendance Code 1 | The attendance code which has been confirmed by the HEP for period 1 | Alphabetic (1) | No | Allowable values: A C D F L N X S |
| 34 | Attendance Code 2 | The attendance code which has been confirmed by the HEP for period 2 | Alphabetic (1) | No | Allowable values: A C D F L N X S |
| 35 | Attendance Code 3 | The attendance code which has been confirmed by the HEP for period 3 | Alphabetic (1) | No | Allowable values: A C D F L N X S |
| 36 | Award Authority | The name of the Award Authority who is processing the students support application | Alphanumeric (100) | No | Nottingham |
| 37 | Sponsor Bursary Consent | Indicates whether all sponsors have consented to share information for bursary purposes | Alphabetic (1) | No | Allowable values: Y N |
| 38 | Student Bursary Consent | Indicates whether the student has consented to share information for Bursary purposes | Alphabetic (1) | No | Allowable values: Y N |
| 39 | Child Care Grant Indicator | Indicates whether the student has applied for a Child Care Grant | Alphabetic (1) | No | Allowable values: Y N |
| 40 | NHS Bursary Indicator | Indicates whether the student has applied for an NHS bursary | Alphabetic (1) | No | Allowable values: Y N |
| 41 | Cohort Year | The year in which a student is assessed for a period of continuous study | Numeric (4) | No | 2009 |
| 42 | Registration Confirmation Indicator | This field will either be populated with the Registration Confirmation code which the HEP has input for the student record or it will be blank | Alphanumeric (1) | No | Allowable values: Y N |
| 43 | Registration Status | The registration status of the student record | Alphabetic (40) | No | Allowable values: Awaiting registration confirmation Registered Not registered Registration confirmation not required |
| 44 | Mode of Study | Confirmation of whether the student is studying full time or part time | Alphabetic (2) | Yes | Allowable values: FT PT |
| 45 | Current year start date | The start date for the student in the current academic year. This field is only populated for 2012 cohort part time applications | DATE | No | MMYYYY |
| 46 | Application status | Literal term to represent the work stage of the student application | Alphabetic (30) | Yes | Allowable values: approved approved awaiting signature |
| 47 | UCAS Course Code | UCAS course identifier | Alphanumeric (6) | No | C102 |
| 48 | Level of Funding | Confirmation of whether the student is in receipt of Undergraduate or Postgraduate funding | Alphabetic (2) | Yes | Allowable values: UG PG |
| 49 | Credit Value | The number of credits the student is studying in the AY applicable | Numeric (4) | No | 9999 |
View detailed student information
The Detailed Student Information page shows personal, course and other information about an individual student. The fields you can view depend on the level of access your university or college has to that student.
You can go to the Detailed Student Information page from the Student Information, Attendance Worklist or CoC filter results pages. You can also go there from the Remittance Report page in the Financial Reporting section. Select the hyperlinked Student Support Number (SSN) of the relevant student from any of these pages to view their detailed information.
It's not available for the following students:
- Student Awards Agency Scotland (SAAS) students
- students who have only applied for:
- DSA – non-medical helpers
- DSA – equipment
- DSA – general
- DSA – travel
The detailed student information for these students will only show 2 tabs:
- personal information
- course information
Detailed student information – general details
The section at the top of the Detailed Student Information page will show general details about the student. These fields appear on all tabs and include:
- Full Name
- Customer Reference Number
- Student Support Number
- Date of Birth

Detailed student information – personal information
The Detailed Student Information page has 3 tabs:
- personal information
- course information
- other information
The page defaults to the Personal Information tab. This shows the fields listed below.
Contact Address
The student’s address details.
Domicile
The student’s domicile.
Award Authority
The student’s award authority.
Reassessed Indicator
This shows if the student has been reassessed (yes or no).
Date of Birth
In dd/mm/yyyy format.
Bank Details Held
This shows if we have the student’s bank details (yes or no).
Valid NINO Held
This shows if we have a valid National Insurance number for the student (yes or no).
Registration Status
This shows the current registration status of the student. The options are:
- awaiting registration confirmation
- registration confirmed
- registration confirmation not required
FSN Status
This shows the current Student Notification Status.
Alternative Location Details
The student’s address details.
Current Attendance Status
This shows the current attendance status of the student.
Current Attendance Code
This shows the attendance code you've saved for the student.
Application Status
This shows the application status. This can be either Approved or Approved Awaiting Signature.
Detailed student information – course information
The Course Information tab has the following fields:
- course name
- course status
- SLC course code
- UCAS course code
- campus
- course duration (years)
- method of attendance
- qualification
- temporary course indicator (yes or no)
- part-time course indicator (yes or no)
- course year start date (dd/mm/yyyy)
- course year end date (dd/mm/yyyy)
- current course year*
- level of funding
- Tuition Fee Loan amount
- Tuition Fee Grant amount
- tuition fee waiver amount
- tuition fee amount payable by student
- course fee rate confirmed by student
- course fee rate confirmed by HEP
* For part-time applications, this will always show as Year 1.
Detailed student information – other information
The Other Information tab shows the fields listed below.
Sponsor Bursary Consent
This shows if the student’s sponsor has given consent to share their data (yes or no). If there are 2 sponsors this will only show as yes if both sponsors have given consent to share.
Student Bursary Consent
This shows if the student has given consent to share their data (yes or no).
NHS Bursary Indicator
This shows if the student has applied for an NHS Bursary (yes or no).
Cohort Year
The year in which the student is assessed for a period of continuous study.
Fee Waiver
This shows if the student has been awarded a fee waiver (yes or no).
Detailed student information – actions
Depending on your level of access, you can perform these actions from the Detailed Student Information page:
- look into the history of a student
- confirm registration
- confirm attendance
- view details of the 3 attendance liability points
- submit Change of Circumstance notifications (CoCs)
Anyone with Student Information Advisor access can view the page. You'll need task-specific access to submit registration confirmations, attendance confirmations or CoCs. See SIS access and user roles for more information.
Confirming registration from the Detailed Student Information page
We recommend that you use the registration worklist under the Registration section of SIS to confirm registration. However, you can also do this from the Detailed Student Information page.
You'll need Registration Administrator access to confirm registration.
Students will need registration confirmation when:
- it is within 30 days of the start of their course
- they're on the registration worklist
- their application is approved or approved awaiting signature
- you have not yet confirmed their registration
A registration confirmation will only trigger payment when the application is approved.
- To confirm registration from the Detailed Student Information page, go to the Registration Confirmation dropdown.
- Select Yes or No from the dropdown.
- Select Submit.

The Submit button will only become active once you've selected Yes or No.
If you select Yes, this will confirm the student as registered. They'll disappear from the registration worklist and their registration status will change to Registration Confirmed.
Selecting No will also remove the student from the registration worklist, but their registration status will change to Registration Not Required. Students with this status will not appear on any future attendance worklists. You should use this option for students who fail to appear at the start of a course.
If you confirm a student as not registered, you can change this later.
- Go back to the student's detailed information.
- Select Yes in the Registration Confirmation dropdown.
- Select Submit.
If you confirm a student as registered, you'll no longer see the dropdown and cannot reverse this action.
Confirming attendance from the Detailed Student Information page
We recommend that you use the attendance worklist under the Attendance section of SIS to confirm attendance. However, you can also confirm attendance from the Detailed Student Information page.
You'll need Attendance Administrator access to confirm attendance.
You should only confirm attendance for students after you've registered them with the appropriate awarding body.
The Attendance section of the Detailed Student Information page lets you:
- confirm student attendance
- reverse a negative attendance code for any outstanding tuition periods
- see the latest attendance status for each tuition period
The Attendance section is split between the 3 liability periods and will show the following fields.
Liability Period
Course
Course location
Course Year
TFL Amount – Tuition Fee Loan amount
TFG Amount – Tuition Fee Grant amount
TFW Amount – Tuition Fee Waiver amount
STP Amount – student to pay amount
Attendance Status – the student's attendance status:
- awaiting attendance confirmation
- attendance confirmed
- attendance saved
- awaiting reassessment
- attendance required
- attendance confirmation not required
Last Updated By – the person who made the last update's username (this will say 'SIS_APPLICATION_SERVICE or JWSSIS' if it was a system action)
Last Updated Date/Time – the time and date stamp of the last action for audit purposes
Attendance code – this shows any attendance codes you've submitted for the student earlier in the current academic year
If the student needs an attendance confirmation, you'll see a dropdown filter in the Attendance Code column of the relevant liability period. This will be set to Select as a default.
- To confirm attendance, select the appropriate code from the Attendance Code dropdown.
- Select Submit if you want to submit the attendance confirmation right away.
- Select Save if you want to come back to the page and submit the attendance confirmation later.
The Save and Submit buttons will only become active once you've selected an attendance code.
Once you've submitted a student’s attendance confirmation, their status will change to Attendance Confirmed and they'll disappear from the attendance worklist. If you submitted attendance for the first liability period, they'll also disappear from the combined worklist.
If you submit a positive attendance code, this will appear in the Attendance Code column and you'll no longer be able to edit it. If you've made an error, you'll need to submit a Change of Circumstance notification (CoC) to correct it.
If you submit a negative code, this will appear in the Attendance Code column, but the dropdown will still be active so you can reverse it if you need to.
- To reverse a negative attendance code, select a positive code from the Attendance Code dropdown.
- Select Submit if you want to submit the positive attendance confirmation right away.
- Select Save if you want to come back to the page and submit the positive attendance confirmation later.
If you save an attendance confirmation but do not submit it, the saved code will appear in the Attendance Code column along with the dropdown option to amend it. The Submit button will become active. Select this to submit the confirmation when you're ready.
If a student does not need an attendance confirmation, the Attendance Code column will be blank. This might be because it is too early for the student to appear on the attendance worklist.
Sometimes, we need to reassess a student’s application and this affects a previous liability period. In this case, you may need to enter an attendance code for 2 liability periods at the same time.
The system will not let you submit an attendance code for the later liability period until you've submitted one for the earlier period. If you've only saved the code for a previous liability period, the system will consider it outstanding.
If you try to submit an attendance confirmation when there is an outstanding confirmation for an earlier liability period, you'll get an error message:
'The attendance code for the selected period cannot be submitted without submitting a code for all outstanding periods.'
You'll also see a warning when you submit attendance codes:
'Please ensure that any attendance codes are correct.'
Detailed student information history
Student information history shows any changes that have been made to the student's record. These can be a result of reassessments or attendance confirmations. Some of the change categories are:
- new application
- suspension
- fee revision
- attendance confirmation
Every time you make a change to an existing record in SIS, it will be recorded on the History tab for that student. You can view a complete list of all actions on this tab.
- Go to the Detailed Student Information page.
- Select History.

The student’s details appear in the top section of the page. The bottom half of the page is split across 3 tabs:
- Registration
- Attendance
- Change of Circumstance
The page defaults to the Registration tab. The events on each tab are ordered by update time, starting with the most recent.
Registration history
The Registration tab under Student Information History shows:
- the registration event
- the registration status
- registration confirmed (RC)
- awaiting registration confirmation (ARC)
- not registered (NR)
- registration confirmation not required (RCNR)
- who created the event
- HEP individual user's username
- SIS_APPLICATION_SERVICE or JWSSIS if it was a system action
- the time and date of the event
Use the Back button to return to the Detailed Student Information page.

New Application – Approved Awaiting Signature
SIS records this when it receives a system generated notification. The registration status will be Awaiting Registration Confirmation.
Application Approved
SIS records this when an application is fully approved.
Course Start Date Change
This shows that the course start date has changed for the first term. The Courses Management Service (CMS) generates this message. It will only apply to the first liability period. The registration status will be Awaiting Registration Confirmation.
Registration Status Change
This indicates the following changes to the original application:
- the addition of a maintenance grant or loan
- the removal of a maintenance grant or loan
- bursary approval
Manual Registration
SIS records this when you manually register a student. The registration status will be Registration Confirmed.
Manual Registration Status Update
SIS records this when a registration status changes from Registration Confirmation Not Required to Awaiting Registration Confirmation.
Registration Confirmation
SIS records this when you confirm registration. This can be a positive or negative confirmation.
Corrective Reassessment
SIS records this when an assessment for an application is corrected. It will usually mean that a CoC has been submitted and processed in error and the award authority has corrected this.
Attendance history
The Attendance tab under Student Information History shows:
- the attendance event
- the attendance status for each liability period
- awaiting attendance confirmation (AAC)
- attendance confirmed (AC)
- attendance saved (AS)
- awaiting reassessment (AR)
- attendance confirmation not required (ACNR)
- who created the event
- HEP individual user's username
- SIS_APPLICATION_SERVICE or JWSSIS if it was a system action
- the time and date of the event
Use the Back button to return to the Detailed Student Information page.

New Application – Approved
SIS generates this when it receives an approved application notification. This is system generated and includes:
- the FSN (Final Version of Support Notification) status of the student
- if we hold the student's bank details
- the Tuition Fee Loan amount
- the Tuition Fee Grant amount
- the amount the student is to pay
The attendance status will be Awaiting Attendance Confirmation for each liability period.
The Last Updated By field will say 'SIS_APPLICATION_SERVICE or JWSSIS' as the event was system generated.
The Last Updated Date and Time field will show when the event came into SIS.
Bursary Approval
SIS records this when a bursary award is approved. It will show the attendance status, along with the timestamp when the information came to SIS from the Bursary Administration Service (BAS).
Fee Waiver
SIS records this when a fee waiver is processed. It will show the updated amounts for:
- Tuition Fee Loan
- Tuition Fee Grant
- tuition fee waiver
- student to pay
It will also show the attendance status, along with the timestamp when the information came to SIS from our application and assessment system.
Attendance Confirmed
SIS records this when you confirm attendance. It will show:
- the attendance code
- the period you confirmed attendance for
- the attendance status
- the username of the person who confirmed attendance
- the time stamp for audit purposes
Corrective Reassessment
SIS records this when an assessment for an application is corrected. It will usually mean that a Change of Circumstance notification (CoC) has been submitted and processed in error and the award authority has corrected this.
Change of Circumstance history
The Change of Circumstance tab under Student Information History shows:
- all submitted CoC notification events
- who actioned the event
- the time and date of the event
Use the Back button to return to the Detailed Student Information page.

Registration confirmation
Registration confirmation
Both undergraduate and postgraduate students need a registration confirmation at the beginning of each academic year. When you submit this on SIS, it will trigger the release of the maintenance grant or loan and contribution to cost loans. If you've set the registration confirmation as a trigger in the Bursary Administration Service (BAS), it will also release bursary or scholarship payments.
When do you need to confirm registration?
You must make sure that your confirmations are timely and accurate. This will help us to minimise the risk of fraud and make payments only to those students who are entitled to them. You should only confirm registration if you're confident the student has registered for the coming session. For new students, this is usually after you’ve had face-to-face contact with them. However, how you accept registrations is at your discretion.
Students will appear on the registration worklist 30 days before the start of their course. You should submit a registration confirmation as soon as the student has enrolled. You can wait 28 calendar days after the course start date to submit a Not Registered confirmation. This will allow the student time to register at a different university or college. If you know that the person is not pursuing higher education and this is before the course start date, they should be guided to cancel their application. If this is on the course start date or later, you can submit the Not Registered confirmation. This should be done as soon as you find out. The application will be automatically withdrawn once you submit the Not Registered confirmation.
Who needs a registration confirmation?
Any student receiving maintenance or contribution to costs funding will need registration confirmation.
All part-time Welsh students will appear on the registration worklist. You should not confirm registration for a part-time student if the intensity of study is less than 50%. In this case, you should submit a Part-Time Fee Change CoC to tell us.
Once you’ve made the registration confirmations, it is best to check when you can submit attendance confirmations for these students. You should make a note of when the course start date is and when the cooling-off period ends for your students. At this point you’ll be able to confirm attendance for the students.
Validation checks you must make
You need to have a process in place for independent validation of registration confirmations. At least 2 members of staff should be involved in this. You can achieve this in several ways.
For example, you can save confirmations in SIS and have another person check them for accuracy before you submit them. You can also have different people determine that student registration is complete and submit the confirmation on SIS.
If your confirmations are system generated, the process managers are responsible for the accuracy and security of the involved systems and processes. For example, let's say that the admissions team creates the entry in the student record system after accepting a student. The registry team then uses your internal systems and SIS to confirm registration. In this case, the process managers are an admissions manager and a registry manager.
What else does registration confirm?
When you submit a registration confirmation, you're telling us you're confident the student has registered for the coming session. For some loan products, a registration also confirms some further information. This chapter will explain what this is depending on the product.
Undergraduate Part-Time Maintenance Loan
When students apply for Student Finance England (SFE) or Student Finance Wales (SFW) Part-Time Maintenance Loans, they tell us how many credits they'll be studying in the academic year. We need you to confirm if the credit value they have given us on their application is correct. This will be part of the registration confirmation and is only mandatory for Part-Time Maintenance Loan students.
You'll see this credit value in the registration worklist on SIS. It will also appear on the Course Information tab under Detailed Student Information.
The Credit field will also be included in file exports:
- the extended student information file
- the summary student registration information file
- the registration confirmation import
You can also tell us about earlier or later credit changes using the Credit CoC.
If you disagree with the credit value on SIS, you can amend it for the relevant academic year. This will automatically raise a CoC to change the credit value. We'll process the CoC and complete a reassessment. Once this is done, the student will reappear on your registration worklist for confirmation.
You can find more information on how to confirm or amend credit values in the Registration Worklist chapter.
Postgraduate Master’s and Doctoral Loans
The Department for Education (DfE) requires a confirmation of study before releasing payments. For this, we use registration confirmations as they trigger payments directly to students.
For postgraduate doctoral students, registration also confirms that the student:
- is in study
- is on an eligible full doctoral course
- is studying at least 50% of the full course in the UK
- is on track to finish within the duration of their course
- is not or will not be in receipt of Research Council funding, made by United Kingdom Research and Innovation (UKRI)
- is not or will not be in receipt of Knowledge Economy Skills Scholarships (KESS 2) funding (Welsh providers only)
Students who have applied for UKRI or KESS 2 funding and are waiting to hear if they've been successful should not apply to us for the Postgraduate Doctoral Loan. If the student receives confirmation that they'll not receive funding from UKRI or KESS 2, they can apply for funding from us. Students who intend to apply for UKRI or KESS 2 funding later in their course should also not apply for doctoral funding from us.
For postgraduate master's students, registration also confirms that the student:
- is in study
- is meeting the minimum study intensity requirements if studying part time
- is on track to complete the course within the current course duration
- is studying at least 50% of the full course in the UK
Part-time courses should be no more than twice the length of their one or two-year full-time equivalent if you have one. If you have no full-time equivalent course, the part-time course should be no more than 3 academic years.
What should we do if a postgraduate student does not meet criteria?
The student is not in study
If students are taking a temporary break from their studies, you should process them as suspended. You can use the Suspension CoC in SIS to do this. If the student remains suspended, you should not submit a not registered 'N code'. The student will then have to remain on the worklist until you submit a resumption or withdrawal.
If the student has not attended after the start of the academic year and has not told you about circumstances such as a suspension, you should submit a not registered 'N code'.
The student is not progressing
If the student is not progressing and is unlikely to complete in the duration of their course, you can transfer them to a longer course. You can only do this if there is no repetition of study.
The longer course must fit the eligibility criteria for the student finance product.
For example, let’s say you have a student on a 3-year postgraduate doctoral course. At the start of year 3 it is evident that they will not complete at the end of the year. You can transfer this student onto a course with a longer duration to match their progression. In this case, this will be a 4-year course or longer.
This will not work if the student is already on an 8-year course. Only courses up to 8 years in length are eligible for doctoral funding. If, at the start of year 8, it becomes evident that the student will not complete that year, you cannot transfer them to a longer course.
If the student does not meet the above criteria and you cannot transfer them, you should not submit a registration confirmation. Instead, you should email us at hep_referrals@slc.co.uk. Please provide the following information in your email:
- subject line 'PGD registration'
- the student's name
- the student's Customer Reference Number (CRN)
- the student's Student Support Number (SSN)
- the academic year
- the reason why the student does not meet the registration criteria
- your HEP code
- your full name
- the email address registered under SIS contacts if you're sending the message from another email address
Sometimes a student starts a doctoral course with funding from us, but their circumstances change in a way that opens a route to UKRI or KESS 2 funding. In these cases, the student will become ineligible for our funding from the date they're in receipt of the alternative funding.
You should not use the Withdrawal CoC when this happens, as the student is still in study and the CoC would be inaccurate. Instead, you should email us at hep_referrals@slc.co.uk. Please provide the following information in your email:
- subject line 'PGD UKRI funding' or 'PGD KESS funding'
- the student’s name
- the student’s CRN
- the student’s SSN
- the academic year
- the date from which the student was or will be in receipt of the UKRI or KESS funding
- your HEP code
- your full name
- the email address registered under SIS contacts if you're sending the message from another email address
Student prisoners
You must submit registration confirmations for prisoners who are in receipt of postgraduate funding. We'll then make payment directly to you, with the bank details you provided for fee payments.
Registration Home
You'll need Registration Administrator access to see the Registration section of SIS.
The Registration Home page lists the academic years where you have students with outstanding registration confirmations. It also has a menu with links to all the registration functions:
- registration worklist
- import registration confirmations
- create manual registrations
- registration import results
- view manual registrations

Registration worklist
Students will appear on the registration worklist 30 days before the start of their course. You should submit a registration confirmation as soon as a student has been enrolled. For new students, this is normally after you have had face-to-face contact with them.
You can wait 28 days to submit a Not Registered confirmation. This will allow the student time to register at a different university or college. If you know that the person is not pursuing higher education, you should make the submission as soon as you find out.
Any student receiving maintenance or contribution to costs funding will need a registration confirmation.
If a student appears on the worklist as full-time but is part-time, you should submit a mode switch CoC to correct this.
The Registration Worklist filter page is split over 2 tabs:
- student search
- course search
The page defaults to the course search tab.
The following options are available on both tabs.
Clear Filter and Results
This clears all fields and reverts to the initial view. If you have any search results open, these will also be removed.
Filter and Display Results
This searches all student details on the system, retrieves those that match your criteria and displays them on screen.
Filter and Export Results
This searches all student details on the system, retrieves those that match your criteria and lets you save these in an export file.
Registration worklist – student search

These are the fields you can search on in the Student Search tab.
Academic Year
This defaults to the current academic year and is the only mandatory field you need to run a search.
CRN and SSN
Unique customer identifiers.
Date of Birth
The format is dd/mm/yyyy.
Forename/Surname
The student’s name. You can use a wildcard search for these fields. For this, you must enter at least 3 characters along with the wildcard symbol (%). If you use one of these fields, you must also use the other.
Number of Records to Display
The number of search results per page. By default, this is 25, but you can change it to 50, 100 or 200.
Mode of Study
Full-time or part-time.
Registration worklist – course search

These are the fields you can search on in the Course Search tab.
Academic Year
This defaults to the current academic year and is the only mandatory field you need to run a search.
Course Name
You can enter up to 41 characters and use a wildcard search.
Course Start Date
Only applies to full-time study. If you select part-time, this option will be inactive.
SLC Course Code and UCAS Course Code
Course identifiers.
Method of Attendance
A dropdown with a choice of attendance methods.
Qualification
A dropdown with a choice of qualifications.
Campus
A dropdown with a choice of campus locations.
Course Type
A dropdown with a choice of course types.
Course Status
A dropdown that lets you search for open or closed courses.
Course Fee Rate
Enter the full course fee rate you're charging in this field.
Number of Records To Display
The number of search results per page. The default is 25, but you can change it to 50, 100 or 200.
Mode of Study
A dropdown with a choice of modes of study.
Level of Funding
A dropdown showing options for the level of funding or study. The choices are undergraduate, postgraduate, postgraduate NI and postgraduate SAAS.
Registration worklist search results

The registration worklist results page will show the results of the filtered search.
Students who need a registration confirmation will appear on the worklist 30 days before their course starts. SIS gets the course start date from the Courses Management Service (CMS).
Students will appear on the list in alphabetical order. Each entry will show the following fields:
- Student Support Number (SSN)
- Full Name
- DoB
- Course Start Date
The SSN also acts as a hyperlink to the Detailed Student Information page.
Next to each student’s record, there is a Registration Confirmation dropdown. Select Yes from the dropdown to register the student.
If a student’s details appear on the registration worklist, but they never turn up to study, select No. This will clear the student from the worklist and remove their support entitlement. The student’s registration status will show as Registration Not Required. If the student turns up later, you can change their registration code.
For academic year 2018/19 and later, you'll also see a Credits field. This will only be valid for Part-Time Maintenance Loan students.

When you confirm registration for Part-Time Maintenance Loan students, you also confirm that the correct credits are showing for that academic year. Once you select Y from the Registration Confirmation dropdown, the credit value becomes editable. If it is incorrect, overtype the value.
Once you've selected Yes or No for all the relevant students, select Submit to make the confirmations. All students whose registration you confirm as Yes or No will be removed from the registration worklist. Their Student Information History page will update to show the registration confirmation.
At this point, students will be removed from the registration worklist. For students whose credit value has been amended, their registration status will stay at Awaiting Registration Confirmation until we reassess the application. Once we've done this, the student will come back onto the registration worklist for confirmation.
You can view the details of the submitted CoC on the Detailed Student Information page by selecting History.
If a student is on the worklist but does not meet the criteria for funding, you should not submit a registration confirmation. Please email us at hep_referrals@slc.co.uk and provide the following information in your email:
- the student's name
- the student's Customer Reference Number (CRN)
- the student's Student Support Number (SSN)
- the academic year
- the reason why the student does not meet the registration criteria
- your HEP code
- your full name
- the email address registered under SIS contacts if you're sending the message from another email address
Sometimes a student starts a course with funding from us, but their circumstances change in a way that would make them ineligible. You should not use a Withdrawal CoC as the student is still in study and the CoC would be inaccurate. Please email us at hep_referrals@slc.co.uk and provide the following information in your email:
- the student's name
- the student's Customer Reference Number (CRN)
- the student's Student Support Number (SSN)
- the academic year
- details of the student’s circumstance
- your HEP code
- your full name
- the email address registered under SIS contacts if you're sending the message from another email address
Registration confirmation export
The previous chapters of this guide explained how to confirm registration manually on SIS. This works well for individual students and smaller groups. If you have many students, you may want to submit the confirmations in bulk instead.
To do this, you should first export the registration worklist file from SIS. You can then add your confirmations and import the file back into SIS to update all student records at once.
- Go to the Registration Worklist page and run a search to find the students whose registration you want to confirm.

- Once you have your search results, select Filter and Export Results. This will open the Student Information Export page.

- Select the Registration Confirmation Report radio button. The filename will default to Registration Confirmation Report. You can overtype this with another filename if you like.
- Select Export Results to export the file or select Cancel to return to the registration worklist.
The exported file will only include the details of the students who came up in your search and whose registration you need to confirm.
From academic year 2018/19, the file has a Credits field for Part-Time Maintenance Loan students. When you confirm registration for Part-Time Maintenance Loan students, you also confirm that the correct credits are showing for that academic year.
You can find the full details of the format of this file in the Attendance and Student Information Import and Export Files Technical Specification. If you need a copy, please email hep_services@slc.co.uk.
Registration confirmation import
After you've exported the registration confirmation report from SIS, you can update it with your registration confirmations.
You can then import the file back into SIS. This will confirm your students’ registration in bulk to release bursary and maintenance payments.
You can only make positive registration confirmations with the registration confirmation import. For any negative confirmations, you'll need to go to the registration worklist and manually select N for 'not registered'.
- Go to the Registration Home page and select Import Registration Confirmations.
- Browse for the file you want to upload and select it.

- Once you've selected the file, select Import and Submit to import the file into SIS. The system will check the file. If it fails any of its validation rules, you'll get an error message.
Errors
The file extension is not ‘txt’
The file must be in .txt format.
A file with the same content has already been imported into SIS
The file content has already been imported into SIS. The system will check both the filename and the values in the file to decide if you're trying to import a duplicate.
The file contains no records
The imported file must contain at least 3 records: a header record, a footer record and at least one detail record.
The number of records within the file exceeds 50,000
The total number of lines in the file must not exceed 50,002. This includes up to 50,000 records, plus one line for the header and one for the footer.
The filename can have up to 100 characters. If it is longer, the system will truncate it to 100 characters.
The format of the file does not match that expected
SIS will check if the HEI code in the header record of the imported file matches your HEI code. If it does not, the file will fail and no records will be uploaded.
SIS will also run a business validation check on each student record in the file. This will make sure that the student exists and needs a registration.
All mandatory items in the file must be populated. You can find the full details of the format of this file in the Attendance and Student Information Import and Export Files Technical Specification. If you need a copy, please email hep_services@slc.co.uk.
The confirmation date on the detail record must be a valid date and on or before the current business date. The current business date means the system date when the validation is run.
The academic year on the detail record must be the same or earlier than the academic year on the header record.
The HEI code on the detail record must be the same as the HEI code on the header record, or its child.
The Student Support Number (SSN) must exist. It must be in the correct format (4 letters, followed by 8 numbers, followed by one letter, for example, ABCD12345678X).
If a record fails any of the validation checks, you'll get an error message saying, 'The format of the file does not match that expected'.
Registration import results
The file import results will tell you if your file has passed validation and if any errors need correction.
- Go to the Registration Home page and select Registration Import Results.
- This will take you to the Registration Import Results Filter. Use the filter options here to find the registration import file you need.
The Academic Year is the only mandatory field you need to run a search.
The HEI Code defaults to the code of your university or college.
The Date From and Date To fields default to the previous day. You can overtype these with the dates you need.
The File Import Status field lets you search for files that have either failed validation, been successful or are still processing. It is set to Failed as a default.
- Once you've set the filter options, select Filter.
- This will bring up a list of all submitted registration import files. The list shows the filename, the import date, the academic year the file relates to and the file status.

The filenames in this list act as hyperlinks. Select a filename to view the details of the records in that file.
If a file did not successfully upload, you can find its details in the Import Error Details section of the results page.
Errors on the file will show:
- the row number in the file where the error appears
- the Student Support Number (SSN) from the original entry in the imported file; this will be blank if the error is in the header row or any other row without an SSN
- the error type – file format error or business rules error
- the error details – select Export Results to export error details; you can then review and correct them and resubmit the file or manually confirm the registrations

When you submit the file, you'll see one of 3 file import statuses on the Import Results page.
Awaiting Processing
The file has been uploaded and is awaiting processing. Once the system finishes processing it, the status will update to Failed or Successful.
Processing with Error
The file is in processing but will fail. The status will update to Failed once the system finishes processing it.
Out of Sequence
You should only see this in exceptional circumstances. If you ever see this status, please report it immediately to our Partners Support Desk.
Error details
Once you've submitted a file, any processed errors will appear in the Import Error Details section of the page. The list below shows the different error types and descriptions.
The format of the file does not match that expected
The file must have a header record at the beginning. It can only have one header record.
The header record must be 15 characters long and:
- start with 'HH', (characters 1 and 2)
- contain a numeric academic year (characters 3 and 4)
- end with 'CR' (characters 14 and 15)
You do not have access to import a file for the HEI code specified in the header record
The HEI code in the file header must belong to your university or college, or its child.
The format of the file does not match that expected
The file must have a footer record at the end. It can only have one footer record.
The footer record must be 8 characters long and start with 'TT' (characters 1 and 2).
The number of records in the file footer does not agree with the details in the file
The number of records specified in the file footer must be the same as the number of detail records in the file.
This student cannot be matched
The Student Support Number (SSN) you've provided must match the one in the system.
Confirmation is not required for this student
Students in the file must need confirmation.
Confirmation has already been submitted for this student
You can only submit confirmation once.
Confirmation is not yet due for this student. Please check the appropriate worklist for currently outstanding confirmations
Students must be available for registration confirmation. You can submit this 30 days before the course start date at the earliest.
Manual registration functionality is not available for your institution
You can only submit manual registration confirmations for publicly funded providers.
Manual registration
You'll sometimes need to register a student who has not yet appeared on the registration worklist. This is called manual registration and it is only available for full-time undergraduate students.
There are several reasons to submit manual registrations. For instance, you would do this for late applications. You'd also do it when a student changes provider but either has no CoC to transfer their application or has a CoC but this has not been actioned. This means we will not hold a record for that student for the new provider.
If you know the student’s Student Support Number (SSN), you can submit a manual registration on SIS. This will release their maintenance payments.
Only publicly funded universities or colleges can submit manual registrations.
You can manually register students either individually or in bulk by importing a registration file into SIS.
You'll need Registration Administrator access to submit manual registrations.
- Go to the Registration Home page and select Create Manual Registrations.

- Go to the Academic Year dropdown and choose the year you want to register the student for.
- Enter the Student Support Number (SSN) or the Customer Reference Number (CRN) of the student you want to register.
- Select the search icon next to the SSN/CRN field. The system will find the student’s surname, forename and date of birth.
- If you want to submit more than one manual registration, select the + icon. This will create a new line where you can add another student’s details.
- When you've added all the students you want to register, select Submit.
If the submission is successful, you'll get a message saying, 'The manual registration confirmations have been submitted successfully to be processed'.
If any manual registrations fail, the system will list the relevant SSNs and give you an error message.
Errors
Confirmation is not required for this student
For normal registrations, students must need confirmation of registration. Check that the registration status is Awaiting Registration Confirmation and the worklist date is on or before the current date.
This student cannot be matched
For manual registrations, the student must be an existing customer. There must be an entry for their Student Support number in SIS.
Confirmation is not required for this student
We must not already have received a registration confirmation for the student. Check that there is no Registration Requests entry for the same student, HEI code and academic year.
You can include manual registrations in the registration file import by adding the Student Support Number.
View manual registrations
You can view all submitted manual registrations in SIS.
- Go to the Registration Home page and select View Manual Registrations.
- This will take you to the View Manual Registration Filter page. Like the registration worklist, this page has tabs for Student Search and Course Search. It defaults to the Course Search tab. Select the tab you need and enter your search criteria.
- Select Filter and Display Results to find the manual registrations that match your search criteria. You can view the search results on screen but cannot export them.
- Select Clear Filter and Results to clear the search and return to the Registration Home page.

The following options are available on both the Student Search and Course Search tabs.
Clear Filter and Results
This clears all fields and reverts to the initial view. If you have any search results open, these will also be removed.
Filter and Display Results
This searches all student details on the system, retrieves those that match your criteria and displays them on screen.
Search criteria on the Student Search tab
Academic Year
This defaults to the current academic year. It is the only mandatory field on this tab.
Customer Reference Number and Student Support Number
Unique customer identifiers.
Date of Birth
The format is dd/mm/yyyy.
Forename/Surname
The student’s name. You can use a wildcard search for these fields. For this, you must enter at least 3 characters along with the wildcard symbol (%). If you use one of these fields, you must also use the other.
Number of Records to Display
The number of search results per page. By default, this is 25, but you can change it to 50, 100 or 200.
Mode of Study
Full-time or part-time.
Search criteria on the Course Search tab
Academic Year
This defaults to the current academic year. It is the only mandatory field on this tab.
Course Name
You can enter up to 41 characters. You can use a wildcard search.
SLC Course Code
The unique course identifier.
UCAS Course Code
As provided by UCAS.
Method of Attendance
A dropdown with a choice of attendance methods.
Qualification
A dropdown with a choice of qualifications.
Campus
A dropdown with a choice of campus locations.
Course Type
A dropdown with a choice of course types.
Course Status
A dropdown that lets you search for open or closed courses.
Course Fee Rate
Enter the full course fee rate you're charging in this field.
Number of Records to Display
The number of search results per page. By default, this is 25, but you can change it to 50, 100 or 200.
Mode of Study
Full-time or part-time.
Manual registration search results
Once you run a search on the View Manual Registrations page, the search results will appear on screen. The top half of the page will show your search criteria. The bottom half will show the search results.

The results will include students who match your search criteria and will show their:
- Student Support Number (SSN)
- Full Name
- DoB
- CoC
- Last Updated By
- Last Updated Date
The CoC shows the student’s Change of Circumstance (CoC) status. If there is an outstanding CoC for the student, an icon will appear in this column. Select this icon to view the details so you can raise the appropriate CoC notification.
If you've already raised the CoC, there will be no icon and the student’s SSN will become a hyperlink to their Detailed Student Information page.
Combined registration and attendance worklist
Combined registration and attendance worklist
You can use the combined worklist to submit both the registration confirmation and the first attendance confirmation at the same time. This combined confirmation will release any maintenance payments and the first instalment of the Tuition Fee Loan (and Tuition Fee Grant for Welsh students).
You need to have Combined Administrator access to see the combined worklist.
Like the registration worklist, you'll see students on the combined worklist 30 days before the start of their course. However, you should not use the combined worklist to submit attendance confirmations before students appear on the attendance worklist. Only students with approved applications will be on the combined worklist.
If you're an Alternative Provider you must only use the combined worklist for students you've registered with the appropriate awarding body. This is because a confirmation on the combined worklist will trigger the payment of tuition fees.
When you submit a confirmation on the combined worklist, the student will not appear on the registration or attendance worklists.
When you use the combined worklist, the student’s attendance will be confirmed as 'A (in attendance)' to the latest assessment in SIS. You must therefore ensure that the course and fee information is correct first, as submitting a confirmation here will lead to fee payments.
Combined Home
The Combined Home page lists the academic years where you have students with outstanding registration confirmations. It also has a menu with the following options:
- combined worklist
- import combined confirmations
- combined import results

Combined worklist
Like the registration worklist, the Combined Worklist page has tabs for Student Search and Course Search. The page defaults to the Course Search tab.
The following options are available on both tabs.
Number of Records to Display
The number of search results per page. By default, this is 25, but you can change it to 50, 100 or 200.
Clear Filter and Results
This clears all fields and reverts to the initial view. If you have any search results open, these will also be removed.
Filter and Display Results
This searches all student details on the system, retrieves those that match your criteria and displays them on screen.
Filter and Export Results
This searches all student details on the system, retrieves those that match your criteria and lets you save these in an export file.
Combined worklist – student search
The list below shows the search criteria you can use on the Student Search tab.
Academic Year
This defaults to the current academic year and is the only mandatory field you need to run a search.
CRN and SSN
Unique customer identifiers.
Date of Birth
The format is dd/mm/yyyy.
Forename/Surname
The student’s name. You can use a wildcard search for these fields. For this, you must enter at least 3 characters along with the wildcard symbol (%). If you use one of these fields, you must also use the other.
Mode of Study
A dropdown with a choice of modes of study.
Combined worklist – course search
The list below shows the search criteria you can use on the Course Search tab.
Academic Year
This defaults to the current academic year. It is the only mandatory field on this page.
Course Name
You can enter up to 41 characters. You can use a wildcard search.
SLC Course Code
The unique course identifier.
UCAS Course Code
As provided by UCAS.
Method of Attendance
A dropdown with a choice of attendance methods.
Qualification
A dropdown with a choice of qualifications.
Campus
A dropdown with a choice of campus locations.
Course Type
A dropdown with a choice of course types.
Course Status
A dropdown that lets you search for open or closed courses.
Course Fee Rate
Enter the full course fee rate you're charging in this field.
Mode of Study
A dropdown with a choice of modes of study.
Combined worklist search results
Once you run a search on the Combined Worklist page, the search results will appear on screen. The top half of the page will show your search criteria. The bottom half will show the search results.

Students who need a combined confirmation will appear on the worklist 30 days before their course starts. Every student record will show the information explained below.
SSN
Student Support Number. This also acts as a link to the View Detailed Student Information page for the selected student.
Full Name
The student’s full name.
DoB
The student’s date of birth.
Course Name
The student’s course name.
Course Location
The location of the course the student is on.
Course Year
The student’s current year of study.
SLC Course Code
The SLC code of the student’s course.
TFL Amount
The Tuition Fee Loan as requested by the student. This is the portion of their total fee paid by the Tuition Fee Loan.
TFG Amount
This is the portion of the student’s fee paid by the Tuition Fee Grant.
STP Amount
This is the tuition fee amount that the student must pay.
Total TF
This is the total tuition fee amount. It is the total of the previous 3 columns.
Combined Confirmation
A dropdown where you should select Yes to indicate a combined confirmation.
Submitting confirmations from the combined worklist
- Select Y (yes) or N (no) from the Combined Confirmation dropdown.
- When you've done this for all students you need to, select Submit.
Once you've submitted a combined confirmation for a student, they'll disappear from the worklist. Their record will update to show they've been registered and marked in attendance with an 'A' code.
When you use the combined worklist to confirm attendance, you must submit any necessary course or fee corrections before the second liability point. To do this, you must raise the relevant Change of Circumstance notifications (CoCs) on SIS.
Combined worklist export
The previous chapters explained how to submit combined confirmations manually on SIS. This works well for individual students and smaller groups. If you have many students, you may want to submit the confirmations in bulk instead.
To do this, you should first export the combined worklist file from SIS. You can then add your confirmations and import the file back into SIS to update all student records at once.
- Go to the Combined Worklist page and run a search to find the students you want to submit confirmations for.
- Once you have your search results, select Filter and Export Results. This will open the Student Information Export page.
- Select the Combined Confirmation Report radio button. The filename will default to Combined Confirmation Report. You can overtype this with another filename if you like.
- Select Export Results to export the file. The file will export in .out format. Alternatively, select Cancel to cancel the export and return to the combined worklist.
The exported file will only include the details of students who came up in your search and who need confirmations.
The Combined Confirmation Report file format is the same as the Registration Confirmation Export file. You can find a detailed breakdown of the file format in the Attendance and Student Information Import and Export Files Technical Specification. If you need a copy, please email hep_services@slc.co.uk.

Combined worklist import
Once you have exported the combined worklist from SIS, you can add your confirmations to the file. You can then import the file back into SIS to submit the confirmations.
The Combined Confirmation Import file format is the same as the Registration Confirmation Import file. You can find the full details in the Attendance and Student Information Import and Export Files Technical Specification. If you need a copy, please email hep_services@slc.co.uk.
Importing the combined worklist into SIS works the same way as importing the registration worklist. See Registration confirmation import and Registration import results for:
- the steps to import the file into SIS
- how to view imported files
- how to check for validation errors
The only difference is that when you import the combined worklist, this will update the student’s attendance as well as their registration status.
When you upload a Combined Confirmation Import file into SIS, this will confirm attendance against the latest active tuition period. If you include a course code and course year on the imported file, the system will always ignore it. You must ensure that you confirm attendance against the correct course. Check the course in SIS and raise a Change of Circumstance notification (CoC) if you need to.
If there is no active tuition period for the student, university or college and academic year, the entry will fail. This means it will confirm neither registration nor attendance. If you go to Monitor Combined Import Submission, you will see the message 'Combined confirmation cannot be applied to this student'.
Attendance confirmation
Confirming ongoing attendance
You must submit accurate and timely attendance confirmations so we can release fee payments to you on behalf of students.
Attendance means active and ongoing engagement with the activities and learning opportunities on a course. These include scheduled learning and teaching activities, but are not limited to these. This would not include freshers’ activities and other social events prior to the commencement of teaching.
You must confirm attendance for students at 3 separate liability points in the academic year. These correspond to the term dates you give us when you submit your courses on the Courses Management Service (CMS).
You should confirm attendance when the student has started attending the course and has become liable for tuition fees. Undergraduate part-time and postgraduate Northern Ireland students must attend for at least 2 weeks in the first term.
We need you to submit an attendance confirmation for all students each term. This will release the payment instalment for the liability period.
You should only confirm attendance after you've registered your students with the appropriate awarding body.
You're only entitled to receive the full fee loan (or fee grant for Welsh students) if you confirm attendance at each of the liability points.
Tuition fee payment schedule
We'll pay tuition fees in 3 instalments of 25%, 25% and 50%, once you've confirmed attendance. The table below outlines the payment dates.
|
Season (academic year start) |
Payment 1 |
% |
Payment 2 |
% |
Payment 3 |
% |
|
Autumn (August to December) |
third Wednesday in October |
25% |
first Wednesday in February |
25% |
first Wednesday in May |
50% |
|
Winter (January to March) |
first Wednesday in February |
25% |
first Wednesday in May |
25% |
third Wednesday in October |
50% |
|
Spring (April to June) |
first Wednesday in May |
25% |
third Wednesday in October |
25% |
first Wednesday in February |
50% |
|
Summer (July) |
third Wednesday in July |
25% |
first Wednesday in February |
25% |
first Wednesday in May |
50% |
To view specific payment dates for academic years 2024/25 and 2025/2026 download the tuition fee calendar.
To ensure we can pay your fees as early as possible, you should confirm attendance by close of business on the Thursday before the main payment dates. These are in October, February and May.
After the main payment dates, we'll make BACS payments each Wednesday. To ensure that we can pay you on the Wednesday, you should confirm attendance on SIS by Thursday the week before.
Attendance code definitions
You can use the following attendance codes on SIS. Remember that you must only confirm attendance for students after you've registered them with the appropriate awarding body.
|
Code |
Definition |
|
A |
In attendance, the course and fee information are correct. Also after reassessment: Course and fee information amended correctly. Payment will be released. |
|
C |
Course mismatch – you should raise a Change of Circumstance notification (CoC). |
|
F |
In attendance but you disagree with the fee – you should raise a Change of Circumstance notification (CoC). |
|
L |
In attendance but the liability is disputed, you'll resolve. Payment will be released. |
|
N |
In attendance but the liability is disputed, you will not resolve – you should raise a Change of Circumstance notification (CoC). |
|
X |
Not in attendance after the course start – you should raise a Change of Circumstance notification (CoC). |
|
S |
Suspended – you should raise a Change of Circumstance notification (CoC) to block maintenance and fee payments. |
|
D |
You can only submit this code in the first liability period to tell us the student has never attended your university or college. Submitting a D code will remove the student’s support entitlement. |
Attendance Home
The Attendance Home page will list the academic years where you have students with outstanding attendance confirmations. If there are none outstanding, it will have a message saying, ‘There are no attendance confirmations outstanding’.
This page also has a menu with links to the attendance functions:
- attendance worklist
- import attendance confirmations
- attendance import results
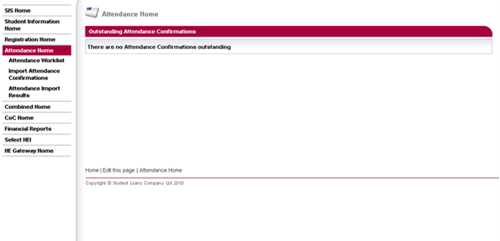
Attendance worklist
Like the registration and combined worklists, the Attendance Worklist page has tabs for Student Search and Course Search. The page defaults to the Course Search tab.
The following options are available on both tabs.
Clear Filter and Results
This clears all fields and reverts to the initial view. If you have any search results open, these will also be removed.
Filter and Display Results
This searches all student details on the system, retrieves those that match your criteria and displays them on screen.
Filter and Export Results
This searches all student details on the system, retrieves those that match your criteria and lets you save these in an export file.
Number of Records to Display per page
The number of search results per page. The default is 25, but you can change it to 50, 100 or 200.

Attendance worklist – student search

The list below shows the search criteria you can use on the Student Search tab.
Academic Year
This defaults to the current academic year and is the only mandatory field you need to run a search.
Mode of Study
You can search for full-time or part-time students. If you leave this as Select, the search will return both.
Student Support Number / Customer Reference Number
Unique student identifiers.
Date of Birth
The student’s date of birth. The format is dd/mm/yyyy.
Forename/Surname
The student’s name. You can use a wildcard search for these fields. For this, you must enter at least 3 characters along with the wildcard symbol (%). If you use one of these fields, you must also use the other.
Registration Status
The student’s registration status.
Current Year Start Date From / Current Year Start Date To
This field lets you filter on the current year start date of part-time students. You cannot use it if you set the Mode of Study field to Full Time.
Level of Funding
A dropdown showing options for the level of funding or study. You can choose:
- undergraduate
- postgraduate
- postgraduate NI
Attendance worklist – course search
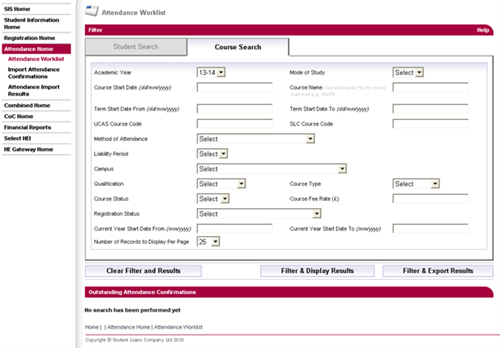
The list below shows the search criteria you can use on the Course Search tab.
Academic Year
This defaults to the current academic year and is the only mandatory field you need to run a search.
Mode of Study
You can search for full-time or part-time students. If you leave this as Select, the search will return both.
Course Start Date
The start date of full-time courses only. If you set Mode of Study to Part Time, this field will be unavailable.
Course Name
The student’s course name. You can use a wildcard search.
Term Start Date From/To
Term start date for full-time courses only. If you set Mode of Study to Part Time, this field will be unavailable.
UCAS Course Code/ SLC Course Code
Unique course identifiers.
Method of Attendance
If you set Mode of Study to Part Time, this field defaults to Part Time.
Liability Period
This field lets you filter on a specific liability period.
Campus
A dropdown with a choice of campus locations.
Qualification
A dropdown with a choice of qualifications.
Course Type
A dropdown with a choice of course types. If you set Mode of Study to Part Time, this field defaults to Part Time.
Course Fee
Enter the full course fee rate you're charging in this field.
Course Status
A dropdown that lets you search for open or closed courses.
Registration Status
The student’s registration status. This field will be unavailable if you select an academic year before 2012/13.
Current Year Start Date From/To
This field lets you filter on the current year start date of part-time students. You cannot use it if you set the Mode of Study field to Full Time.
Level of Funding
A dropdown showing options for the level of funding or study. You can choose:
- undergraduate
- postgraduate
- postgraduate NI
Attendance worklist search results
Once you run a search on the Attendance Worklist page, the search results will appear on screen. The top half of the page will show your search criteria. The bottom half will show the search results.
The results are split into 3 tabs:
- unconfirmed attendances – confirmations you have not yet actioned
- saved attendances – confirmations you've saved but not submitted
- saved and reassessed – confirmations you've saved and we have reassessed
The number of search results for each tab will be in brackets after the heading and the fields.
The search results will default to the Unconfirmed Attendances tab.
Once you've confirmed attendance for a student, their status will be updated to Attendance Confirmed. The student will disappear from the attendance worklist. If you submit attendance for the first liability period, they'll also disappear from the combined worklist.
Attendance worklist results – unconfirmed attendances
Each line of the Unconfirmed Attendances tab shows one student record. It includes the student’s:
- Student Support Number (SSN)
- full name
- date of birth
- course name
- course location
- course year
- SLC course code
- current year start date (for part-time students only)
- Tuition Fee Loan
- Tuition Fee Grant
- tuition fee waiver
- student to pay amount
- total tuition fee
Next to each student’s record, there is an Attendance Confirmation dropdown for each of the 3 liability periods. This will only become active when an attendance confirmation is due.
You'll see blanks under the liability points if you need to submit an attendance confirmation but the liability date has not been reached yet. If an attendance code is not applicable to the student, you'll see N/A.
- To confirm attendance, select the appropriate code from the Attendance Code dropdown.
- Select Submit if you want to submit the attendance confirmation right away.
- Select Save if you want to come back to the page and submit the attendance confirmation later.
The Save and Submit buttons will only become active once you have selected an attendance code.
Once you've submitted a student’s attendance confirmation, their status will change to Attendance Confirmed and they'll disappear from the attendance worklist. If you submitted attendance for the first liability period, they'll also disappear from the combined worklist.
If you submit a positive attendance code, this will appear in the Attendance Code column and you'll no longer be able to edit it. If you've made an error, you'll need to raise a Change of Circumstance notification (CoC) to correct it.
If you submit a negative code, this will appear in the Attendance Code column, but the dropdown will still be active so you can reverse it if you need to.
- To reverse a negative attendance code, select a positive code from the Attendance Code dropdown.
- Select Submit if you want to submit the positive attendance confirmation right away.
- Select Save if you want to come back to the page and submit the positive attendance confirmation later.
If you save an attendance confirmation but do not submit it, the saved code will appear in the Attendance Code column along with the dropdown option to amend it. The Submit button will become active. Select this to submit the confirmation when you're ready.
If a student does not need an attendance confirmation, the Attendance Code column will be blank. This might be because it is too early for the student to appear on the attendance worklist.
Sometimes, we reassess a student’s application and this affects a previous liability period. In this case, you may need to enter an attendance code for 2 liability periods at the same time.
The system will not let you submit an attendance code for the later of the 2 outstanding liability periods until you've submitted one for the earlier period. If you have only saved a code for a previous liability period, the system will consider it outstanding.
If you try to submit an attendance confirmation when there is an outstanding confirmation for an earlier liability period, you'll get an error message:
'The attendance code for the selected period cannot be submitted without submitting a code for all outstanding periods.'
Attendance worklist results – saved and reassessed
The Saved and Saved and Reassessed tabs have the same fields as the Unconfirmed tab. The only difference is that the Attendance Code field will show the code you've saved.
You cannot change the attendance code for the students on these tabs. To update a student’s confirmation, select their Student Support Number (SSN). This acts as a hyperlink that will take you to the Detailed Student Information page where you can update their attendance confirmation.
Select the checkboxes at the beginning of each row to choose the relevant codes to submit. Alternatively, choose Select All Displayed to select all records on the page. If you need to, you can deselect records individually or by selecting Deselect All Displayed. Select Submit to submit the codes.
An application may appear on both the Unconfirmed tab and the Saved tab. This will happen if the attendance confirmation for liability period 1 is still outstanding by the time liability period 2 arrives.
If you save an attendance code for liability period 1, this will move to the Saved tab. The outstanding attendance code for liability period 2 means that the record will also appear on the Unconfirmed tab. If you submit the attendance code for liability period 2, the saved code for liability period 1 will also be submitted.
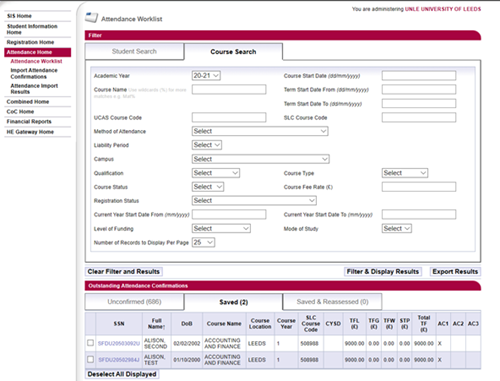
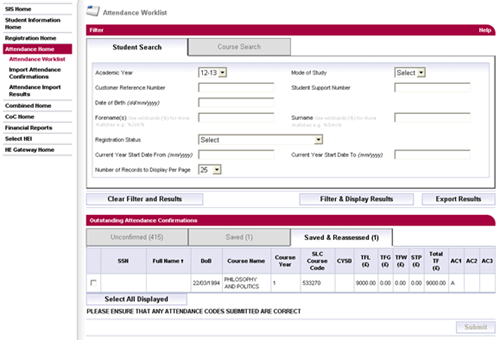
You can enter and save attendance codes in any order, but our system will only let you submit them in order. You must submit liability period 1 before liability period 2 or both at the same time.
If you try to submit an attendance confirmation when there is an outstanding confirmation for an earlier liability period, you'll get an error message:
'The attendance code for the selected period cannot be submitted without submitting a code for all outstanding periods.'
When you save or submit an attendance code, the system will automatically check that the record has not been updated in the meantime. If it has, the system will not save your attendance code and you'll get a warning message. This applies to all tabs.
You'll also see a warning message when you submit attendance codes:
'Please ensure that any attendance codes are correct.'
When you've successfully submitted or saved an attendance confirmation, you'll get a message confirming this.
Manual attendance confirmations
- Go to SIS Home and select Attendance Home. This will show the attendance subareas you can see with your access level.
- Select Attendance Worklist to go to the worklist page.
If you use the search filters on this page, only students who need an attendance confirmation will appear in the results. You may also see students who normally would not appear for attendance confirmation but need this for bursary payments. - The Attendance Worklist Filter page is split into 2 tabs: Student Search and Course Search. Choose the tab you want to search on.
- Select your search criteria, then select Filter and Display Results. The results of your search will show below the filters.
The results are split into 3 tabs.
Unconfirmed attendances
Attendance confirmations you have not actioned yet.
Saved attendances
Attendance confirmations you've saved but not submitted.
Saved and reassessed
You've saved an attendance code and we've since reassessed the student.
Each line of the results table shows one student record with the student’s personal, course and fee information. It also includes the attendance status dropdown for each of the 3 liability periods. - Select the appropriate attendance codes for the students on the list.
- Select Submit to confirm attendance straight away. If you do this, the positive attendance codes will trigger the fee payment process. Alternatively, select Save to save your selection and come back to it later.
Once you confirm attendance for liability period 1, the student will no longer appear on the attendance worklist. Their attendance status will be updated to Attendance Confirmed. It will stay at this status until the first day of liability period 2 (the start of the second term). At this point the student will reappear on the worklist. Their attendance status for period 2 will be Awaiting Attendance Confirmation.
You'll need to confirm a student's attendance for the earliest outstanding liability period first. Otherwise, the system will not let you confirm if for a later period. You can check for outstanding attendance confirmations for a specific liability period by using the liability period filters on the Course Search page.
If you save an attendance code, you can come back to the worklist and submit it later. Saving a record will move it from the Unconfirmed tab to the Saved tab.
Checking for previous attendance confirmations
When you raise a Change of Circumstance notification (CoC) that affects a previous liability period, the student will reappear on the attendance worklist for that period. This means a student may need attendance confirmations for more than one liability period at the same time. You'll not be able to submit an attendance code for the later liability period until you've confirmed the earlier period.
Please note that you must allow 24 hours before reconfirming the attendance codes.
Use the Liability Period filter on the Attendance Worklist to check if there are any students who need a confirmation for an earlier period. For example, if you want to check for outstanding confirmations in liability period 1, filter on all students within this period.
The Outstanding Attendance Confirmations section will show any attendance confirmations you need to submit for those students. Students need a confirmation for each of the 3 periods. You can not submit a confirmation for a period that has not started yet.
The 3 periods are headed AC1, AC2, and AC3. A dropdown with attendance codes is available under each period for each student. If an attendance confirmation is outstanding, the dropdown will say Select. Use it to select the appropriate confirmation code for the student.
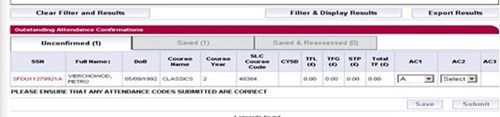
The Attendance tab of the Student History section of a student’s record shows their attendance confirmation history for each of the 3 periods. If you've confirmed attendance, it will be marked with AC. If they're still awaiting attendance confirmation, it will be marked with AAC.
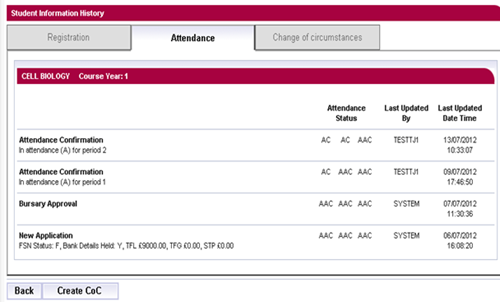
Attendance worklist export
The previous chapters explained how to submit attendance confirmations manually on SIS. This works well for individual students and smaller groups. If you have many students, you may want to submit the confirmations in bulk instead.
To do this, you should first export the attendance worklist file from SIS. You can then add your confirmations and import the file back into SIS to update all student records at once.
- Go to the Attendance Worklist page and run a search to find the students you want to submit confirmations for.
- Once you have your search results, select Filter and Export Results. This will open the Student Information Export page.
- You can only export the results in the Summary Student Information format. This will be selected by default. When you choose to export the results, you'll see your filter criteria on screen but they'll be in read-only format.
- Select the Attendance Confirmation Report radio button. The filename will default to Attendance Confirmation Report. You can overtype this with another filename if you like.
- Select Export Results to export the file. You can export up to 50,000 records. If your search has returned more, you'll get an error message.
- Alternatively, select Cancel to cancel the export and return to the attendance worklist.
You will not be able to see what liability period the attendance confirmation applies to in the exported file.

Attendance worklist import
Once you've exported the attendance worklist from SIS, you can add your confirmations to the file. You can then import the file back into SIS to submit the confirmations.
You can also create an import file from scratch if you prefer.
The file can contain a combination of both full-time and part-time students.
- Go to the Attendance Home tab and select Import Attendance Confirmations.
- Select the academic year the file covers.
- Select Browse and find the file you want to upload.
- Select Import and Save to import all records in the file and save them in SIS. You can then come back to the records and submit them later.
- Select Import and Submit to import all records in the file and submit them straight away. A submitted file will trigger the payment process.

If you enter an invalid file path and select one of the import buttons, the system will take you back to the Attendance Home page. You will not get an error message.
The course code in the Attendance Confirmation Report file will normally be the UCAS course code. If the course is not a UCAS course, SIS will include the SLC course code instead.
If the UCAS course code and the course name are not unique, the system will not update the record when you try to import the file. You'll get an error message saying, ‘The course cannot be uniquely identified in SIS’.
If this happens, you'll need to update the attendance code manually. Alternatively, you can rename the course with a unique name and then promote it again.
Attendance worklist import – file validation
When you import an attendance confirmation file, real-time validation will check that:
- the file is of the expected type (.txt or .out)
- the number of records in the file is not over 50,000
- the file has not already been imported into SIS
The file validation only looks at the file content and not the filename. A file that has the exact same content as a previously imported one but a different filename will not pass this stage of validation.
If the file passes this check, SIS will store basic file data and you'll get a message saying, ‘File received successfully for academic year 00/00’.
If the file fails this check, SIS will not save any of its details. You'll get one of the following error messages:
- The file extension is not ‘.out’ or ‘.txt’
- The number of records within the file exceeds 50,000
- The file content has already been imported into SIS
Once the file has passed the real-time validation, it will move on to detailed format and business rule validation.
Attendance worklist import – format and business rule validation
Once your import file has passed the basic real-time file validation, it will move on to detailed format and business rule validation. This will take place offline and within 24 hours from when you import the file.
The detailed format validation checks that:
- the file contains all the expected fields in the correct order
- the file contains at least one record
- the HEI code in the file header belongs to your university or college
- the number of records and the totals of the Tuition Fee Loan, Tuition Fee Grant and Student to Pay fields in the header are equal to the sum of all records for those fields
The business rules validation checks that:
- the record matches a unique higher education provider, course, course year, academic year and student on SIS
- the student in the record needs an attendance confirmation
- the attendance confirmation code is A, C, F, L, N, S, X or NULL
- if the attendance code is not NULL, the attendance confirmation applies to the most recent tuition fee data (the amount in the Tuition Fee Loan, Tuition Fee Grant and Student to Pay fields in the file match those on SIS)
Validation checks that the contents of all fields across every record in the imported file match those in SIS. The system will only verify fields that are relevant to the attendance confirmation process. For example, it will verify tuition fee amounts but not dates of birth.
If a single record in your file fails format validation, this will not necessarily cause the entire file to fail. It depends on the nature of the format failure and whether it is serious enough to affect the integrity of the whole file. If one or more records have mandatory fields missing, only these records will fail.
After validation
What happens to a file when we have validated it depends on whether you saved or submitted it.
For saved records:
- we will update the student’s record with the attendance confirmation code you gave us
- we will update the attendance confirmation status to Attendance Confirmation Saved
For submitted records:
- we will update the student’s record with the attendance confirmation code you gave us
- we will update the attendance confirmation status to Attendance Confirmed if you submitted a fee paying attendance code
- we will update the attendance confirmation status to Awaiting Reassessment if you submitted a non-fee paying attendance code
- if you submitted a fee paying code, this will trigger payments in line with our business processes
Monitor uploaded submissions
Once you've imported a file, you can view its status in SIS. You can view the detailed results within 24 hours.
- Go to the Attendance Home page and select Attendance Import Results.
- This will take you to the Attendance Import Results Filter page. Use the filter options here to find the attendance import file you need. The filter options you can use are:
-
- Academic Year
- Date from and Date to
- Import Type (Saved or Submitted)
- File Import Status (Processing, Failed or Successful, Failed Header Validation)
- Select Filter to view the files matching your search criteria. You'll see the following information:
-
- the filename
- the submission date
- the academic year
- the import type
- the file import status
- Last Updated Date/Time
The filename acts as a link to the Attendance Confirmation Import Results page.
You cannot use the filename link if the file is still processing. You can only view the detailed results once all processing is complete.

Attendance confirmation import results
The Attendance Confirmation Import Results page gives you a breakdown of each imported file that has passed validation.
The top half of the page will show the filter criteria you entered on the Attendance Import Results Filter page. The rest of the page is split between Overview and Import Error Details.

Overview
The overview shows:
- the total number of records in the file
- the number of invalid attendance codes
- the number of blank attendance codes (this means a blank, NULL or “_”) along with the number of times each code occurred
Import error details
For each error in the file, this section shows:
- the row number where the error appears
- the student’s Student Support number (SSN) – this will be the entry in the imported file, if the error is in the header row or the SSN is unobtainable, this will be blank
- the error type (file format or business rules error) and a brief explanation of the error details
Select Export Results to export the error details. You can then review and correct them before you resubmit the file.
File Format Errors
You may see the following file format errors:
- the format of the file does not match that expected for an Attendance Confirmation File
- the file contains no records
- the filename exceeds 100 characters
- the HEI code in the file header does not match the university or college you're signed in as
- either the number of records or the tuition fee loan, grant or student to pay totals in the file header do not agree with the details in the file
Business rule errors
You may see the following business rule errors:
- this student cannot be matched in SIS – the Student Support Number (SSN) in the file cannot be matched
- attendance confirmation is not required for this student – you've entered an attendance code for a student who does not need an attendance confirmation
- invalid attendance code – you've entered an incorrect attendance code
- no course found in SIS – the system cannot find a course matching the one in the file
- the course cannot be uniquely identified in SIS, multiple courses found – the system cannot identify the course in the file
- confirmation has already been submitted for this student – you've already confirmed the student’s attendance for this period
- confirmation cannot be provided at this time as the application status is not yet approved – the student’s application has not been approved yet
- confirmation is not yet due for this student, please check the appropriate worklist for currently outstanding confirmations – the student has not yet become available for attendance confirmation
Negative attendance confirmation
If we receive a negative attendance confirmation (X code) for a tuition fee loan product, we'll block future maintenance payments. The payment block is applied automatically when you submit an X code. We'll write to the student to let them know, but you must submit a follow-up Change of Circumstance notification (CoC) so we can reassess the student.
If we've already released a maintenance payment when you confirm non-attendance for that term, we'll block maintenance for the following term. Once you've confirmed attendance, we'll make all payments that were due to be released until the date of the confirmation.
We'll always need confirmations for all outstanding periods. If you have not confirmed that a student was in attendance in the first liability period, you cannot submit a confirmation for the second period.
You can confirm attendance manually on the attendance pages in SIS. You can also do it in bulk by exporting the attendance worklist from SIS, updating attendance confirmations and importing the file back into SIS.
There are several attendance codes you can use.
A
The student is in attendance. The course and fee information are correct.
OR
After reassessment – the course and fee information have been amended correctly. The payment will be released.
C
Course mismatch. You need to raise a Change of Circumstance notification (CoC).
F
The student is in attendance but the fee is disputed. You need to raise a Change of Circumstance notification (CoC).
L
The student is in attendance but the liability is disputed, you'll need to resolve. Payment will be released.
N
The student is in attendance but the liability is disputed, you will not resolve. You need to raise a Change of Circumstance notification (CoC).
X
The student not in attendance. You need to raise Change of Circumstance notification (CoC).
S
The student is suspended. You need to raise a Change of Circumstance notification (CoC) to block maintenance and fee payments.
Cooling-off period – attendance
Students have a cooling-off period when they can cancel their contract for educational services with you. The duration of this varies across the sector. It is an arrangement separate from student finance.
Our guidance is to confirm attendance for students only when they've become liable for fees. This will be after the cooling-off period has ended.
If students leave during the cooling-off period, you must withdraw them with the real-time effective date because attendance has not been confirmed.
Example
You correctly confirmed the student’s registration on 17 September, once they enrolled on their course. The course starts on 24 September.
You have a 2-week cooling-off period. As the student does not become liable for fees until the end of this period, you should not submit an attendance confirmation yet.
The cooling-off period will end on 8 October. The student drops out of the course within the cooling-off period on 4 October.
You should submit a Withdrawal CoC with the real-time effective date of 4 October.
Positive attendance submitted in error – student withdrawn
You've submitted a positive attendance confirmation in error. The student has not attended in that liability period and will not be returning to study.
You should submit a Withdrawal CoC with the effective date before the first term course start date.
Example 1
You correctly confirmed the student’s registration on 17 September, once they enrolled on their course. The course starts on 24 September.
You confirm the student’s attendance for the first liability period with an A code on 1 October. This is in error. The student has not attended and will not start the course.
You should submit a Withdrawal CoC with the effective date of 23 September.
Example 2
You correctly confirmed positive registration and attendance for the first term.
For the second term, you confirm the student’s attendance with an A code on 7 January. This is in error. The student is not continuing with the course.
You should submit a Withdrawal CoC. The effective date should be the student’s last date of attendance (before 7 January).
Negative attendance submitted in error
If you have submitted a negative attendance confirmation in error, you can change this. The Attendance Code dropdown will still be visible. Select a positive code and then select Save or Submit.
Attendance Management guidance


Higher Education Providers - Attendance Management
- Every Higher Education Provider (provider) should have a published, auditable attendance policy to satisfy its own governance processes. A provider must not claim funding from the Student Loans Company (SLC) for students who are not adhering to a provider’s attendance policy. This relates to various provisions in respective student support regulations and any other applicable regulations1, which means payment of student funding is conditional on confirmation by a provider that a student is attending and undertaking their course.
- This document makes clear what attendance means for the purpose of entitlement to student funding. A provider is responsible for compliance with this for all its courses including those delivered through franchising arrangements.
- Attendance means participation in a course by a student, including, but not limited to, teaching face-to-face or blended study, in line with a provider’s published attendance policy. A provider should communicate its policy to a student and have an auditable process in place to support the action it may take when a student does not meet attendance expectations.
- Providers have flexibility to ensure every student engages with a course, and that the student and/or the course may require greater or less attendance than another due to circumstances or content. Every provider must have a published attendance policy. This does not impact on the current requirement for providers to follow existing government guidance for international students.
- A provider should communicate to a student what its attendance policy is, considering the demands of the course and any personal circumstances of students who may require specific study arrangements, for example, but not exclusively, due to a disability. If a student’s participation in a course does not meet its expectations, a provider should act promptly to inform the SLC that it has withdrawn a student as per a provider’s service agreement with the SLC. The necessity to do so, to reduce the risk to public funding, may arise after a provider exhausts its own procedures to help a student remain on their course.
- A provider should retain a sufficient, auditable record in a format that enables it to determine if a student is attending their course. The Department for Education, Welsh Government or the Student Awards Agency Scotland, as applicable, reserve the right to ensure there is action if it is considered a provider is not implementing an effective attendance policy.
This guidance is not applicable to students who are funded by the Department of Education (NI).
(1) England - The Education (Student Support) Regulations 2011, Chapter 4, para 113 (3)(4)
Wales - The Education (Student Support) (Wales) Regulations 2017, Part 10, para 57(4)
Scotland - The Student Support (Scotland) Regulations 2022, Part 4, para 22(7)
Change of circumstances
Change of Circumstance notifications
There are many cases where the information on SIS does not match the student’s current situation. This could be because they have
- changed course
- changed mode of study
- withdrawn from their course
If the information on SIS is not correct you must submit a Change of Circumstance notification (CoC) as soon as possible. This will let us know what changes are needed.
Our service level for CoC processing is 20 days in off-peak periods. During peak periods (August to end of November) it is 30 working days.
You need to use SIS to submit CoCs. The exceptions to this are:
- Student Awards Agency Scotland (SAAS) students
- Part-Time Grant students (excluding Welsh Part-Time Loan and Grant students from academic year 2014/15)
You should submit changes for SAAS students directly to SAAS. For Part-Time Grant students, you should request a CoC form by emailing coc@slc.co.uk.
On SIS, you can submit CoCs:
- manually through the CoC Home area
- in bulk by file upload (for undergraduate students only)
You must have CoC Administrator access to SIS to create CoCs. If you need this added to your account, contact the User Administrator at your organisation.
The next chapters will take you through the types of CoCs and how to submit each one.
View CoC
Go to the CoC Home menu and select View CoC. This will open the Change of Circumstance filter.
You can use the search options to view the required CoCs.
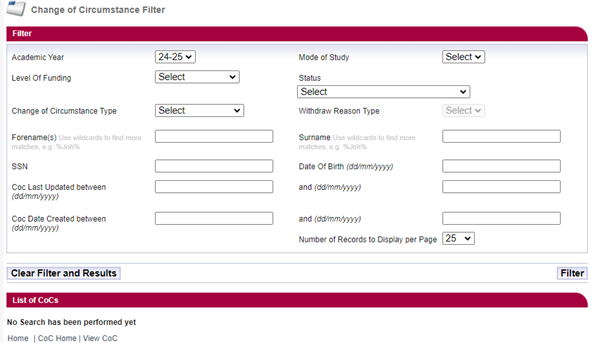
Search options available
Academic year
This defaults to the current academic year and is the only mandatory field you need to run a search.
Mode of study
The dropdown options are FT (full-time) and PT (part-time).
Level of funding
A dropdown showing options for the level of funding or study. You can choose:
- undergraduate
- postgraduate
- postgraduate NI
Status
A dropdown showing options for the CoC status. You can choose:
Failed
The submission of this CoC has not been completed correctly. You should resubmit the CoC.
Saved
The user has saved the CoC to be submitted later. It has not been submitted yet.
Submitted
The CoC has been recently submitted. It is now waiting to move into a queue to be worked. This will update within 24 hours.
In progress
We are working on the CoC. If the status remains unchanged and it is outside of our service level agreement, or you need further information, please email hep_services@slc.co.uk.
Completed (auto)
Our automated system has processed the CoC. The CoC has taken effect. You should regularly check your attendance worklist to confirm you agree with the change. You can then resubmit the A code in acceptance of the update or amendment.
Completed (manual)
Our staff have processed the CoC. The CoC has taken effect.
Deleted
The CoC was deleted. This can occur for various reasons.
For example:
If a duplicate withdrawal CoC is submitted which is not ‘Never Attended’ the previous withdrawal would be deleted and the latest processed.
Sent for manual processing
Our automatic processing systems cannot work this CoC. It is in the queue for us to work. Our service standard for CoC processing is 20 working days in off-peak periods and 30 working days during peak periods (August to end of November).
Submitted (imported)
The CoC has been recently submitted by file import. It is now waiting to move into a queue to be worked. This will update within 24 hours.
Successfully submitted to automation
Postgraduate master's status is showing that the systems are processing the CoC.
Change of Circumstance type
A dropdown showing options for the CoC search. You can choose:
- withdrawal
- suspension
- resumption
- repetition
- transfer
- fee
- fee waiver
- credit
Withdraw reason type
This will only be available if you have selected withdrawal from the Change of Circumstance Type field. You can choose:
- academic
- deceased
- disciplinary
- health
- other
- never attended
- funding
- credits
- never attended – confirmed in error
- left during cooling off period
- left during course
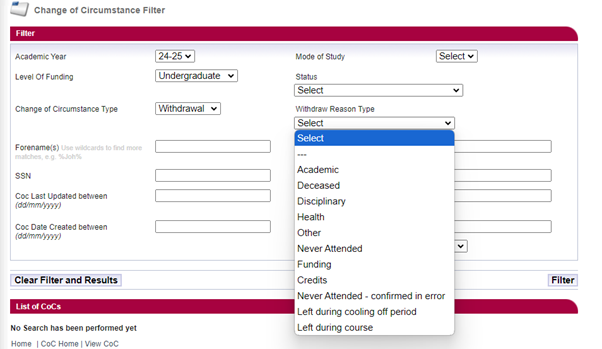
Reason for transfer
This will only be available if you have selected ’transfer’ from the Change of Circumstance type field. You can choose:
- all fees to new course
- split fees
- transfer in

Forename(s)/surname
You can use a wildcard search for these fields. For this, you must enter at least 3 characters along with the wildcard symbol, the percent sign(%). If you use one of these fields, you must also use the other.
Student support number (SSN)
These are unique student identifiers.
Date of birth
You should enter this in dd/mm/yyyy format.
CoC last updated between/and
The date range you want to check for student information updates. If you use one of these fields, you must also use the other.
CoC date created between/and
The date range you want to check for student information updates. If you use one of these fields, you must also use the other.
Number of records to display
The number of search results per page. The default is 25, but you can change it to 50, 100 or 200.
CoC status definitions
Once you've submitted a CoC, you can view its status on the Change of Circumstance tab of the Detailed Student Information page.
- Go to the SIS Home page and select Student Information Home. This will take you to the View Student Information section.
- To search for a student, select the correct year from the Academic Year dropdown, enter the student's SSN (Student Support Number) or CRN (Customer Reference Number) and select Display results.
- To see a student’s information, select their SSN in the search results. This will take you to their Detailed Student Information page.
- Select History.

- Select the Change of Circumstance tab.
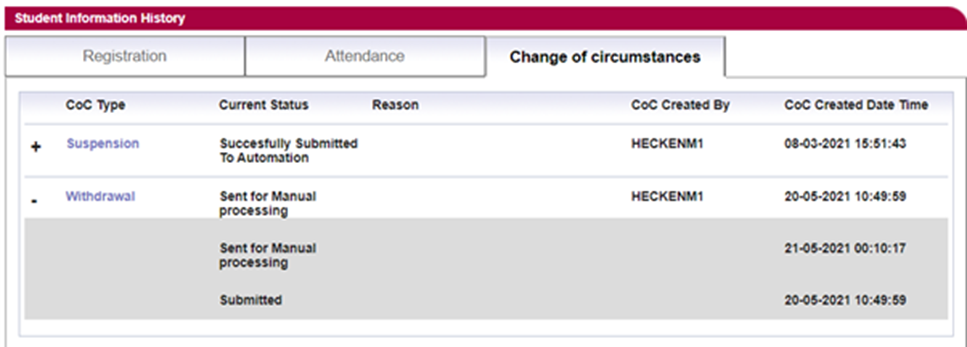
- This tab will show the current status of the CoC submitted for the student. If you select the + icon on the CoC, the line will expand to show the CoC status history.
CoC statuses
Sent for manual processing
Our automatic processing systems cannot work this CoC. It is in the queue for our processing staff to work it. Our service standard for CoC processing is 20 working days in off-peak periods and 30 working days during peak periods (August to end of November).
Failed
The submission of this CoC has not been completed correctly. You should resubmit the CoC.
Saved
The user has saved the CoC to be submitted later. It has not been submitted yet.
Submitted
The CoC has been recently submitted. It is now waiting to move into a queue to be worked. This will update within 24 hours.
In progress
Our staff are working on the CoC.
Completed (Auto)
Our automated system has processed the CoC. The CoC has taken effect.
Completed (Manual)
Our staff have processed the CoC. The CoC has taken effect.
Deleted
The CoC was deleted.
Submitted (imported)
The CoC has been recently submitted by file import. It is now waiting to move into a queue to be worked. This will update within 24 hours.
Successfully submitted to automation
Postgraduate master's status showing that the systems are processing the CoC.
If you need further information about a CoC, please email hep_services@slc.co.uk.
Transfer CoC reason codes
When you submit an undergraduate Transfer CoC, you'll need to select a reason code. This chapter explains the reason codes and the rules relating to them.
All fees to new course
You should use this reason code when a student is internally transferring to a new course and you want all fees to go to the new course. In this case, the effective date of the Transfer CoC must be before the start date of the course the student is currently on.
We will not allocate any funding to the original course. When the student moves to the new course, you'll be able to submit attendance confirmations to release the funding.
If your student is changing seasonal intake within SLC regulations, you can only confirm registration when the transfer is complete.
Split fees
You should use this reason code when a student is internally transferring to a new course after you've submitted a positive attendance code. The effective date of the Transfer CoC must be after the course start date.
When the CoC goes through, the student's original course will receive funding based on the positive attendance confirmations you've submitted by the transfer effective date.
You should enter 100% of the fees. The system will split these based on the effective date you've entered.
If 25% of the fees should go to the original course, the effective date should be after the submission date of term 1 but before the attendance confirmation is submitted for term 2. If 50% of the fees should go to the original course, the effective date should be after the submission date of a positive term 2 attendance confirmation.
Please note that you will not be able to submit more than one split fee transfer. If you wish to split fees more than once, you’ll need to submit a Fee CoC with a note confirming the details.
Alternatively, you can select all fees to new course from the dropdown menu if you wish for all the fees to go to the new course.
Example:
A student begins academic year 2023/24 on course A in September. In October, you submit an A attendance code for the student. This releases 25% of the total academic year funding for term 1.
The student then tells you that they want to switch to course B on 31 December, before term 2 attendance has been confirmed.
You should submit a Transfer CoC using the split fees reason code and an effective date of 31 December. This will move the student to the new course and course A will keep 25% of the total fees that were already released in term 1.
Course B will get the remaining 75% of the fees when you submit positive attendance codes for terms 2 and 3.
Transfer in
You should use this reason code for an external transfer when a student is moving from one higher education provider to another.
The new provider must submit this CoC as soon as possible. This will remove the student from the worklists of the original provider.
We will not be able to redirect any funding released to the original provider before the Transfer CoC has been processed. If there are any disputes of funding, the providers must handle these between them.
Before a Transfer CoC is submitted, the new provider can submit a manual registration using the student's date of birth and student support number (SSN) and DOB. This will release maintenance funding if the undergraduate student has applied for this support and the original provider has not confirmed their registration.
Pre-liability Transfer CoC for application corrections
A pre-liability CoC is a change to a student’s application before the point of liability. The point of liability is when the student becomes responsible for the repayment of a maintenance or fee loan.
You can create a CoC from the CoC worklist, the Detailed Student Information page or the Create CoC page. For undergraduate students only, you can also create CoCs in bulk by uploading an xml file. This guide will tell you how to create a CoC from the Create CoC page.
- Go to the SIS Home page and select CoC Home.
- This will open the CoC Home menu showing the CoC subareas you can see with your access level.
- Select Create CoC.
- Select Transfer from the Change of Circumstance category dropdown.
- Select the year you want to apply this CoC to from the Academic Year dropdown.
- Select Next.
- The system will ask you to enter the details of the student this CoC applies to. You can search for the SSN (student support number) to find the student’s details.
- You can add up to 20 students to the CoC by selecting the green + icon. You'll be submitting this CoC for all the students you add to the list, so you must ensure the change details apply to them all.
- Select Next. This will open the Change of Circumstance Details page where you can enter the specific details of the change.

- Enter the Transfer Effective Date. For a pre-liability CoC this must be before the first day of the student’s course year start date.
- Enter the Expected Date of Completion of New Course. This is the month and year the student will complete the course they're transferring onto.
- Enter the Tuition Fee for New Course. This must be the total fee for the year (100%) as you're making a pre-liability change.
- Enter the Course Tuition Fee Liability. This is the amount the student is liable for. It must be the total for the year (100%). This field should match the Tuition Fee for New Course field unless the student is paying a proportion of their fee themselves.
- For Part-Time Maintenance Loan students only, enter a Credits value. This is the number of credits the student will be studying at your university or college in that academic year only.
- If you need to, you can include additional notes in the Further Explanation If Required field. Including notes is one of the reasons we cannot process the CoC automatically and will process it within the 20 or 30 working day service level. It is important that you only add notes when you need to tell us something that is not covered by a field on the CoC page.
- When you've entered all the details for the CoC, select Next to continue.
- This will take you to the Course Details page where you can search to find the correct course. When you've chosen the correct details select Next.
- You must now select a contact for the CoC. This will be a registered person at your university or college whom we can contact about this CoC. Use the radio buttons to select the contact, then select Next.
- This will take you to the CoC Summary page. Review the CoC details and select Submit.
Post-liability Transfer CoC for application corrections
A post-liability CoC is a change to a student’s application after the point of liability. The point of liability is when the student becomes responsible for the repayment of a maintenance or fee loan.
You'll typically need to submit a post-liability CoC when a student:
- withdraws
- suspends
- resumes
- transfers
For these CoCs we may need a confirmation of attendance to confirm the reassessment.
You can use a Transfer CoC:
- to correct course and year information
- when a student transfers from one provider to another (external transfer)
- when a student transfers to a different course at your university or college (internal transfer)
You should always check that a student’s course and year information is correct before you confirm attendance. If you find this is wrong after you've confirmed attendance, you should use a post-liability Transfer CoC to correct the application. This guide will tell you how to do this and backdate the changes to the start of the academic year.
The service level for processing a post-liability Transfer CoC is 20 working days in off-peak periods. During peak periods (from August to the end of November) it is 30 working days.
This CoC does not enter automated processing due to the effect of reassessments after we've made payments.
You can create a CoC from the CoC worklist, the Detailed Student Information page or the Create CoC page. For undergraduate students only, you can also create CoCs in bulk by uploading an xml file. This guide will tell you how to create a CoC from the Create CoC page.
- Go to the SIS Home page and select CoC Home.
- This will open the CoC Home menu showing the CoC subareas you can see with your access level.
- Select Create CoC.
- Select Transfer from the Change of Circumstance category dropdown.
- Select the year you want to apply this CoC to from the Academic Year dropdown.
- Select Next.
- The system will ask you to enter the details of the student this CoC applies to. You can search for the SSN (student support number) to find the student’s details.
- You can add up to 20 students to the CoC by selecting the green + icon. You'll be submitting this CoC for all the students you add to the list, so you must ensure the change details apply to them all.
- Select Next. This will open the Change of Circumstance Details page where you can enter the specific details of the change.

- Enter the Transfer Effective Date. Even though you're creating a post-liability CoC, it must apply to the full year to correct the original application details. The effective date must therefore be before the first day of term.
- Enter the Expected Date of Completion of New Course. This is the month and year when the student will complete the course.
- Enter the Tuition Fee for New Course. This is the amount of tuition fee you'll charge the student. You should enter 100% of the fees. The system will split these based on the effective date you've entered.
Please note, if you are splitting the fees, the system will limit you to the maximum percentage the liability allows.
For example, if you want to split the fees for Term 1, you cannot exceed the 25% maximum allowable for this period, for Term 1 and Term 2 the maximum would be 50%.
- Enter the Course Tuition Fee Liability. This field should match the Tuition Fee for New Course field.
- For Part-Time Maintenance Loan students only, enter a Credits value. This is the number of credits the student will be studying at your university or college in that academic year only.
- If you need to, you can include additional notes in the Further Explanation If Required field.
If you have a variable fee rate and entered the 100% fee amount in the Tuition Fee for New Course field, do not add notes to explain this. - When you've entered all the details for the CoC, select Next to continue.
- This will take you to the Course Details page where you can search to find the correct course. When you've chosen the correct details select Next.
- You must now select a contact for the CoC. This will be a registered person at your university or college whom we can contact about this CoC. Use the radio buttons to select the contact, then select Next.
- This will take you to the CoC Summary page. Review the CoC details and select Submit.
Internal Transfer CoC
You can use an internal Transfer CoC when a student moves between courses at your university or college during the academic year.
The service level for processing a post-liability internal Transfer CoC is 20 working days in off-peak periods. During peak periods (from August to the end of November) it is 30 working days.
We can only process internal Transfer CoCs automatically if they:
- are pre-liability changes (made before the student has been in attendance)
- match the criteria for automatic processing
If a student changes course after they've been in attendance, we cannot process the CoC automatically.
You can create a CoC from the CoC worklist, the Detailed Student Information page or the Create CoC page. For undergraduate students only, you can also create CoCs in bulk by uploading a csv or xml file. This guide will tell you how to create a CoC from the Create CoC page.
- Go to the SIS Home page and select CoC Home.
- This will open the CoC Home menu showing the CoC subareas you can see with your access level.
- Select Create CoC.
- Select Transfer from the Change of Circumstance category dropdown.
- Select the year you want to apply this CoC to from the Academic Year dropdown.
- Select Next.
- The system will ask you to enter the details of the student this CoC applies to. You can search for the SSN (student support number) to find the student’s details.
- You can add up to 20 students to this CoC by selecting the green + icon. You'll be submitting this CoC for all the students you add to the list, so you must ensure the change details apply to them all.
- Select Next. This will open the Change of Circumstance Details page where you can enter the specific details of the change.
- Enter the Transfer Effective Date. This should be the date when the student transferred to the new course.
- Enter the Expected Date of Completion of New Course. This is the month and year when the student will complete the course they are transferring onto.
- Enter the Tuition Fee for New Course. This is the amount of tuition fee you'll charge the student. You should enter 100% of the fees. The system will split these based on the effective date you've entered.
Please note, if you are splitting the fees, the system will limit you to the maximum percentage the liability allows.
For example, if you want to split the fees for Term 1, you cannot exceed the 25% maximum allowable for this period. For Term 1 and Term 2 the maximum would be 50%.
- Enter the Course Tuition Fee Liability. This is the amount of tuition fee the student is liable for. This field should match the Tuition Fee for New Course field unless the student is paying a proportion of the fee themselves.
- For Part-Time Maintenance Loan students only, enter a Credits value. This is the number of credits the student will be studying at your university or college in that academic year only.
-
If you need to add additional information to this CoC, you must select the checkbox after the line saying, 'I need to include additional information so this CoC can be accurately processed. I understand that this will cause a delay as the CoC will need to be manually processed.'
- When you've entered all the details for the CoC, select Next to continue.
- This will take you to the Course Details page where you can search to find the correct course. When you've chosen the correct details select Next.
- You must now select a contact for the CoC. This will be a registered person at your university or college whom we can contact about this CoC. Use the radio buttons to select the contact, then select Next.
- This will take you to the CoC Summary page. Review the CoC details and select Submit.
Transfer In CoC
You can use a Transfer In CoC:
- for application corrections to course and year information
- when a student transfers from one provider to another (external transfer or transfer in)
- when a student transfers to a different course at your university or college (internal transfer)
You can use a Transfer In CoC pre- or post-liability.
You should submit a pre-liability Transfer In CoC when a student has entered the wrong university or college on their application.
You should submit a post-liability Transfer In CoC when a student has transferred to you from another university or college during the academic year.
The service level for CoC processing is 20 working days in off-peak periods. During peak periods (from August to the end of November) it is 30 working days.
You can create a CoC from the CoC worklist, the Detailed Student Information page or the Create CoC page. For undergraduate students only, you can also create CoCs in bulk by uploading an either a csv or xml file. This guide will tell you how to create a CoC from the Create CoC page.
- Go to the SIS Home page and select CoC Home.
- This will open the CoC Home menu showing the CoC subareas you can see with your access level.
- Select Create CoC.
- Select Transfer from the Change of Circumstance category dropdown.
- Select the year you want to apply this CoC to from the Academic Year dropdown.
- Select Next.
- The system will ask you to enter the details of the student this CoC applies to. You can search for the SSN (student support number) to find the student’s details.
- You can add up to 20 students to this CoC by selecting the green + icon. You'll be submitting this CoC for all the students you add to the list, so you must ensure the change details apply to them all.
- Select Next. This will open the Change of Circumstance Details page where you can enter the specific details of the change.
- Select the Inform about a student transferring to my HEP or transferring within my HEP radio button.
- Enter the Transfer Effective Date. This should be the date when the change took place. If it was before the course started, this date should be before the course start date.
- Enter the Expected Date of Completion of New Course. This is the month and year when the student will complete the course they are transferring onto.
- Enter the Tuition Fee for New Course. This is the remaining amount of tuition fee loan available to the student (100%, 75% or 50%), depending on how long they attended their previous university or college.
- Enter the Course Tuition Fee Liability. This is the amount of tuition fee the student is liable for. This field should match the Tuition Fee for New Course field unless the student is paying a proportion of the fee themselves.
- For Part-Time Maintenance Loan students only, enter a Credits value. This is the number of credits the student will be studying at your university or college in that academic year only.
-
If you need to add additional information to this CoC, you must select the checkbox after the line saying, 'I need to include additional information so this CoC can be accurately processed. I understand that this will cause a delay as the CoC will need to be manually processed.'
- When you've entered all the details for the CoC, select Next to continue.
- This will take you to the Course Details page where you can search to find the correct course. When you've chosen the correct details select Next.
- You must now select a contact for the CoC. This will be a registered person at your university or college whom we can contact about this CoC. Use the radio buttons to select the contact, then select Next.
- This will take you to the CoC Summary page. Review the CoC details and select Submit.
Full-time Fee Change CoC
You should only use a Fee CoC when a student’s record appears in SIS and the fee amount is incorrect.
You can create a CoC from the CoC worklist, the Detailed Student Information page or the Create CoC page. For undergraduate students only, you can also create CoCs in bulk by uploading either a csv or xml file. This guide will tell you how to create a CoC from the Create CoC page.
- Go to the SIS Home page and select CoC Home.
- This will open the CoC Home menu showing the CoC subareas you can see with your access level.
- Select Create CoC.
- Select Fee from the Change of Circumstance category dropdown.
- Select the year you want to apply this CoC to from the Academic Year dropdown.
- Select Next.
- The system will ask you to enter the details of the student this CoC applies to. You can search for the SSN (student support number) to find the student’s details.
- You can add up to 20 students to this CoC by selecting the green + icon. You'll be submitting this CoC for all the students you add to the list, so you must ensure the change details apply to them all. The system will automatically fill in the course details for this CoC, so all the students must be on the same course.
- Select Next. This will open the Change of Circumstance Details page where you can enter the specific details of the change.
- Enter the Correct Course Tuition Fee Amount. This is the full fee amount for the academic year you selected.
If the change involves a student on a foundation year, the fee must not exceed the maximum fee cap for a foundation year of the course.
For example, if the maximum fee cap is £5,760, as the course is in a classroom-based subject, do not enter a value greater than this. Doing so will generate an incorrect liability for your student, and you will receive an incorrect tuition fee payment. If you are unsure of the limits for foundations years, please check our foundation year tuition fee limits guidance. - Enter the Correct Course Tuition Fee Liability. This is the amount the student is liable for. For us to process the CoC automatically, the fee liability and fee amount fields must match.
- Enter the Correct Course Year. This should remain unchanged from what already appears on the student’s record.
- If you need to add additional information to this CoC, you must select the checkbox after the line saying, 'I need to include additional information so this CoC can be accurately processed. I understand that this will cause a delay as the CoC will need to be manually processed.'
- When you've entered all the details for the CoC, select Next to continue.
- This will take you to the Course Details page. For a Fee CoC, the system will automatically fill in the course details. Select Next to move on.
- You must now select a contact for the CoC. This will be a registered person at your university or college whom we can contact about this CoC. Use the radio buttons to select the contact, then select Next.
- This will take you to the CoC Summary page. Review the CoC details and select Submit.
Part-time Fee Change CoC
You should only use a Fee CoC when a student’s record appears in SIS and the fee amount is incorrect.
You can create a CoC from the CoC worklist, the Detailed Student Information page or the Create CoC page. For undergraduate students only, you can also create CoCs in bulk by uploading either a csv or xml file. This guide will tell you how to create a CoC from the Create CoC page.
- Go to the SIS Home page and select CoC Home.
- This will open the CoC Home menu showing the CoC subareas you can see with your access level.
- Select Create CoC.
- Select Fee from the Change of Circumstance category dropdown.
- Select the year you want to apply this CoC to from the Academic Year dropdown.
- Select Next.
- The system will ask you to enter the details of the student this CoC applies to. You can search for the SSN (student support number) to find the student’s details. Make sure the student you select is on a part-time course.
- You can add up to 20 students to this CoC by selecting the green + icon. You'll be submitting this CoC for all the students you add to the list, so you must ensure the change details apply to them all.
- Select Next. This will open the Change of Circumstance Details page where you can enter the specific details of the change.

- Enter the Correct Course Tuition Fee Amount. This is the full fee amount for the academic year you selected.
If the change involves a student on a foundation year, the fee must not exceed the maximum fee cap for a foundation year of the course.
For example, if the maximum fee cap is £4,315, as the course is in a classroom-based subject, do not enter a value greater than this. Doing so will generate an incorrect liability for your student, and you will receive an incorrect tuition fee payment. If you are unsure of the limits for foundations years, please check our foundation year tuition fee limits guidance. - Enter the Correct Course Tuition Fee Liability. This is the amount the student is liable for. This should match the tuition fee amount unless the student is paying a proportion of the fee themselves.
- Select the Fee Change Reason from the dropdown. The options are:
-
- N/A
- intensity has decreased below 25%
- intensity of study between 25% and 50%
- intensity of study more than 50%
- course not designated
- If you need to add additional information to this CoC, you must select the checkbox after the line saying, 'I need to include additional information so this CoC can be accurately processed. I understand that this will cause a delay as the CoC will need to be manually processed.'
- When you've entered all the details for the CoC, select Next to continue.
- This will take you to the Course Details page. For a Fee CoC, the system will automatically fill in the course details. Select Next to move on.
- You must now select a contact for the CoC. This will be a registered person at your university or college whom we can contact about this CoC. Use the radio buttons to select the contact, then select Next.
- This will take you to the CoC Summary page. Review the CoC details and select Submit.
Full-time course on a part-time basis
A student might need to attend a year of their course on a part-time basis, over 2 years instead of one. If the course is full-time, the student will remain eligible for full-time support. Students who attend a full-time course on a part-time basis are subject to previous study rules.
If you agree to prolong their attendance over 2 years in the first year of study, we'll award the student fee support in the first year of the split. This will use their additional year of funding.
If you agree to prolong their attendance over 2 years after the first year of study, we'll award the student fee support in the final year of the split. We will not pay tuition fees in the first year of the split.
You should use the Fee CoC to submit the details and include a note. We cannot award compelling personal reasons for repeat study to students who've agreed to split the academic year over 2 or more years.
Example 1
A new student applies in academic year 2020/21. You agree in academic year 2020/21 that they'll study their final year over 2 years: academic years 2022/23 and 2023/24. The overall entitlement will be:
- academic year 2020/21 – year 1 of 3: funded (standard entitlement)
- academic year 20201/22 – year 2 of 3: funded (standard entitlement)
- academic year 2022/23 – year 3 of 3: funded (additional year – full year rate)
- academic year 2023/24 – year 3 of 3: funded (standard entitlement – final year rate)
Example 2
A student has previously studied full-time for one academic year. This was before they started their current course. They did not gain a qualification from the previous course and there's been no indication of compelling personal reasons. You and the student agree that they can complete their second year over 2 academic years. The overall entitlement will be:
- academic year 2010/21 – year 1 of 3: funded (standard entitlement)
- academic year 2021/22 – year 2 of 3: not funded (no tuition fees)
- academic year 2022/23 – year 2 of 3: funded (standard entitlement)
- academic year 2023/24 – year 3 of 3: funded (standard entitlement)
Mode switchers
You should use a mode switch CoC if a student has decided to change from a designated full-time course to a designated part-time course or vice versa.
If the student has not attended the course or mode of study in their application, you should use the 'Withdrawal – never in attendance' CoC option. It is important that you include information in the Further Explanation If Required field. You should include that the student has not been attending the course or mode of study in their funding application. You should also include that the student will need to reapply for funding for the correct mode of study.
Follow the steps below to submit a mode switch Fee CoC through the manual CoC submission route. It is important that you include information in the Further Explanation If Required field. This will allow us to pick up the CoC as a mode switch CoC and not a standard Fee CoC. To complete the mode switch process, the student will need to submit the corresponding application form.
- Go to the SIS Home page and select CoC Home.
- This will open the CoC Home menu showing the CoC subareas you can see with your access level.
- Select Create CoC.
- Select Fee from the Change of Circumstance Category dropdown.
- Select the year you want to apply this CoC to from the Academic Year dropdown.
- Select Next.
- The system will ask you to enter the details of the student this CoC applies to. You can search for the SSN (student support number) to find the student’s details.
- Once you've found the student, select Next. This will open the Change of Circumstance Details page where you can enter the specific details of the change.
Correct Course Tuition Fee Liability – enter the proportion of fees that the student will receive payment for, for the duration of the first mode of study they attended.
Correct Course Year – this should remain unchanged from what already appears on the student’s record.
Correct Course Tuition Fee Amount – enter the proportion of fees that the student will receive payment for, for the duration of the first mode of study they attended. - To allow us to process this as a mode switch CoC, you must enter additional information in the Further Explanation If Required field.
To access this field, you must select the checkbox after the line that says, 'I need to include additional information so this CoC can be accurately processed. I understand that this will cause a delay as the CoC will need to be manually processed’.
Copy the below text into the Further Explanation If Required field, then add the relevant information:
Mode Switch CoC requestNew course name:
New course code:
Mode of study for new course: Full-time / Part-time
Date student left first mode of study:
Date student began second mode of study:
Credits to be undertaken in academic year:
Fees required for second mode of study:
New course name: this is the name of the course that the student is transferring to.New course code: this is the code of the course the student is moving to after the mode switch.
Mode of study for the new course: this should show which mode the student is moving to – delete as appropriate.
Credits to be taken: for Part-Time Maintenance Loan students only, enter a credit value – this is the amount of credits the student will be studying at your university or college in that academic year only.
Fees required for second mode of study: Fees will be split according to attendance dates.
-
When you've entered all the details for the CoC, select Next to continue.
-
This will take you to the Course Details page. The fields here will already have the correct course details for the student. Select Next to continue.
-
You must now select a contact for the CoC. This will be a registered person at your university or college whom we can contact about this CoC. Use the radio buttons to select the contact, then select Next.
-
This will take you to the CoC Summary page. Review the CoC details and select Submit.
Split fees example
A student will finish full-time study on 18 January and will start part-time study on 19 January. Term 2 of the course runs from 4 January to 3 April. The fees are split with terms 1 and 2 paid full-time and term 3 paid part-time.
- term 1: 25%
- term 2: 25%
- term 3: 50%
You're entitled to charge the student up to 50% of the full-time course maximum or the part-time provider-designated maximum.
Childcare Grant extension CoC
Follow the steps below to submit a Fee CoC to extend the Childcare Grant. You should do this if a student is extending their final year course date and is receiving Childcare Grant. You can only use a Childcare Grant extension for final year students.
There are 2 ways to submit a Childcare Grant extension. You should use one when the student's extension falls within the current academic year. You should use the other when the extension goes past it. This guide covers both options.
If there are any further changes to the dates or duration of the course extension, you need to submit another Fee CoC. This includes if the extension date is moved forward or is no longer needed.
How to add a Childcare Grant extension within the current academic year
As an example, you should use this option if you have the following scenario.
A student is part of the September 2023 intake. They applied for Childcare Grant from 1 September 2023 to 5 June 2024. They then have their course extended to 31 July 2024.
- Go to the SIS Homepage and select CoC Home.
- This will open the CoC Home menu showing the CoC subareas you can see with your access level.
- Select Create CoC.
- Enter the level of funding and academic year.
- Select Fee from the Change of Circumstances Category drop down.
- Select the student.
- Add the following information in the Further Explanation if Required box:
- the extended course date
- the reason for the extension
- confirmation that the student is still attending lectures, engaging with tutors or accessing other resources.
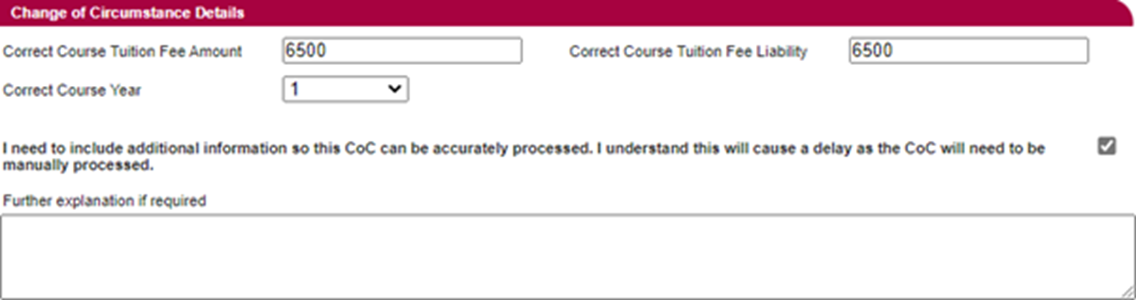
8. Select Next to go to the Course page and select a contact for the CoC.
9. This will take you to the CoC Summary page. Review the CoC details and select Submit.
The submitted CoC will join our processing queue. Our service standard for CoC processing is:
- 20 working days in off-peak periods
- 30 working days during peak periods (from August to the end of November)
How to add a Childcare Grant extension beyond the current academic year
As an example, you should use this option if you have the following scenario.
A student is part of the September 2023 intake. They applied for Childcare Grant from 1 September 2023 to 5 June 2024. They then have their course extended to 15 November 2024.
- Go to the SIS Home page and select CoC Home.
- This will open the CoC Home menu showing the CoC subareas you can see with your access level.
- Select Create CoC.
- Enter the level of funding and academic year.
- Select Fee from the Change of Circumstances Category dropdown.
- Select the student.
- Add the following information in the Further Explanation if Required box:
- the extended course date
- the reason for the extension
- confirmation that the student is still attending lectures, engaging with tutors or accessing other resources
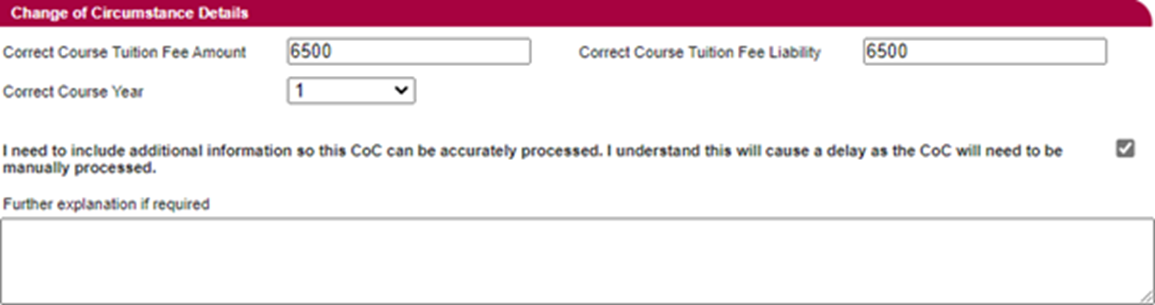
8. Select Next to go to the Course page and select a contact for the CoC.
9. This will take you to the CoC Summary page. Review the CoC details and select Submit.
The submitted CoC will join our processing queue. Our service standard for CoC processing is:
- 20 working days in off-peak periods
- 30 working days during peak periods (from August to the end of November)
You need to tell the student to make an application for the next academic year to cover the extended dates.
You should then submit a Repetition CoC, confirming the student is in attendance from the start of the next academic year until the end of the course extension period.
Course extension CoC
Follow the steps to submit a Fee CoC to extend the student’s course. You should do this if a student is extending their final year course date.
There are 2 ways to submit the extension. You should use one when the student's extension falls within the current academic year. You should use the other when the extension goes past it. This guide covers both options.
If there are any further changes to the dates or duration of the course extension, you need to submit another Fee CoC. This includes if the extension date is moved forward or is no longer needed.
How to add a course extension within the current academic year
As an example, you should use this option if you have the following scenario.
A student is part of the September 2023 intake. Their funding duration is from 1 September 2023 to 5 June 2024. They then have their course extended to 27 July 2024.
- Go to the SIS Home page and select CoC Home.
- This will open the CoC Home menu showing the CoC subareas you can see with your access level.
- Select Create CoC.
- Enter the level of funding and academic year.
- Select Fee from the Change of Circumstances Category dropdown.
- Select the student.
- Add the following information in the Further Explanation if Required box:
- the extended course date
- the reason for the extension
- confirmation that the student is still attending lectures, engaging with tutors or accessing other resources

- Select Next to go to the Course page and select a contact for the CoC.
- This will take you to the CoC Summary page. Review the CoC details and select Submit.
The submitted CoC will join our processing queue. Our service standard for CoC processing is:
- 20 working days in off-peak periods
- 30 working days during peak periods (from August to the end of November)
How to add a course extension beyond the current academic year
As an example, you should use this option if you have the following scenario.
A student is part of the September 2021 intake. Their funding duration is from 1 September 2021 to 5 June 2022. They then have their course extended to 15 November 2022.
- Go to the SIS Home page and select CoC Home.
- This will open the CoC Home menu showing the CoC subareas you can see with your access level.
- Select Create CoC.
- Enter the level of funding and academic year.
- Select Fee from the Change of Circumstances Category dropdown.
- Select the student.
- Add the following information in the Further Explanation if Required box:
- the extended course date
- the reason for the extension
- confirmation that the student is still attending lectures, engaging with tutors or accessing other resources.
- Select Next to go to the Course page and select a contact for the CoC.
- This will take you to the CoC Summary page. Review the CoC details and select Submit.
The submitted CoC will join our processing queue. Our service standard for CoC processing is:
- 20 working days in off-peak periods
- 30 working days during peak periods (from August to the end of November)
You need to tell the student to make an application for the next academic year to cover the extended dates.
You should then submit a Repetition CoC, confirming the student is in attendance from the start of the next academic year until the end of the course extension period.
Early completion of studies
- Go to the SIS Home page and select CoC Home.
- This will open the CoC Home menu showing the CoC subareas you can see with your access level.
- Select Create CoC.
- Enter the current level of funding and academic year.
- Select Fee from the Change of Circumstances Category drop down.
- Select the student.
- Change the Correct Course Tuition Fee Liability accordingly.
- In the Further Explanation if Required box please add:
- the date of the early completion
- the reason for the early completion
10. Select next to go to the Course page and select a contact for the CoC.
11. This will take you to the CoC Summary page. Review the CoC details and select Submit.
The submitted CoC will join our processing queue. Our service standard for CoC processing is:
- 20 working days in off-peak periods
- 30 working days during peak periods (from August to the end of November)
External resit
If a student’s graduation date changes due to them repeating externally, repeating part of the course or exams at the same provider while not classed as being in attendance on the course for that repeat part, and they've not made a new application, you need to tell us the correct date. You must use a Fee CoC in SIS to do this.
You can create a CoC from the CoC worklist, the Detailed Student Information page or the Create CoC page. For undergraduate students only, you can also create CoCs in bulk by uploading an xml file. This guide will tell you how to create a CoC from the Create CoC page.
- Go to the SIS Home page and select CoC Home.
- This will open the CoC Home menu showing the CoC subareas you can see with your access level.
- Select Create CoC.
- Select Fee from the Change of Circumstance category dropdown.
- Select the year you want to apply this CoC to from the Academic Year dropdown.
- Select Next.
- The system will ask you to enter the details of the student this CoC applies to. You can search for the SSN (student support number) to find the student’s details.
- When you've entered the student’s details, select Next. This will open the Change of Circumstance Details page where you can enter the specific details of the change.
- You will not be changing the Tuition Fee Amount, Course Tuition Fee Liability or Course Year, so you should enter the details we already hold for the student. This will make sure the current application is not amended.
- Give us the information about the external resit in the Further Explanation If Required field. You should use this format:
Reason: Resitting Externally
Expected date of completion: mm/dd/yyyy
- When you've entered all the details for the CoC, select Next to continue.
- This will take you to the Course Details page. For a Fee CoC, the system will automatically fill in the course details. Select Next to move on.
- You must now select a contact for the CoC. This will be a registered person at your university or college whom we can contact about this CoC. Use the radio buttons to select the contact, then select Next.
- This will take you to the CoC Summary page. Review the CoC details and select Submit.
Student has created a new application
If a student’s graduation date changes due to them repeating externally, and they've made a new application, you need to tell us the correct date. You must use a Repetition CoC in SIS to do this.
Withdrawal CoC reason codes
When you submit an undergraduate Withdrawal CoC, you'll need to select a reason code. This chapter explains the reason codes and the rules relating to them.
A student is no longer in attendance at the point when their scheduled learning, teaching and assessment activities and other active and ongoing engagement end in agreement with you. This is also known as the last day of attendance for the student. It also means the student does not intend to return.
Left during cooling-off period
You should use this reason code when a student has left during your defined cooling-off period in term 1. The effective date of the Withdrawal CoC must be:
- after the course start date
- when the student is no longer in ongoing and active engagement with their course
No fees will be charged to the student.
Never in attendance – confirmed in error
You should use this reason code when a student has left the course and:
- has never been liable for funding
- has had a positive attendance confirmation submitted by mistake
The effective date of the Withdrawal CoC must be before the course start date. No fees will be charged to the student.
Left during course
You should use this reason code when a student leaves the course after the cooling-off period.
The Withdrawal CoC should be effective from the point when the student’s scheduled learning, teaching and assessment activities and other active and ongoing engagement end in agreement with you. This is also known as the last day of attendance for the student. It also means the student does not intend to return. They'll have no further obligation to pay fees to you.
A withdrawal terminates the student’s period of student finance eligibility.
Health
You should use this reason code when a student has withdrawn from their course due to health reasons.
The effective date of the Withdrawal CoC must be after the course start date. It should mark the point from which the student was no longer in ongoing and active engagement with their course.
The student will be liable for the funding they've received up to the withdrawal date.
Deceased
You should use this reason code if a student dies during their course.
The effective date of the Withdrawal CoC must be after the course start date. It should mark the point from which the student was no longer in ongoing and active engagement with their course.
We'll begin the process of closing the account.
Withdrawal CoC
You should use a Withdrawal CoC when a student withdraws from their course after you've confirmed their registration.
A withdrawal means the point when a student’s scheduled learning, teaching and assessment activities and other active and ongoing engagement end in agreement with you. It also means the student does not intend to return. They'll have no further obligation to pay fees to you.
This terminates their period of student finance eligibility. We'll recalculate their maintenance and tuition fee support.
If a student tells us that they intend to withdraw from a course, we'll suspend their maintenance payments. You must discuss the withdrawal with the student.
You must submit Withdrawal CoCs swiftly and accurately. This is to ensure our payments to the student and to you are correct and on time.
The service level for CoC processing is 20 working days in off-peak periods. During peak periods (from August to the end of November) it is 30 working days.
We can process Withdrawal CoCs through the automated service if they match the criteria for this. The processing time for an automated CoC is 48 hours. To maximise the likelihood of your CoCs being automatically processed, please follow the steps in this guide when you submit them.
You can create a CoC manually from the Create CoC page. For undergraduate students only, you can also create them in bulk by uploading an xml or csv file. This guide will tell you how to use the Create CoC page. If you'd like the technical specification with information on the bulk upload process, please email hep_services@slc.co.uk.
- Go to the SIS Home page and select CoC Home.
- This will open the CoC Home menu showing the CoC subareas you can see with your access level.
- Select Create CoC.
- Select Withdrawal from the Change of Circumstance category dropdown.
- Select the year you want to apply this CoC to from the Academic Year dropdown.
- Select Next.
- The system will ask you to enter the details of the student this CoC applies to. You can search for the SSN (student support number) to find the student’s details.
- Once you've found the student, select Next. This will open the Change of Circumstance Details page where you can enter the specific details of the change.
- Enter the Date of Last Attendance. This must be on or before the course end date. We use this to process the student’s funding entitlement.
Attendance on a course means active and ongoing engagement with the activities and learning opportunities you offer. These include, but are not limited to, scheduled learning and teaching activities.
If the student attended for the full first day of the applicable term, you should submit the last date of attendance as the second day of that term. - Enter the Date Student Left the Course. This should match the Date of Last Attendance (last date of engagement), which must be on or before the course end date.
- Select a reason from the Reason for Withdrawal dropdown. There are different options for undergraduate and postgraduate Withdrawal COCs.
You can find out more about undergraduate reason codes in the Withdrawal CoC reason codes chapter. The options are:
- left during cooling-off period
- never in attendance – confirmed in error
- left during course
- health
- deceased
- The postgraduate options are:
-
- academic
- deceased
- disciplinary
- health
- other
- Enter the Course Tuition Fee Liability. This field should match the Tuition Fee Charged to Student field to ensure automated processing. These values must be the same, if you enter different values it could impact the student’s loan request on their application.
- The system will automatically fill in the Course Year field.
- If you need to add additional information to this CoC, you must select the checkbox after the line saying, 'I need to include additional information so this CoC can be accurately processed. I understand that this will cause a delay as the CoC will need to be manually processed.'
- When you've entered all the details for the CoC, select Next to continue.
- This will take you to the Course Details page. For a Withdrawal CoC, the system will automatically fill in the course details. Select Next to move on.
- You must now select a contact for the CoC. This will be a registered person at your university or college whom we can contact about this CoC. Use the radio buttons to select the contact, then select Next.
- This will take you to the CoC Summary page. Review the CoC details and select Submit.
Withdrawal – reducing the tuition fee charged
When a student withdraws, our system will limit the amount you can charge them to 25%, 50% or 100% of their full tuition fee. This amount depends on the effective date of the withdrawal.
In some cases you may want to charge the student less than the full amount they owe for their time in study. To do this, enter the value that you want to charge in the Tuition Fee Charged to Student field. Our system will then charge that exact amount.
You should also include a note with the CoC to say you're knowingly charging a lower fee. This will ensure our processing teams can understand your request.
Example 1
A student has been marked in attendance for term 1. They've only attended 4 weeks of term 1 but now want to withdraw. Their full academic year tuition fee is £9,250.
You can receive 25% of the full year’s tuition fee for this student, but you only want to charge the student £1000 since they have not attended the whole term.
If you enter the full academic year tuition fee in the Tuition Fee Charged to Student and Course Tuition Fee Liability fields, the system will automatically charge the student 25% of this fee (£2,312.50). However, if you enter £1000 in these fields, the system will only charge the student £1000.
Example 2
A student has attended most of the academic year but withdraws before the end of the year.
The student has attended some of term 3, so you can receive the full year's tuition fee for them. However, you only want to charge them 80% of this.
You should enter £7400 (80% of the full fee of £9250) in the Tuition Fee Charged to Student and Course Tuition Fee Liability fields. Since the student has attended the 3 terms, our system will charge the full value in these fields.
Withdrawal – correcting a registration made in error
If you've confirmed a student’s registration in error and they've never been in attendance, you'll need to submit a Withdrawal CoC.
You should follow the steps in the Withdrawal CoC chapter to do this.
Use the day before the course start date as the Date of Last Attendance and the Date Student Left the Course.
Enter 0 in both the Tuition Fee Charged to Student and Course Tuition Fee Liability fields. This ensures that the student is not charged a fee.
Withdrawal – after suspension
Sometimes a student is suspended when the withdrawal decision is made. When this happens, you must not withdraw the student from the date their suspension began. The effective date of the withdrawal should be the date when you agreed on the student withdrawing from study.
Example
The student was suspended on 1 December. You submitted a Suspension CoC. The student continued to be suspended over the Christmas break. On 2 February they told you that they wanted to withdraw from their course.
You should use 2 February as the Date Student Left the Course and the Date of Last Attendance.
You confirmed the student's term 1 attendance before the suspension. We will therefore not claw back the 25% tuition fee payment for term 1. You should not claim funding for term 2 as the student was not in study for this period.
Withdrawal – undergraduate student not returning
You should not submit a Withdrawal CoC for undergraduate students who complete one academic year but do not return for the next. This is because undergraduate students must apply for each academic year they want to attend. If the student does not want to attend the next academic year, they will not apply for funding for that year.
Example
The student completes academic year 2023/24. They do not return for academic year 2024/25. The student's application will not roll over into the next academic year. Therefore, you do not need to submit a Withdrawal CoC for 2023/24.
If the student does apply for the new academic year but does not return, you'll need to submit a D attendance code. This will let us know that they never registered. See Confirming ongoing attendance for more detail.
Withdrawal – postgraduate student not returning
When a postgraduate student does not return for a new academic year, you should submit a Withdrawal CoC. This should be in the previous academic year, with the last day of the previous academic year as the effective date.
Example
The student was in attendance for the whole of academic year 2023/24. They do not return for academic year 2024/25. You should submit a Withdrawal CoC for 2023/24. The effective date will be 31 August 2024, as that is the last day of the academic year for this course.
You should not submit an N registration code for a non-returning postgraduate student, as this will cancel their application for every academic year.
Suspension CoC
You should use a Suspension CoC when a student takes an agreed leave of absence and plans to return in the future.
You can create a CoC from the CoC worklist, the Detailed Student Information page or the Create CoC page. For undergraduate students only, you can also create CoCs in bulk by uploading either a csv or xml file. This guide will tell you how to create a CoC from the Create CoC page.
- Go to the SIS Home page and select CoC Home.
- This will open the CoC Home menu showing the CoC subareas you can see with your access level.
- Select Create CoC.
- Select Suspension from the Change of Circumstance category dropdown.
- Select the year you want to apply this CoC to from the Academic Year dropdown.
- Select Next.
- The system will ask you to enter the details of the student this CoC applies to. You can search for the SSN (student support number) to find the student’s details.
- When you've entered the student’s details, select Next. This will open the Change of Circumstance Details page where you can enter the specific details of the change.
- Enter the Date of Last Attendance (last date of engagement). This is the last date when the student attended their course. We use this to process the student’s funding entitlement.
- Enter the Date Student Left the Course. A Suspension CoC cannot be dated in the future. Both the date of last attendance and the date the student left the course must be today or earlier.
- Enter the Tuition Fee Charged to Student. The system will automatically enter the student’s tuition fee amount in this field.
- Select a reason from the Reason for Suspension dropdown. The options are:
-
- health
- other
If you select Health the student’s support will automatically extend for 60 days. It is thus vital that you have evidence from the student. If the student’s suspension period is longer than 60 days, they must contact their award authority and send further evidence to support this.
- Enter the Original Duration of Course.
- Enter the Current Year of Study. The system will automatically fill in this field but you can change it if you need to.
- Enter the Agreed Date of Return. This field is mandatory. If you do not have an definite date of return please enter an expected date. If the student returns within the same academic year, you must submit a Resumption CoC.
- Enter the Course Tuition Fee Liability. You should leave this as the full year amount. We'll calculate how much the student will be charged based on their attendance confirmations and suspension date. This will be 25%, 50% or 100% of the total fee. For example, if a student begins their course in September and has a suspension effective date of 1 December, they'll be charged 25% of their tuition fee amount.
- If you need to add additional information to this CoC, you must select the checkbox after the line saying, 'I need to include additional information so this CoC can be accurately processed. I understand that this will cause a delay as the CoC will need to be manually processed.
Please note that the processing of all suspension CoCs takes place manually. - When you've entered all the details for the CoC, select Next to continue.
- You must now select a contact for the CoC. This will be a registered person at your university or college whom we can contact about this CoC. Use the radio buttons to select the contact, then select Next.
- This will take you to the CoC Summary page. Review the CoC details and select Submit.
Suspension examples
Undergraduate health suspension
If an undergraduate student is suspending due to health reasons, select Health from the Reason of Suspension dropdown. Once you've selected this complete the rest of the CoC as normal.
The students will receive maintenance loan support for 60 calendar days from the date you've entered in the Last Day of Attendance field. When they return from their period of suspension you should submit a Resumption CoC.
Suspension due to pregnancy
Students taking a break due to pregnancy or to give birth are not eligible for the 60 days of maintenance loan support available for health reasons. You should choose Other from the Reason of Suspension dropdown. Once you’ve done this, complete the CoC as normal.
Students taking a break due to pregnancy-related illness are eligible for the 60 days of maintenance loan support. You should select Health from the Reason of Suspension dropdown.
Resumption date into next course year.
If the student has applied for the next academic year and you submit a suspension CoC with a 'date student is resuming study' after the course start date of the next academic year, we'll reassess the amount of maintenance support available for the student based on the date provided.
We'll suspend the new application and you'll need to submit a Resumption CoC when the student has resumed study. You need to make sure that the agreed return date in the CoC is correct.
Suspension over an academic year
If an undergraduate student suspends and returns within the same academic year, we need a Resumption CoC.
If they return in the following academic year, they'll need to apply for the new academic year. Their registration and attendance confirmations will continue as normal.
If the student applies for the new academic year but does not return, you should submit a D attendance code. You can find more information on how to submit attendance codes in the manual attendance confirmation chapter.
If the student does not apply for the following academic year and tells you they're withdrawing, you do not need to submit a Withdrawal CoC. The application can remain suspended and it will move to the abandonment process.
Pre-registration health suspension
If you're suspending an undergraduate student due to health reasons before the start of the academic year, select Health from the Reason of Suspension dropdown.
When you complete the following CoC, enter the day before the course start date as the Last Day of Attendance.
You will need to enter the Agreed Date of Return. This field is mandatory. If you do not have a definite date of return, please enter an expected date.
The student will then receive maintenance loan support for 60 calendar days from that date. When they return from their period of suspension you should submit a Resumption CoC.
The student will not have been confirmed for registration. To clear the student from your registration worklist, select Y (yes) from the Registration Confirmation dropdown. This will not release further maintenance loan support as it has been capped at the 60-day support already paid.
If the student resumes within the same academic year, assessment will prorate the student’s maintenance loan to account for the 60 days already paid.
If they return in the following academic year, they'll need to apply for that year. Their registration and attendance confirmations will continue as normal.
Resumption CoC
You should use a Resumption CoC when a student returns in the same academic year after a period of suspension.
You should also use a Resumption CoC when a student has applied for the following academic year. You should submit a Suspension CoC. When you’re submitting the Suspension CoC, use the course start date of the next academic year as the ‘date student is resuming study’. We'll then reassess the amount of maintenance support that’s available for the student based on the date you’ve provided.
We'll suspend the new application and you'll need to submit a Resumption CoC when the student has resumed study. You need to make sure that the agreed return date in the CoC is correct.
You can create a CoC from the CoC worklist, the Detailed Student Information page or the Create CoC page. For undergraduate students only, you can also create CoCs in bulk by uploading either a csv or xml file. This guide will tell you how to create a CoC from the Create CoC page.
- Go to the SIS Home page and select CoC Home.
- This will open the CoC Home menu showing the CoC subareas you can see with your access level.
- Select Create CoC.
- Select Resumption from the Change of Circumstance category dropdown.
- Select the year you want to apply this CoC to from the Academic Year dropdown.
- Select Next.
- The system will ask you to enter the details of the student this CoC applies to. You can search for the SSN (student support number) to find the student’s details.
- When you've entered the student’s details, select Next. This will open the Change of Circumstance Details page where you can enter the specific details of the change.
- Enter the Year of Course the Student is Entering. This is upon the student’s return.
- Enter the Date Student is Resuming Study. A Resumption CoC cannot be dated in the future, so this date must be today or earlier.
- Enter the Course End Date. You should update this if the course end date is now later than the original graduation date.
- If the student has a placement in the year of resumption, enter the details of this in the text field.
- Enter the Course Tuition Fee Liability. This is the amount of the tuition fee the student is liable for at the relevant point in the academic year. This field should match the Tuition Fee Amount field unless the student is paying a proportion of the fees themselves.
- If you need to add a note to the CoC select Y (yes) from the dropdown for the question, 'Is there a placement in this year?'. You can add any additional information that's essential for us to process the CoC correctly.
- When you've entered all the details for the CoC, select Next to continue.
- This will take you to the Course Details page. For a Resumption CoC, the system will automatically fill in the course details. Select Next to move on.
- You must now select a contact for the CoC. This will be a registered person at your university or college whom we can contact about this CoC. Use the radio buttons to select the contact, then select Next.
- This will take you to the CoC Summary page. Review the CoC details and select Submit.
Repetition CoC
You should use a Repetition CoC if a student fails to progress to the next course year and you let them repeat a period of study.
This guide covers how to submit an undergraduate CoC. If you need information on how to process postgraduate students, see Postgraduate repeated study.
You can create a CoC from the CoC worklist, the Detailed Student Information page or the Create CoC page. For undergraduate students only, you can also create CoCs in bulk by uploading either a csv or xml file. This guide will tell you how to create a CoC from the Create CoC page.
- Go to the SIS Home page and select CoC Home.
- This will open the CoC Home menu showing the CoC subareas you can see with your access level.
- Select Create CoC.
- Select Repetition from the Change of Circumstance category dropdown.
- Select the year you want to apply this CoC to from the Academic Year dropdown.
- Select Next.
- The system will ask you to enter the details of the student this CoC applies to. You can search for the SSN (student support number) to find the student’s details.
- When you've entered the student’s details, select Next. This will open the Change of Circumstance Details page where you can enter the specific details of the change.
- Enter the Revised Course End Date. This is the month and year when the student will complete their full course.
- From the Period of Course to Be Repeated dropdown, select either Full Year or Part Year. Full year means the student will repeat all 3 terms. A part year repeat is anything less than 3 terms. This applies to both full-time and part-time students.
- Enter the date the Student Is Repeating Study from. This is when the student will begin the period of repeated study.
- Enter the date the Student Is Repeating Study to. This is when the student will end the period of repeated study.
- If you need to add a note to the CoC select Y (yes) from the dropdown for the question, Do you need to include important information as to why the student is repeating as part of their study?. Please only add information that is necessary for us to process the CoC correctly, since including a note means the CoC cannot be worked automatically.
If a student is repeating externally, repeating part of the course or exams at the same provider while not classed as being in attendance on the course for that repeat part, please provide us with the information in the Further Explanation Required field.
You should use this format:
Reason: Resitting externally
Expected date of completion: mm/dd/yyyy
- Enter the Tuition Fee Amount. This should be the full 100% fee for the period of repetition.
- Enter the Course Tuition Fee Liability. This is the amount of the tuition fee the student is liable for. This field should match the Tuition Fee Amount field unless the student is paying a proportion of the fees themselves.
- Enter the Course Year. This will be the year the student is repeating.
- When you've entered all the details for the CoC, select Next to continue.
- This will take you to the Course Details page. For a Repetition CoC, the system will automatically fill in the course details. Select Next to move on.
- You must now select a contact for the CoC. This will be a registered person at your university or college whom we can contact about this CoC. Use the radio buttons to select the contact, then select Next.
- This will take you to the CoC Summary page. Review the CoC details and select Submit.
Repeating study after a foundation year
You should submit a Transfer CoC followed by a Repetition CoC if all the following is true:
- the student transfers from one course to another
- both courses have a foundation year
- the student needs to repeat a year of study
The student will receive funding for the full length of their second course, since they'll take advantage of their 'additional year'. Students get the length of their course and one additional year to complete the course, minus any previous study.
Example
A student is on course A, which has a foundation year and 3 further years of study. They complete their foundation year and one more year of study.
They then move to course B, which also has a foundation year and 3 further years of study. They'll bypass the foundation year of course B, but will need to repeat year 1 after the move.
They'll still receive funding for all years of study in course B, since they'll use their 'additional year' along with 2 further years of funding.
Credit CoC
You should use the Credit CoC to amend the number of credits a student is undertaking.
For students in receipt of a Part Time Maintenance Loan, their funding entitlement depends on their intensity of study. We use the number of credits to calculate this.
When you confirm registration, you'll also need to confirm the credits these students will be studying in each academic year. You can use the Credit CoC to tell us about changes to these credit values. You can do this either:
- before you confirm registration
- during the year following registration confirmation
You can create a CoC from the CoC worklist, the Detailed Student Information page or the Create CoC page. For undergraduate students only, you can also create CoCs in bulk by uploading either a csv or xml file. This guide will tell you how to create a CoC from the Create CoC page.
-
- Go to the SIS Home page and select CoC Home.
- This will open the CoC Home menu showing the CoC subareas you can see with your access level.
- Select Create CoC.
- Select Undergraduate from the Level of Funding dropdown.
- Select Credit from the Change of Circumstance category dropdown.
- Select the year you want to apply this CoC to from the Academic Year dropdown.
- Select Next.
- The system will ask you to enter the details of the student this CoC applies to. You can search for the SSN (student support number) to find the student’s details.
- Go to the SIS Home page and select CoC Home.

-
- When you've entered the student’s details, select Next. This will open the Change of Circumstance Details page where you can enter the specific details of the change.

- The credits field will automatically blank. You can use this to enter the correct credits. This should be the number of credits the student will study at your university or college in that academic year.
- If you need to add additional information to this CoC, you must select the checkbox after the line, 'I need to include additional information so this CoC can be accurately processed. I understand that this will cause a delay as the CoC will need to be manually processed.'
- When you've entered the correct credit value, select Next to continue.
If you've not entered a value in the Credits field, you'll get an error message when you try to move on. If this happens, enter the correct value in the Credits field and select Next. - You must now select a contact for the CoC. This will be a registered person at your university or college whom we can contact about this CoC. Use the radio buttons to select the contact, then select Next.
- This will take you to the CoC Summary page. Review the CoC details and select Submit.
CoC csv import
The previous chapters explained how to submit Change of Circumstance notifications (CoCs) manually on SIS.
This works well for individual students and smaller groups. You'll also need to use that method for postgraduate students.
However, if you have many undergraduate students who need CoCs, you may want to submit these in bulk instead.
You can do this by uploading a csv file into SIS. A CoC file import will let you submit CoCs for:
- suspension
- resumption
- withdrawal
- transfer
- repetition
- credit
- fee revision
You must first create a csv file with the relevant CoC information. You can find instructions on how to create the file in the CoC CSV Bulk Upload Technical Specification. If you need a copy of this please email hep_services@slc.co.uk.
The file encoding must be UTF-8, no other variation.
The records of your csv file should be ~ separated for each data item. A file submitted through the CoC Import page must contain a minimum of 1 and a maximum of 1,000 CoCs. There is no limit to the number of files you can submit.
The headers in the file will differ depending on the CoC type you want to import. For example, a file uploading a list of Withdrawal CoCs will need to include the following headers:
- CoC type
- HEI code
- academic year
- SSN/CRN
- SLC course code
- UCAS course code
- actual course year
- other course year
- tuition fee charged
- tuition fee liability
- date of last attendance
- withdrawal reason
For the exact header names, formats and further information please see the CoC CSV Bulk Upload Technical Specification.
- Once you have the csv file ready, go to the SIS Home page and select CoC Home.
- Select Import CoC.

- Select Browse to find the file you want to upload.
- Use the radio buttons to select your username from the list under Contact Details.
- Select Submit to import the file.
You should check your Attendance Worklist to confirm Attendance Codes when a reassessment takes place.
You can find more information on checking for previous attendance confirmations in the attendance confirmation section of this guide.
View CoC import results
After you've uploaded the CoC file and SIS has processed it, it will appear on the CoC CSV Import Results page. You can open this page from the CoC Home menu.
The results page will show the success and failure counts for the records in the file. Any files that have failed to upload properly will have '1' in the Failed Count column.
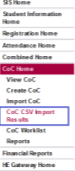
CoC csv import – validation
Initial validation
When you upload your CoC file, our system will perform multiple checks. If a CoC record fails any of these validations, the system will not import it.
There are 2 messages that can appear on the Import CoC page. If you see either of these, you should review the file you're trying to upload.
This file has already been submitted. Please select another file.
You'll get this message if the same file has been uploaded in the last 28 days.
The Student Information Service element does not meet the specified format. Please update the file and resubmit.
You'll get this message if the headers are not in the correct format.
Secondary validation
If the file passes the first round of validation, SIS will import it and run the second round of validation.
If a CoC record fails any of these validations, the system will not save it. The results of this check will appear on the Import Results Summary page.
There are 5 reasons why a file can fail validation at this stage.
The selected file includes forbidden characters (< # \). Please update the file and re-submit.
You'll get this error message if the file includes a forbidden character.
Cannot create the COCs for HEI <<HEI CODE>> using bulk CSV upload. Please review.
You'll get this error message if your university or college does not have permission to create CoCs using the bulk csv process. If you need more information about this, please email hep_services@slc.co.uk.
This record has exceeded the maximum allowable rows for CoC bulk submission. Please review.
You'll get this error message if the file holds more than 1000 records.
Invalid CoC Types in File. Please review.
You'll get this error message if the CoCs in the file are invalid.
Maximum Number of Records Exceeded, Invalid CoC Types in File. Please review.
You'll get this error message if all the records in the file have an invalid CoC type and there are more than 1000 records.
Postgraduate change of circumstances
Most of the Change of Circumstance notifications (CoCs) and status confirmations work the same way for undergraduate and postgraduate students. The main difference is whether you need to pick Undergraduate or Postgraduate from the Level of Funding dropdown when you create the notification. However, you cannot use bulk upload for postgraduate CoCs.
There are also some postgraduate CoCs where the process is different compared to undergraduate CoCs. The information in this chapter will take you through these exceptions.
Postgraduate Provider Transfer CoC
You can create a postgraduate CoC from the Detailed Student Information page or the Create CoC page. This guide will tell you how to do it from the Create CoC page.
- Go to the SIS Home page and select CoC Home.
- This will open the CoC Home menu showing the CoC subareas you can see with your access level.
- Select Create CoC.
- Select Postgraduate from the Level of Funding dropdown.
- Select Provider Transfer from the Change of Circumstance category dropdown.
- Select the year you want to apply this CoC to from the Academic Year dropdown.
- Select Next.
- The system will ask you to enter the details of the student this CoC applies to. You can enter the SSN (student support number). However, as the student is not attending your university or college yet, you must also manually enter their details.
The system will check that the student has an application but is not currently attending your university or college. If this is not true, it will not let you proceed. - You can add up to 20 students to this CoC by selecting the green + icon. You'll be submitting this CoC for all students you add to the list, so you must ensure the change details apply to them all.
- When you've added all student details, select Next. This will open the Change of Circumstance Details page where you can enter the specific details of the change.
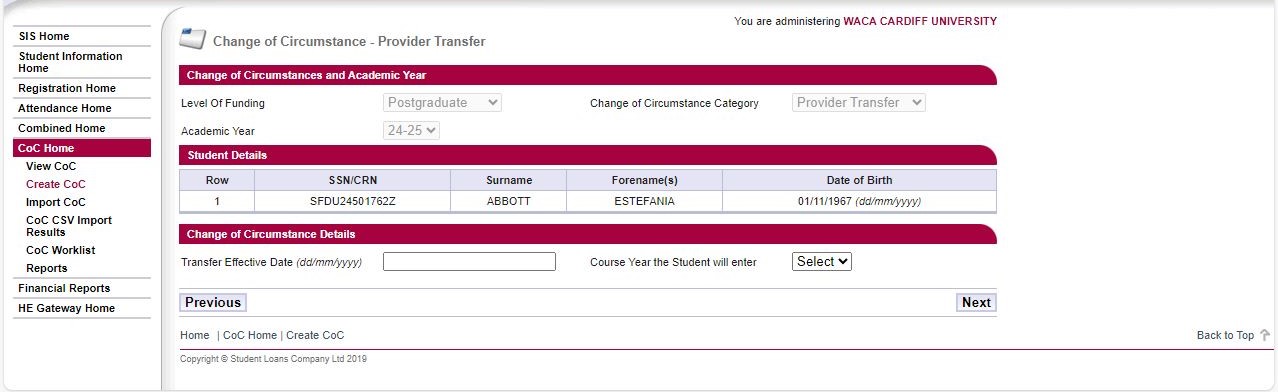
- Enter the Transfer Effective Date. This should be the date when the student transferred to the new course at your university or college.
- Select the correct year from the Course year the student will enter dropdown.
- When you've entered all the details for the CoC, select Next to continue.
- This will take you to the Course Details page where you can search for the correct course.
The only courses the system will show are valid postgraduate master’s or doctoral courses. These come from the Courses Management Service (CMS). Whether you'll see master's or doctoral courses will depend on the student's level of funding.
The results include the course start date and qualification to make it easier to find the correct course.
When you've chosen the correct course details, select Next.
-
You must now select a contact for the CoC. This will be a registered person at your university or college whom we can contact about this CoC. Use the radio buttons to select the contact, then select Next.
-
This will take you to the CoC Summary page. Review the CoC details and select Submit.
Postgraduate Cross Academic Year Transfer CoC
You can use this CoC for postgraduate Student Finance England and Student Finance Wales students. It will let you transfer the student to a course in another year of study. The submission process is very similar to a normal Transfer CoC, except for the addition of the starting academic year.
You should only use this CoC when a student is changing their academic year. You should not use it for a standard course transfer. For these, you should use the Internal Transfer CoC instead.
You can create a postgraduate CoC from the Detailed Student Information page or the Create CoC page. This guide will tell you how to do it from the Create CoC page.
- Go to the SIS Home page and select CoC Home.
- This will open the CoC Home menu showing the CoC subareas you can see with your access level.
- Select Create CoC.
- Select Cross AY Transfer from the Change of Circumstance category dropdown.
- Select the year you want to apply this CoC to from the Academic Year dropdown.
- Select Next.
- The system will ask you to enter the details of the student this CoC applies to. You can search for the SSN (student support number) to find the student’s details.
- You can add up to 20 students to this CoC by selecting the green + icon. You'll be submitting this CoC for all students you add to the list, so you must ensure the change details apply to them all.
- Select Next. This will open the Change of Circumstance Details page where you can enter the specific details of the change.

- Enter the Transfer Effective Date. This is the day, month and year when the student transferred to the new course.
- Select the Course Year the Student Will Enter from the dropdown.
- You can enter further information in the Further Explanation If Required field if you need to. Please leave this blank unless you need to tell us something the other fields do not cover.
- Select Next. This will take you to the Course Details page.

- Enter the SLC course code, course name or UCAS code to search for the student’s course and select Search.
- Select the radio button for the course that matches the one the student is transferring to. When you've chosen the correct course, select Next.
- You must now select a contact for the CoC. This will be a registered person at your university or college whom we can contact about this CoC. Use the radio buttons to select the contact, then select Next.
- This will take you to the CoC Summary page. Review the CoC details and select Submit.
Once you've submitted the CoC and we've processed it, the student’s profile on SIS will update to reflect the new information. Since the student has now transferred to a different academic year, they'll appear on your registration worklist again. You'll need to confirm their registration on the new course to begin payments for that course.
Let's say that you have a student who wants to transfer to a course starting in the next academic year. You can only do this once the new academic year’s course becomes available. This will happen when you've rolled over or newly submitted the new course on the Courses Management Service. This normally happens in March or April for postgraduate courses.
If you're trying to transfer a student to the next academic year before this point, you will not be able to see the dropdown option for the new year. You'll need to submit a Suspension CoC until the new course is available. Once it becomes available, you'll need to submit a Resumption CoC, then submit the Cross Academic Year Transfer CoC.
The following scenario shows an example of Cross Academic Year Transfer CoC.
Scenario 1:
A student starts a two-year postgraduate masters (PGM) course in September 2024 and attends the full year.
At the end of the first year, the student transfers to year one of a new two-year PGM course starting in September 2025.
As they’ve already been paid half of their total entitlement in year one of the initial course, this amount is banked. When the student starts their new course in September 2025, the remaining entitlement (the other half of their total postgraduate masters funding) will be spread across the remaining payment points on the new course after the transfer.
Postgraduate repeated study
Postgraduate students who are repeating learning are not eligible for funding. This chapter will tell you how to avoid payment to students for a period of repeated study.
What is repeated study?
A repeat in learning is when a student needs to retake part of the same course. This usually happens because they have failed modules or need to redo some of their original course.
From academic year (AY) 2025/26, students who switch to a different course will not be repeating learning, even if they join the new course at an earlier point. For example, if a student completes the first two terms of year 1 on one course and then transfers to a new course, starting again at year 1, we will not treat this as repeat study under the new policy.
Suspending payments while not in study
Students may be eligible for financial assistance while they're engaging in learning. However, it is important that they do not receive payments while they're not progressing with learning.
You'll need to use the Suspension CoC to ensure that a student is not paid during a period of repeat learning. This will block the student's payments and will let you use a Resumption CoC later. The Resumption CoC will allow payments to begin after the student has completed the repeat learning.
There are different scenarios where a student can be in repeat study. You'll need to understand and handle each of these in the correct way.
Progressing while repeating learning
Sometimes, a student needs to repeat some learning but can do so without interrupting their original learning programme.
For example, let's say that a student has failed a module and needs to take a few extra classes. They can fit these in alongside their original timetable. While they're repeating some study, they're also undertaking new learning at the same time. They can therefore continue to receive funding as planned.
You will not need to submit a Suspension CoC as the student is eligible to receive payment while engaged in new learning.
Learning not progressing
Let’s look at a student who must repeat a module but cannot do it alongside any new learning. They've already received funding for this module. This means they're not eligible for further funding while repeating it.
You should submit a Suspension CoC to stop the payments over the period of repeat learning. The effective date should be the point when the repeat in learning started.
Once the student finishes the repeat learning or begins new learning again, you should submit a Resumption CoC.
Transferring to a new course with a repeat in learning
From AY 2025/26, students who may need to repeat some study after transferring course or provider, will not be classed as repeating. This means the student remains eligible for funding. You do not need to to suspend funding during any period before they reach a new point of progression.
You will need to submit a Transfer CoC.
We will deduct any entitlement the student has already received on the previous course from the loan for the new course. We will spread their remaining entitlement across the remaining payment points on the new course after the transfer.
Welsh Grant funding
There is an exception in place for students who are receiving Welsh Grant funding.
If these students are repeating learning they've already received funding for, you should use the Suspension CoC as normal.
However, when you submit the Resumption CoC for these students, you should use the suspension date as the effective date.
This will ensure that they do not miss out on grant funding. Any funding they've missed will be paid to them after we process the Resumption CoC.
This is not normal practice for a Resumption CoC and you should only use it for Welsh Grant funded students.
Doctoral repeat in learning
For doctoral courses, it is less clear when repetition of learning is taking place. For example, the student may need to perform a similar test or survey more than once. This would not be classed as a repeat in learning.
You'll need to assess doctoral students individually to see if they're repeating learning.
Payments after resumption
After we've processed a Resumption CoC, the student will be eligible for payments again.
For master’s students, we'll reschedule their outstanding student loan across the remaining payment dates. If the course has finished, we'll make all missed payments to the student on the next payment date.
For doctoral students, we'll make all missed payments to the student on the next payment date.
Doctoral Thesis Submission CoC
You must submit an accurate and timely notification when a doctoral student has changed their thesis submission date.
This chapter will tell you how to submit a Thesis Submission CoC. It will also explain how a change to a thesis submission date may alter the student’s funding.
You can create this CoC manually from the Create CoC page.
- Go to the SIS Home page and select CoC Home.
- This will open the CoC Home menu showing the CoC subareas you can see with your access level.
- Select Create CoC.
- Select Postgraduate from the Level of Funding dropdown.
- Select Thesis Submission from the Change of Circumstance category dropdown.

- Select the year you want to apply this CoC to from the Academic Year dropdown. This CoC is only available from academic year 2019/20 onward.
- Select Next.
- The system will ask you to enter the details of the student this CoC applies to. You can enter the SSN (student support number) to search for the student’s details.
- When you've added the student details, select Next. This will open the Change of Circumstance Details page where you can enter the specific details of the change.

- The system will show the student’s details and the course details.
- Enter the Thesis Submission Date. This is the date you're going to change the student’s thesis submission to. Once you've entered the date, select Next.
The system will not let you enter a date that is after the course end date. You'll need to submit a Transfer CoC to move the student onto a course that finishes later instead.
If you enter a date that is not eligible, you'll get an error message when you select Next.
- If you need to, you can add notes in the Further explanation if required field. Please leave this blank unless you need to tell us something that the other fields do not cover.
- Select Next.
- The system will ask you to select which user at your organisation is submitting this CoC. Use the radio buttons to select your details, then select Next.

- The last page will give you an overview of the information you've entered. Make sure this is correct and select Submit.
Thesis submission date under 3 years or over 8
When you change a student’s thesis submission date, it is important that you talk to the student about how this can affect their funding.
A change to the end date can change the amount a student receives in each payment instalment. After we process the CoC, our system will recalculate the amount paid out to the student. It will distribute the leftover payment equally across the remaining payment dates.
If you move the out the thesis submission date, we'll pay the student over a longer period. This means they could receive a smaller amount in each payment. The opposite is true if you move in the thesis submission date.
To be eligible for doctoral funding, the student's course must be between 3 and 8 academic years in length. A change to their thesis submission date can affect eligibility.
If a student agrees to change the thesis submission date so that the course duration is less than 3 academic years, you should include the decision date in the Further explanation if required field. This is the date when you and the student decided that they're going to submit a thesis in less than 3 years. This will also be the date when funding should stop. Any funding paid to the student after this point will be an overpayment.
If the student is on an 8-year course and wants more time to submit their thesis, you can change their thesis submission date to the course end date. You cannot enter a date later than the course end date. You'll also not be able to transfer them to another course, as our system will not let you create a doctoral course longer than 8 academic years.
Thesis submission after course end date
If a student wants to submit their thesis after their course end date, you'll need to transfer them to a longer course. The new course must begin in the same academic year as their current course.
Example
A student is on a 4-year course beginning in September of academic year 2020/21. Their thesis is due on 31 April 2024.
They now want to submit their thesis on 1 May 2025. This is beyond their course end date.
You'll need to transfer the student onto a course that started in September of academic year 2020/21 but ends after 1 May 2025.
You may need to create a new course to transfer the student onto. See our Courses Management Service user guide to find out more about how to do this.
Postgraduate health suspension
When a postgraduate student
- needs to suspend due to ill health
- and has a loan instalment due within 60 days of the suspension date
you should wait 60 days to submit the CoC.
The effective date should be the same as the submission date.
This is to make sure the student receives support for 60 days after the suspension.
If the instalment is already paid and covers that period, submit the CoC immediately without postdating.
Postgraduate resumption after suspension
Let's look at a scenario where a student is on a 2-year part-time course that started in academic year 2020/21. The student suspended in 2021/22 and has now resumed in academic year 2022/23.
The student can no longer meet the original completion date and this will now extend into a future academic year. As there is no SIS record for academic year 2022/23, the resumption will apply to academic year 2021/22. The application will not roll over to academic year 2022/23.
You can create a CoC from the CoC worklist, the Detailed Student Information page, or the Create CoC page. This guide will tell you how to do it from the Create CoC page.
- Go to the SIS Home page and select CoC Home.
- This will open the CoC Home menu showing the CoC subareas you can see with your access level.
- Select Create CoC.
- Select Postgraduate from the Level Of Funding dropdown.
- Select Resumption from the Change of Circumstance category dropdown.
- Select the year you want to apply this CoC to from the Academic Year dropdown.
- Select Next. The system will ask you to enter the details of the student this CoC applies to. You can search for the SSN (student support number) to find the student’s details.
- When you've entered the student’s details, select Next. This will open the Change of Circumstance Details page where you can enter the specific details of the change.
- Select the Year of Course the Student is Entering. This is upon the student’s return.
- Enter the Date Student is Resuming Study. A Resumption CoC cannot be dated in the future, so this date must be today or earlier.
- Enter the Course End Date. You should update this if the course end date is now later than the original graduation date.
- If you need to add a note to the CoC, you can use the Further explanation if required field. You can add any additional information that is essential for us to process the CoC correctly.
- When you've entered all the details for the CoC, select Next to continue.
- You must now select a contact for the CoC. This will be a registered person at your university or college whom we can contact about this CoC. Use the radio buttons to select the contact, then select Next.
- This will take you to the CoC Summary page. Review the CoC details and select Submit.
Any remaining payments to the student will be made once we've processed the resumption.
For master’s students, we'll reschedule their outstanding student loan across the remaining payment dates. If the course has finished, we'll make all missed payments to the student on the next payment date.
For doctoral students, we'll make all missed payments to the student on the next payment date.
CoC due to Ukrainian conflict
If a student has to be withdrawn or suspended due to the ongoing Ukrainian conflict, you should create a Suspension CoC or Withdrawal CoC. It is important that you include information in the Further Explanation If Required field. Please mention that this is the reason for the withdrawal or suspension. This will enable our manual intervention process and a senior assessor will review the case.
Suspensions
We'll reassess the student and change their entitlement to match the maintenance payment they've already received. We'll also change their status for repayment to Income Contingent Repayment. This means we will not contact the student for overpayments.
Withdrawals
We'll reassess the student and change their entitlement to match the maintenance payment they've already received. We'll also change their status for repayment to Income Contingent Repayment. This means we will not contact the student for overpayments.
CoC worklist
Like the registration, attendance and combined worklists, the CoC worklist will provide you with a list of actions needed. We base this on the attendance code you've submitted.
The CoC Worklist page has tabs for Course Search and Student Search. The page defaults to the Course Search tab.
Once you've entered your search filters, select either Filter & Display Results to display the results on screen or Filter & Export Results to download a file with the results.
CoC worklist - Course Search
The following options are available on the Course Search tab.
Academic year
This defaults to the current academic year and is the only mandatory field you need to run a search.
Mode of Study
The dropdown options are Full Time or Part Time.
Customer Reference Number / SSN
These are unique student identifiers.
Date of Birth
The date format is dd/mm/yyyy.
Forename(s)/Surname
You can use a wildcard search for these fields. For this, you must enter at least 3 characters along with the wildcard symbol (%). If you use one of these fields, you must also use the other.
CoC Created Between
The date format is dd/mm/yyyy. You can use this field if you’re looking for CoCs created during a specific period.
Current Year Start Date From/To
This field lets you filter on the current year start date of part-time students. You cannot use it if you set the Mode of Study field to Full Time.
Number of Records to Display
The number of search results per page. The default is 25, but you can change it to 50, 100 or 200.

CoC worklist - search results
Once you have your results, each account will display a green arrow next to the Created Date Time column. You can use this to create a CoC.
You should submit the relevant CoC based on the attendance code, using the Change of Circumstance Category dropdown.
CoC submission report
You'll need HEI CoC advisor access to view this report.
- Go to the SIS Home page and select CoC Home.
- From the submenu, select Reports.
- Select CoC Submission Report.
The report shows a pie chart of your CoC submissions for a specific academic year. A colour key appears under the pie chart. The report also shows the same information in a table.
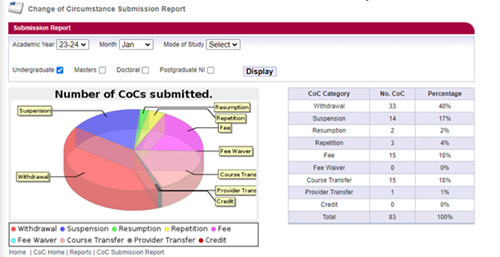
The report will cover the specific chosen academic year and the level or mode of study if there have been any CoCs submitted for students for that academic year.
Please be aware that any submissions submitted at a later date for a previous academic year, will show in their respective years regardless of when it was submitted.
For example, a CoC submitted during academic year 2023/24 for a record relating to the previous 2022/23 academic year, will be included within the 22-23 filter.
Financial reporting
Financial reporting
You can view financial reports in SIS to see payments made to your university or college. You can also see scheduled future payments and other financial information.
All the financial reports are in read-only format. You need SIS Report Advisor access to view them.
To see the reports, go to the SIS Home page and select Financial Reports from the menu.

Tuition fee balance report
You'll need SIS Report Advisor access to view this report.
- Go to the SIS Home page and select Financial Reports.
- From the Financial Reports submenu, select Tuition Fee Balance Report.
The data in this report includes students whose:
- attendance has been confirmed
- tuition fee payment has been scheduled or paid
Our customer accounting system will create the data once a week on Wednesday night. Once it has created the data, it will send it to SIS.
The report shows a pie chart of your tuition fee breakdown, summary and overpayments for a specific academic year. A colour key appears under the pie chart. The report also shows the same information in a table.

The report will cover the current academic year if there have been any tuition fees for that period.
If data is not available for the academic year, you'll get a message saying, ‘No tuition fee details are available for the selected academic year’.
You can view the report for a different academic year, or for specific students only. The filter options appear above the report:
- academic year
- mode of study
- course level
Tuition Fee Summary
The Tuition Fee Summary table shows:
- the total value of tuition fees we expect to pay you for students expected to attend for the selected academic year
- the total number of expected students in the academic year selected who have applied for a tuition fee loan
- the total number of students associated with temporary courses for the latest report date
Tuition Fee Breakdown
The Tuition Fee Breakdown table shows the breakdown of Total Value of Fees Expected to be Paid. It includes categories with calculated values and percentages:
Student Attendance Not Confirmed
The amount of fees for any student not yet confirmed by SIS to our customer accounting system where the attendance indicator is 'Y', the latest attendance status is ‘A’ and the student account is not blocked.
Student Attendance Confirmed (Payments Scheduled)
The amount of fees scheduled, but not yet paid, where the latest attendance status is ‘A’ and the student account is not blocked.
Students Awaiting Reassessment
The amount of fees for any student awaiting reassessment by HEP (excluding any blocked students) where the confirmation status is ‘C’ (course details mismatch) or ‘F’ student in attendance but HEP disagrees with the fee)
Blocked Fee Payments
The amount of fees for a student with a blocked account. Reasons for blocked accounts could fall into these categories:
- deceased
- account disabled (not active)
- Invalid bank details
- ‘suspect flag’ on their account
Fees Paid
The total amount of fees paid so far where we've noted the payment as paid, resubmitted or failed.
The totals of these amounts appear at the bottom of the table.
Overpayments
The Overpayments table includes a row for each academic year when we've made a payment to you. It will be recognised by a Change of Circumstance if the value of payment is greater than the student’s entitlement.
The footer of the table will include the message, ‘Overpayment of £X will be deducted from the payment amount scheduled above’. Here, X is the sum of your recovery amounts for all academic years.
Tuition fee forecast report
You'll need SIS Report Advisor access to view this report.
- Go to the SIS Home page and select Financial Reports.
- From the Financial Reports submenu, select Tuition Fee Forecast Report.
- Select the Academic Year.
- Select the Mode of Study to filter on FT (full-time) or PT (part-time). You can also leave this as All to see the report for all students.
- Select Display to view the report.
The report is populated 40 days before the start of term. It shows details of your scheduled tuition fee payments from academic year 2012/13 onward. The report is for information only and you cannot export it.
The data in the report is derived at the point when:
- you've confirmed your students’ attendance in SIS
- we've scheduled the tuition fee payments
Our customer accounting system will create the data once a week on Wednesday morning. Once it has created the data, it will send it to SIS.

Payment Forecast Summary
This section of the report shows the number of students and corresponding tuition fee amounts for each instalment of each academic year quarter.
It will also show the total amount of tuition fees to be paid to you for the academic year you've selected.
Students you’ve confirmed Not Registered are included in the Number of Students Unconfirmed and Value of Students Unconfirmed sections of the report.
If student fees are blocked, for example due to invalid or missing National Insurance numbers or bank details, payments are excluded from the report until they're resolved and become unblocked.
Report Fields
Academic Year Quarter – The seasonal intake.
Liability Period – The instalment period.
Number of Students Unconfirmed – The number of students with outstanding attendance confirmations.
Value of Students Unconfirmed – The amount of tuition fee loan due, if you submit the attendance confirmations.
No of Students Confirmed (Fee Paying) – The number of students approved and in attendance (with attendance code 'A' or 'L').
Value of Students Confirmed (Fee Paying) – The amount of tuition fee loan payable.
No of Students Confirmed (Non-Fee Paying) – The number of students with an approved application but not considered in attendance for fee releasing due to the submission of attendance code 'C','F','N','X', or 'D'.
Value of Students Confirmed (Non-Fee Paying) – The amount of tuition fee loan unpaid due to the submission of an attendance code 'C','F','N','X', or 'D'.
No of Students Paid – The number of students with an ‘A’ or ‘L’ attendance code who’ve been paid.
Value of Students Paid – The amount of tuition fee loan paid.
No of Students with Interim Payments – The total number of approved interim payments (attendance code not in 'B','F','E','C','P').
Value of Students with Interim Payments – The amount of tuition fee loan paid.
Tuition fee remittance report
You'll need SIS Report Advisor access to view this report.
You'll be able to view the remittance report for all products each Thursday, once generated.
- Go to the SIS Home page and select Financial Reports.
- From the Financial Reports submenu, select Remittance Report.
- Select the Month Created and Year Created.
- Select the Academic Year. The report defaults to the current academic year, you can go back 6 academic years.
If you choose Select from the dropdown, the system will show you the list of reports from all the academic years created in that month. - Select Display.
- This will open the Remittance Report List that shows all reports that match your filter criteria.

The list splits each report by:
- report date
- support type (full-time or part-time)
- payment type (Tuition Fee Loan or Tuition Fee Grant)

The report date acts as a link that will take you to the relevant remittance report.

The remittance report is split into a summary block and a student table.
The summary block at the top of the page shows:
- the number of tuition fee payments
- payment date
- payment type
- total fee amount for the reporting period
The student table lists all the student details that make up the tuition fee payment total for the report. You can sort the columns of the report in ascending or descending order by selecting the column header.
On the Remittance Report page, select Back to return to the Remittance Report List page.
Column headers
Course Start Period
When the course started: autumn, winter, spring or summer.
SSN
The Student Support Number. This is also a link to the Detailed Student Information page.
Student Surname/Forename
The student’s last and first name.
DoB
The student’s date of birth.
Student UCAS Number
The unique identifier UCAS gives to the student.
Course Code
The SLC course code.
Course Name
The name of the course.
Year of Course
The year of the course that the student is on.
Fee Amount
The amount of tuition fees which have been paid to your college or university.
Revision Indicator
This indicator shows whether the payment relates to a revision of tuition fee amounts.
Exporting the remittance report
You can export the remittance report if you need to. It will have a header row and then a detail record for each student in the report.
- On the Remittance Report page, select Export.
- The system will ask if you want to Cancel, Save or Open the file.
- Select Open to view the file without saving it first. Select Save to save the file to your own computer or network drive.
The default filename will be:
<heiCode>_<AY>_<supportType>_<paymentType>_<processingDate>_remittance.dat
You can overtype this with something else if you want. There is no restriction on the number of exports you can make.
Blocked maintenance payments report
You'll need SIS Report Advisor access to view this report. It shows:
- details of students whose maintenance loan or grant payments are blocked from academic year 2012/13 onward
- the reason why the payments have been blocked
This report is for information only and you cannot export it. The data comes from blocked payments in our internal customer accounting system. It is created once a week on Sunday night.
You can use this information to contact students and ask them to provide the missing details.
We will not make any payments until the student provides the missing information and you update the student’s record on SIS.
- Go to the SIS Home page and select Financial Reports.
- From the Financial Reports submenu, select Students with Blocked Maintenance Payments.
- Select the Academic Year. You can go as far back as 2012/13.
- Select Display Results to see the list of students with blocked payments. Select Clear Filter and Results if you want to clear your search.

The Maintenance Non Payment Summary section will show the number of students who have a positive registration confirmation, but whose maintenance payments have not been made for the following reasons:
- invalid or missing National Insurance number
- invalid or missing bank details
- other blocked payments (for example, the customer is deceased, the account has been flagged as suspect or an emergency stop payment notification has been actioned)
- other failed payments (for example, an account blocked for fraud)
The page also includes a Details of Other Blocked Payments section. When you select a non-payment reason hyperlink, the system will list all the students who fall into that category. You'll see the following fields:
- Student Support Number (SSN)
- full name
- date registration confirmed
If we do not have any data for the academic year you select, you'll get a message saying, 'No maintenance payments are blocked for the selected academic year'.
Outstanding online declaration report
This report lists students who have applied online for student finance but have not yet returned a signed declaration form. The report is available for each academic year, but only from academic year 2012/13 onward.
Our application and assessment system continuously updates the data and sends it to SIS. Applications are added to and removed from the report as their status changes to or from Approved Awaiting Signature.
Those at parent higher education providers will be able to view details of any associated child providers. Child providers cannot view parent provider details.
- Go to the SIS Home page and select Financial Reports.
- From the Financial Reports submenu, select Outstanding Online Declaration Report.
- Select the Academic Year. You can go as far back as 2012/13.
- Select Display to see the list of students with outstanding online declarations.

The report details the student’s:
- Student Support Number (SSN)
- full name
- course name
- SLC code
- course year
Select Export Report to export the data.
You can use the file export to contact students from your own systems and encourage them to return their signed declaration form. If they do not return this, you cannot confirm their attendance and we cannot make maintenance or tuition fee payments.
Negative balance report
You’ll need SIS Report Advisor access to view this report.
The negative balance report shows all accounts where an A attendance code has been confirmed against a payment or recovery. It will also show any payments you're due from us, that are not enough to cover the offset amount of recoveries owed back to us. Instead of receiving payment for a student’s tuition fees, the report will show how this payment is reducing your negative balance.
Negative balance reports are for information only and confirm that there are no outstanding actions you need to take. A negative balance report will only be available if you owe more than you're due to be paid. If you no longer have a negative balance, the report will not be available and the 'Negative balance report is not available' notification will appear.
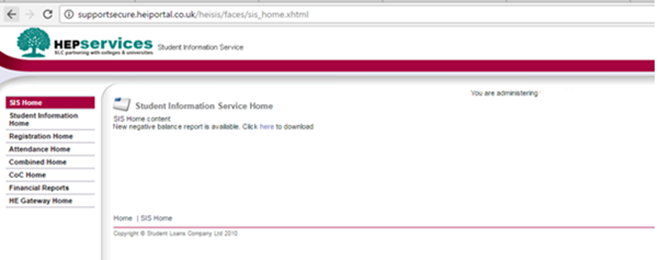
- Go to the SIS Home page and select Financial Reports.
- From the Financial Reports submenu, select Negative Balance Report.
- If you have one available, you'll get a message saying, 'Click here to download negative balance report'.
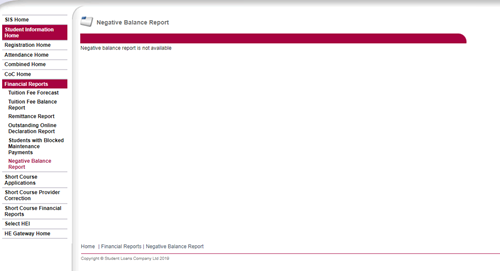
The report has the following fields:
- HEI code
- academic year
- support type (part-time or full-time)
- product type (Tuition Fee Loan or Tuition Fee Grant)
- Student Support Number (SSN)
- paid amount
- scheduled payment date
- customer name
You will receive a new Negative Balance Report notification on the SIS Home page with an option to download the report. This notification will only appear if a new negative report for the current week has not already been downloaded. The message will not appear the next time you sign in.
Data retention
Targeted bulk erasure of data
To comply with the Data Protection Act 2018, we delete some information from our systems that we no longer have reason to keep.
This currently includes deleting applications and customer information where:
- no payment has ever been made
- agreed retention triggers and periods have passed
Once the retention period is over, these applications are removed from the system.
There are some exceptions where we'll keep the data for longer, such as cases of fraud.
Retention triggers and periods
Undergraduate loans and grants (excluding DSAs) and Northern Irish Postgraduate Master's and Doctoral Loans
| Application approved? | Retention trigger | Retention period |
| No | 12 months from the start date of the academic year | 6 months |
| No (ineligible) | 12 months from the start date of the academic year | 6 months |
| Yes | 24 months from the start date of the academic year and no payment made | 12 months |
Undergraduate and postgraduate DSAs
| Application approved? | Retention trigger | Retention period |
| No | 12 months from the start date of the last year of the course | 6 months |
| No (ineligible) | 12 months from the start date of the academic year | 12 months |
| Yes | 12 months from the start date of the last year of the course and no payment made | 12 months |
Student Finance England and Student Finance Wales Postgraduate Master's and Doctoral Loans
| Application approved? | Retention trigger | Retention period |
| No | 12 months from the start date of the last year of the course | 6 months |
| No (ineligible) | 12 months from the start date of the academic year | 12 months |
| Yes | 12 months from the start date of the last year of the course and no payment made | 12 months |
Higher Education Short Courses
Higher Education Short Courses
The Higher Education Short Courses trial will run from 1 September 2022 until 31 August 2025. To participate in the trial, providers had to submit proposals as part of the Office for Students (OfS) Challenge Competition. To be eligible, providers needed to be based in England and be registered with OfS.
22 providers were successful in their bids. These providers can now offer courses funded by the Short Course Tuition Fee Loan for the duration of the trial period. Courses can last up to 12 months within this period and must finish on or before 31 August 2025.
If you're participating in the trial, you can use SIS to manage short course applications that are approved or approved but awaiting signature. You can:
- view short course application details
- confirm student attendance after the student has been on the short course for 14 days to release the tuition fee payment to you
- submit Change of Circumstance (CoC) and Correction notifications
SIS access and user roles
We’ve added a new Short Courses tab to the Maintain Contacts section on the HE Gateway. Your Short Course Administrator can use this to add and edit other short course users. All short course user roles have new titles, prefixed with HEP SC:
- HEP SC User Administrator
- HEP SC Advisor
- HEP SC Attendance Administrator
- HEP SC CoC Administrator
- HEP SC Report Advisor
You can also add short course roles to existing user profiles. This lets your users sign in with the same username and password to manage both short courses and other services.
There is more information about adding users in the HE Gateway user guide.
SIS Home page
The SIS Home page is the first page you'll see after you select SIS Home from the HE Gateway homepage. All SIS users will be able to see this page, but the menu tabs depend on your user role. Your Short Course Administrator can update your access if needed.
You can use the following short course functions on this page:
- Short Course Applications lets you search by course or student
- Short Course Provider Correction lets you tell us about a change of provider
- Short Course Financial Reports lets you see a variety of financial reports for your university or college
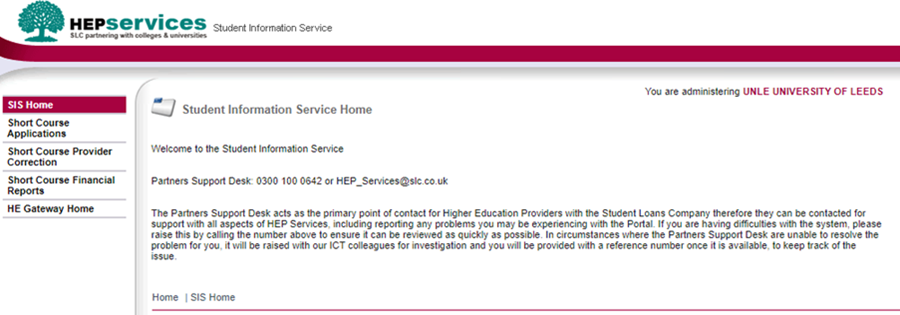
View student information
From the SIS Home page select Short Course Applications. This will open the student information filter.
There are 2 different searches you can use here to find student information:
- application search
- course search
Application search worklist filters
You may have already entered some information into the application search to find a specific student or set of students. For example, you might have selected Awaiting Reassessment from the Current Attendance Status dropdown. There are 3 radio buttons you can use to filter the search results further.
You can also use these to quickly reach a specific data set. For example, if you want to search for all students with outstanding attendance confirmations, leave all other application search fields empty. Select the Limit results to Outstanding Attendance Confirmations radio button and then select either the Display Results or Export Results button.
The radio button options are:
Do not limit results
This does not apply any filtering to the data set.
Limit results to Outstanding Attendance Confirmations
Use this to find students whose attendance code you’ve not submitted yet.
Limit results to Outstanding CoCs/Corrections
Use this to find students for whom you’ve submitted a C or F attendance code, but not an associated Change of Circumstance or Correction.
Options available on all tabs
Clear Search and Results
This clears all fields and reverts to the initial view. If you have any search results open, these will also be removed.
Display Results
This searches all student details on the system, retrieves those that match your search criteria and displays them on screen.
Export Results
This lets you save the search results in an export file.

Options available under Course Search
Course Name
You can enter up to 41 characters and can use a wildcard search. For this, you must enter at least 3 characters along with the wildcard symbol (%).
Short Course Code
The unique course identifier.
Course Start Date
The date format is dd/mm/yyyy.
Academic Year
This defaults to the current academic year. You can search either by academic year or course start date, or neither, but not both.
Options available under Application Search
SSN/CRN
Student Support Number and Customer Reference Number – these are unique student identifiers.
Forename and Surname
You can use a wildcard search for these fields. For this, you must enter at least 3 characters along with the wildcard symbol (%). If you use one of these fields, you must also use the other.
Date of Birth
The format for the date of birth is dd/mm/yyyy.
Current Attendance Status
The current attendance status of the student.
Current Attendance Code
The attendance code you have saved for the student.
Current CoC/Correction Type
Use this dropdown to select the type of CoC or Correction you want to search for, such as Fee, Attendance, Course, Provider.
Current CoC/Correction Status
Use this dropdown to select the status of CoC or Correction you want to search for, such as Submitted, Completed, Sent for Manual.
Application search results
Once you've entered your search criteria, select Display Results to show the results on the page or Export Results to export the results as a CSV file.
If you sign in as a parent higher education provider (HEP), the search will return the details of students at your university or college and any associated child HEPs. If you're signed in as a child HEP, the system will return the details of students at your university or college only.
The results are displayed by surname. However, the header row will let you sort and reorder the results by selecting a column heading.
The Attendance Code field will be blank if the attendance confirmation window is not open. It'll also be blank if the window is open but you've not submitted an attendance confirmation code.
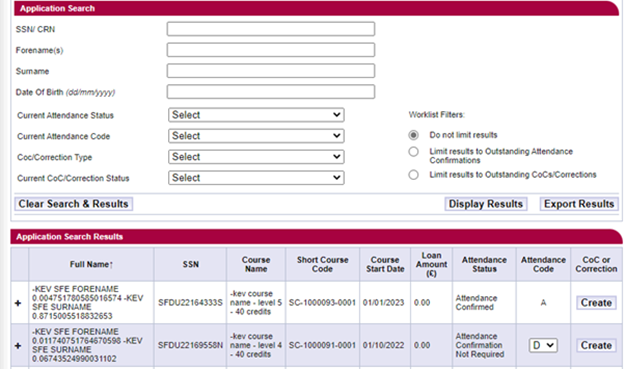
Select the + icon in the first column to expand the student record. This will give you a more detailed view of the student’s details.
Attendance confirmations
You must use the Student Information Service (SIS) to confirm attendance after the student has been on the course for 14 days. Submitting an attendance confirmation will release the tuition fee payment to your university.
You only need to confirm attendance once for each Short Course Tuition Fee Loan. We’ll then pay 100% of the tuition fee in one instalment. This will happen on a Wednesday by BACS payment. To ensure that we can pay you on the Wednesday, you should confirm attendance on SIS by Thursday the week before.
We can only make payment of the Short Course Tuition Fee Loan once you’ve made a valid confirmation of attendance for the student. Only students who have applied for a Short Course Tuition Fee Loan will appear on SIS.
Go to the Student Information Home menu and select Short Course Applications. This will open the student information filter.
A message will appear at the top of the screen under the Outstanding Attendance Confirmations heading to say if you have any outstanding attendance confirmations for any academic years. If there are none outstanding, the message will say, ‘There are no attendance confirmations outstanding’.
You can use the Course Search, Application Search or Worklist Filters on the page to find a specific group of students for attendance confirmation.
Attendance code definitions
You can use the following attendance codes on SIS
|
Code |
Definition |
| A |
In attendance - the course and fee information are correct. Also after reassessment - Course and fee information amended correctly. |
|
C |
Course mismatch – you should raise a Change of Circumstance notification (correction). |
| F |
In attendance but you disagree with the fee – you should raise a Change of Circumstance notification (CoC). |
|
D |
Submit this code to tell us the student has never attended your university or college. Submitting a D code will remove the student’s support entitlement. |
Confirming attendance
Select Display Results to see the application search results.
You can use the + and - icons in the left-hand column to expand and collapse detailed application information. There is also a Create button under the CoC and Correction column. You can use these to raise a CoC or Correction.
If you have not submitted attendance for a student, the Attendance Code column will have a dropdown with no code showing.
If you’ve already submitted an A or D code, these will be locked and non-editable. However, if you’ve entered a C or F, the dropdown remains enabled.
If you’ve already confirmed attendance but further action is needed, the row will be highlighted in yellow. This means you’ll need to submit an associated CoC or Correction. Once you’ve submitted this, the yellow highlight will disappear.
To confirm attendance, select the appropriate code for each student from the dropdown under the Attendance Code column.
Once you’ve completed this for all students you want to confirm attendance for, scroll to the bottom of the page and select Submit Attendance.
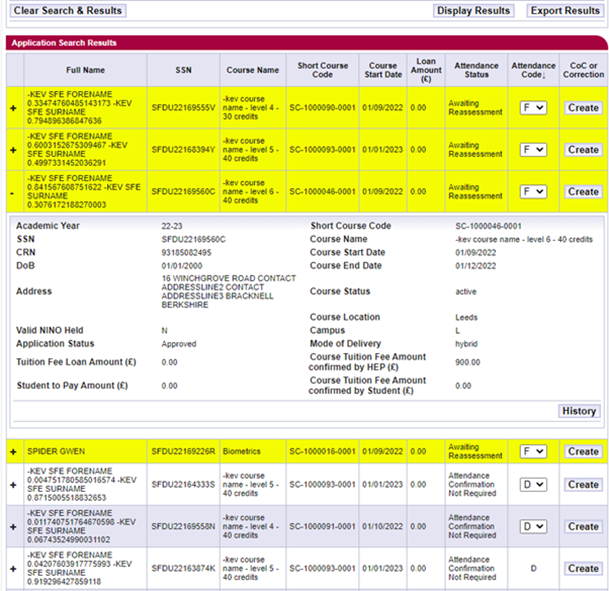
Change of Circumstance and Correction notifications
If the information on SIS is not correct you must submit a Change of Circumstance (CoC) or Correction notification as soon as possible. This lets us know what changes are needed.
You must have HEP SC CoC Administrator access to SIS to create CoCs or Corrections. If you need this added to your account, contact the User Administrator at your university or college.
The next chapters will take you through the types of CoCs and corrections, and how to submit them.
Our service level for CoC and Correction processing is 20 days in off-peak periods. During peak periods (from August to the end of November) it is 30 working days.
Create a course correction
If SIS shows the wrong course for a student you should use a course correction. When you create a course correction, the system will fill in the academic year, current course details, student details and mode of delivery. These fields will be greyed out and you cannot edit them.
- Go to the SIS Home page and select Short Course Applications.

- Use Course Search to bring up a list of students on a course. You can also use the Application Search to find a specific student.
- Enter your search criteria, then select Display Results.
- From the Application Search Results section, select the Create button next to the relevant student. This will open the Change of Circumstance or Correction page.
- Select Course Correction from the Change Type dropdown.
- Use the Short Course Code or Short Course Name to find the course the student is on. If you get more than one search result, use the radio buttons to select the correct course.
- Enter the Correction Effective Date for the correct course. The system will not let you submit a correction with an effective date more than 14 days from the start of the course.
- Enter the New Course Tuition Fee Amount and New Student Tuition Fee Liability.
- If you need to add additional information to this correction, you must select the checkbox after the line saying, ‘I need to include additional information so this CoC can be accurately processed. I understand that this will cause a delay as the CoC will need to be manually processed.’
- You must select a contact for the correction. This will be a registered person at your university or college whom we can contact about this CoC.
- Once you’ve entered all the information, select Submit.

- We’ll then reassess the student. After reassessment, the student will reappear in the Application Search Results section as an Outstanding Attendance Confirmation. You’ll then need to submit an A code to confirm the adjustment, or another code if it applies to the student’s circumstances.
Create a provider correction
If SIS shows the wrong university or college for a student you should use a provider correction.
- Select the Short Course Provider Correction link from the main menu.
- If the student already has an application at your university or college, you only need their Student Support Number (SSN) to find them.
- If the student has no application at your university or college, you’ll need their:
-Student Support Number (SSN)
-surname
-forename
-date of birth - Once you’ve found the student, enter the Previous Short Course Code.
- Next, enter the details of the course the student will attend. Search on the Correct Course Code or Correct Course Name to find it. If you get more than one search result, use the radio buttons to select the correct course.
- Enter the Correction Effective Date for the correct course.
- Enter the correct New Course Tuition Fee Amount. This is the full fee amount for the academic year you selected.
- Enter the correct New Course Tuition Fee Liability. This is the amount the student is liable for. For us to process the CoC automatically, the fee liability and fee amount fields must match.
- You must select a contact for the CoC. This will be a registered person at your university or college whom we can contact about this CoC if we need to.
- Once you’ve entered all the information, select Submit.
- We’ll then reassess the student. After reassessment, the student will reappear in the Application Search Results section under Outstanding Attendance Confirmations . You’ll then need to submit an A code to confirm the adjustment, or another code if it applies to the student’s circumstances.

Create an attendance correction
You should create an attendance correction if you’ve confirmed in error that a student is in attendance or has never attended.
When you create an attendance correction, the system automatically completes in the academic year, student details, course details, and change details. These fields will be greyed out and you cannot edit them.
If you originally marked the student as in attendance, with an A code in the Attendance Confirmation column, the attendance correction will automatically change this to D, for never attended.
If you originally marked the student as never attended, with a D code in the Attendance Confirmation column, the attendance correction will automatically change this to A, for in attendance.
To create an attendance correction.
- Go to the SIS Home page and select Short Course Applications.
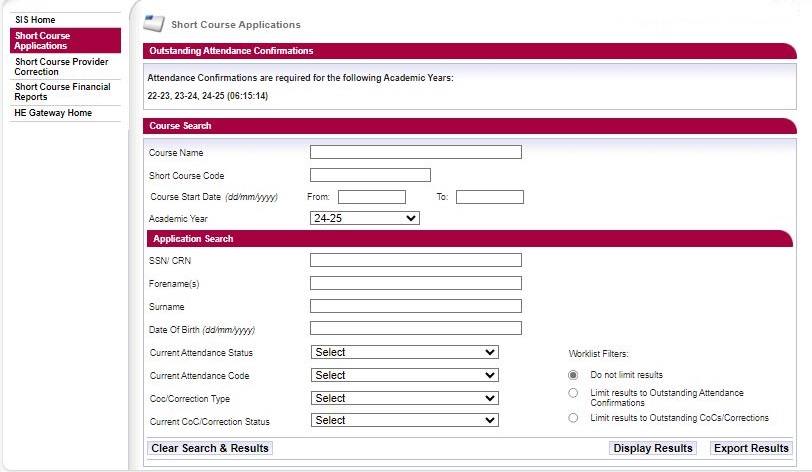
- Use the Course Search to bring up a list of students on the course. You can also use the Application Search to find a specific student.
- Enter your search criteria, then select Display Results.
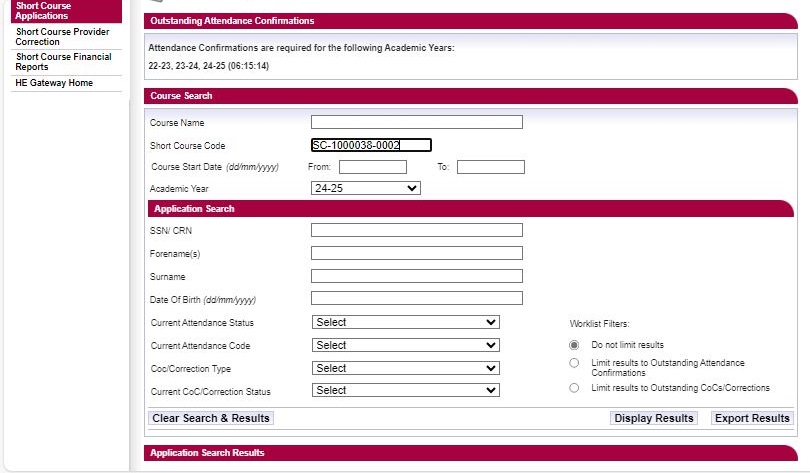
- From the Application Search Results page select the Create button for the relevant student. This will open the Change of Circumstance or Correction page.
- Select Attendance Correction from the Change Type dropdown menu.
- You must select a contact for the correction. This will be a registered person at your university or college whom we can contact about this CoC.
- Once you’ve entered all the information, select Submit.
- We’ll then reassess the student. Following reassessment, the student will reappear in the Outstanding Attendance Confirmations list. You’ll need to submit an A code to confirm the adjustment.
Create a Fee CoC
You should only use a Fee CoC when a student’s fee amount is wrong.
- Go to the SIS Home page and select Short Course Applications.
- Use the Course Search to bring up a list of students on the course. You can also use the Application Search to find a specific student.
- Enter your search criteria, then select Display Results.
- From the Application Search Results page select the Create button for the relevant student. This will open the Change of Circumstance or Correction page.
- Select Fee CoC from the Change Type dropdown. The system will complete the academic year, course details, student details, and mode of delivery. These fields will be greyed out and you cannot edit them. You can edit the fee and contact details.
- Enter the correct New Course Tuition Fee Amount. This is the full fee amount for the academic year you selected.
- Enter the correct New Course Tuition Fee Liability. This is the amount the student is liable for. For us to process the CoC automatically, the fee liability and fee amount fields must match.
- If you need to add additional information to this correction, you must select the checkbox after the line saying, ‘I need to include additional information so this CoC can be accurately processed. I understand that this will cause a delay as the CoC will need to be manually processed.’
- You must select a contact for the CoC. This will be a registered person at your university or college whom we can contact about this CoC.
- Once you’ve entered all the information, select Submit.
- We’ll then reassess the student. After reassessment, the student will reappear in the Application Search Results section as an Outstanding Attendance Confirmation. You’ll then need to submit an A code to confirm the adjustment, or another code if it applies to the student’s circumstances.

Create a Deceased CoC
Create a Deceased CoC
You should create a Deceased CoC when a student dies during their course.
- Go to the SIS Home page and select Short Course Applications.
- Use the Course Search to bring up a list of students on the course. You can also use the Application Search to find a specific student.
- Enter your search criteria, then select Display Results.
- From the Application Search Results page select the Create button next to the relevant student. This will open the Change of Circumstance or Correction
- Select Deceased from the Change Type dropdown.
- The system will automatically complete the academic year, student details, course details, and fee details. These fields will be greyed out and you cannot edit them. You can edit the Date of Last Attendance and contact details.
- The Date of Last Attendance must be after the course start date. It should mark the point from which the student is no longer in ongoing and active engagement with the course.
- You must select a contact for the correction. This will be a registered person at your university or college whom we can contact about this CoC.
- Once you’ve entered all the information, select Submit.
- We’ll begin the process of closing the account.

Financial reports
You can view financial reports in SIS to see payments made to your university or college. You can also see scheduled future payments and other financial information.
All the financial reports are in read-only format. You need HEP SC Report Advisor access to view them.
To see the reports, go to the SIS Home page and select Short Course Financial Reports from the menu.
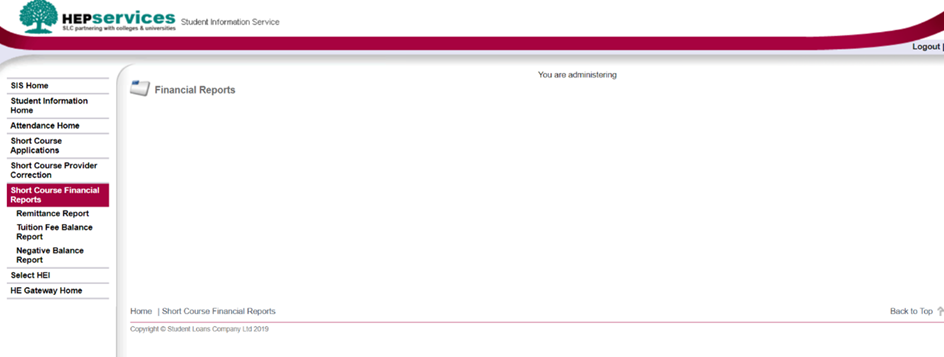
Tuition fee balance report
You'll need HEP SC Report Advisor access to view this report.
- Go to the SIS Home page and select Short Course Financial Reports.
- From the Short Course Financial Reports submenu, select Tuition Fee Balance Report.
The data in this report includes students whose:
- attendance has been confirmed
- tuition fee payment has been scheduled or paid
Our customer accounting system will create the data once a week on Wednesday night. Once the system has created the data, it will send it to SIS.
The report shows a pie chart of your tuition fee breakdown and summary. It will also show overpayments for a specific academic year if you have any. A colour key appears on the same page as the pie chart. The report also shows the same information in a table.

The report will cover the current academic year if there have been any tuition fees for that period.
If data is not available for the academic year, you'll get a message saying, 'No tuition fee details are available for the selected academic year'.
Tuition Fee Summary
The Tuition Fee Summary table shows:
- the total value of tuition fees we expect to pay you for the selected academic year
- the total number of expected students
Tuition Fee Breakdown
The Tuition Fee Breakdown table shows the breakdown of Total Value of Fees Expected to be Paid. It includes categories with calculated values and percentages:
- student attendance not confirmed
- student attendance confirmed (payments scheduled)
- students awaiting reassessment
- blocked fee payments
- fees paid
The totals of these amounts are on the same page with the table.
Overpayments
The overpayments table will only be available if you have an overpayment.
It includes a row for each academic year when we've made an overpayment to you. It also includes the value of the overpayments.
The footer of the table will include the message, 'Overpayment of £X will be deducted from the payment amount scheduled above'. Here, X is the sum of your recovery amounts for all academic years.
Tuition fee remittance report
You'll need HEP SC Report Advisor access to view this report.
- Go to the SIS Home page and select Short Course Financial Reports.
- From the Short Course Financial Reports submenu, select Remittance Report.
- Select dates in the Payments From and Payments To fields.
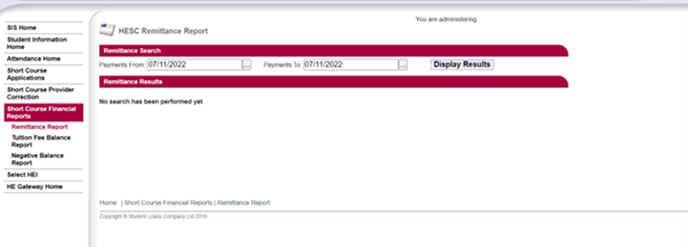
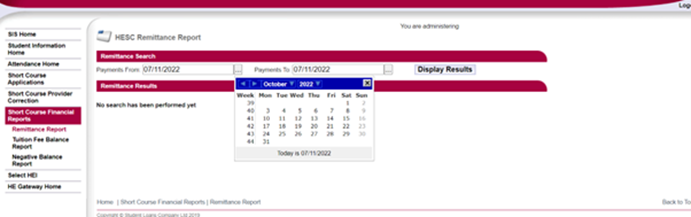
- Select Display Results.
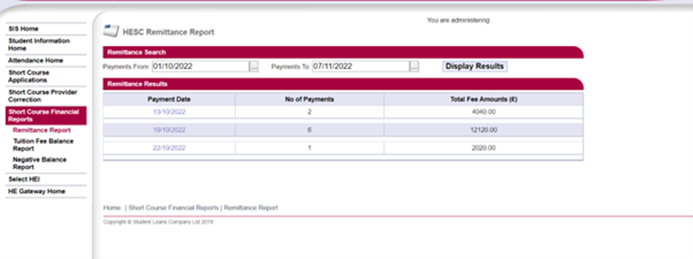
This will open the Remittance Results that show all reports that match your filter criteria.
The results split each report by:
- payment date
- number of payments
- total fee amounts (£)
The payment date acts as a link that will take you to the relevant remittance report.
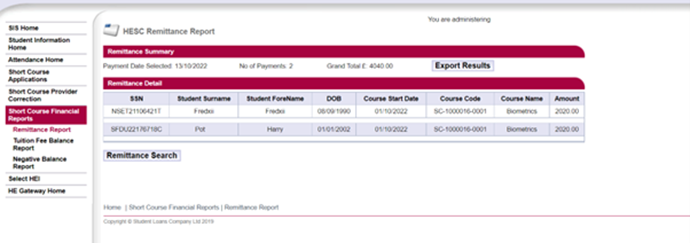
The remittance report is split into a summary block and a student table.
The summary block at the top of the page shows the:
- payment date
- number of payments
- grand total
The student table lists all the student details that make up the tuition fee payment total for the report. You can sort the columns of the report in ascending or descending order by selecting the column header.
On the HESC Remittance Report page, select Back to return to the remittance results page.
Column headers
SSN
The Student Support Number.
Student Surname
The student’s last name.
Student Forename
The student’s first name.
DoB
The student’s date of birth.
Course Start Date
The date on which the course begins.
Course code
The SLC short course code.
Course Name
The name of the course.
Amount
The amount of tuition fees which have been paid to your college or university.
Exporting the remittance report
You can export the remittance report if you need to. It will have a header row and then a detail record for each student in the report.
- On the Remittance Summary page, select Export.
- Depending on your browser, the system will ask if you want to cancel, save or open the file.
- Select Open to view the file without saving it first. Select Save to save the file to your own computer or network drive.
The default filename will be:
<heiCode>_<supportType>_<paymentDate>_remittance.dat
You can overtype this with something else if you want. There is no restriction on the number of exports you can make.
Negative balance report
You'll need HEP SC Report Advisor access to view this report.
The negative balance report shows all accounts where an 'A' attendance code has been confirmed against a payment or recovery. It will also show any payments you're due from us, that are not enough to cover the offset amount of recoveries owed back to us. Instead of receiving payment for a student’s tuition fees, the report will show how this payment is reducing your negative balance.
Negative balance reports are for information only and confirm that there are no outstanding actions you need to take. A negative balance report will only be available if you owe more than you're due to be paid. If you no longer have a negative balance, the report will not be available and the 'Negative balance report is not available' notification will appear.
- Go to the SIS Home page and select Short Course Financial Reports.
- From the Short Course Financial Reports submenu, select Negative Balance Report.
- If you have one available, you'll get a message saying, 'Click here to download negative balance report'.
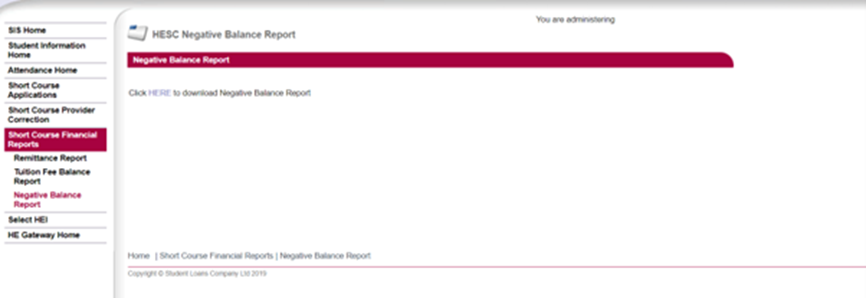
The report has the following fields:
- HEI code
- academic year
- support type
- product type
- Student Support Number (SSN)
- paid amount
- scheduled payment date
- customer name