Version 1.0 - Last Updated: 08 Jul 2025
Higher Education Short Courses
Change of Circumstance and Correction notifications
If the information on SIS is not correct you must submit a Change of Circumstance (CoC) or Correction notification as soon as possible. This lets us know what changes are needed.
You must have HEP SC CoC Administrator access to SIS to create CoCs or Corrections. If you need this added to your account, contact the User Administrator at your university or college.
The next chapters will take you through the types of CoCs and corrections, and how to submit them.
Our service level for CoC and Correction processing is 20 days in off-peak periods. During peak periods (from August to the end of November) it is 30 working days.
Create a course correction
If SIS shows the wrong course for a student you should use a course correction. When you create a course correction, the system will fill in the academic year, current course details, student details and mode of delivery. These fields will be greyed out and you cannot edit them.
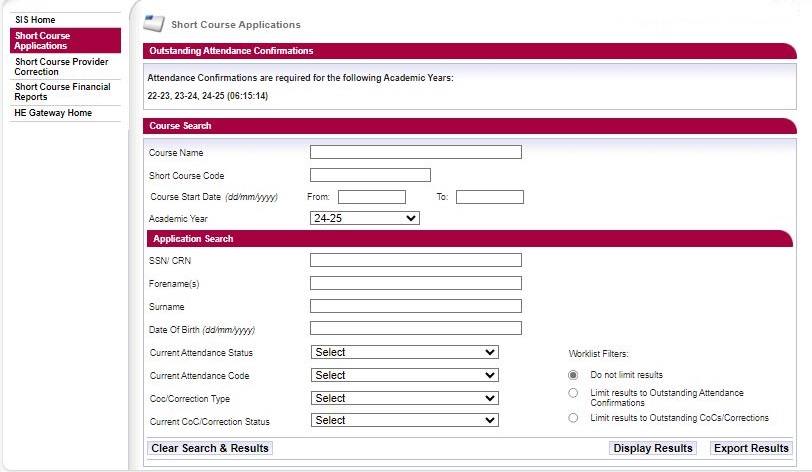
- Go to the SIS Home page and select Short Course Applications.

- Use Course Search to bring up a list of students on a course. You can also use the Application Search to find a specific student.
- Enter your search criteria, then select Display Results.
- From the Application Search Results section, select the Create button next to the relevant student. This will open the Change of Circumstance or Correction page.
- Select Course Correction from the Change Type dropdown.
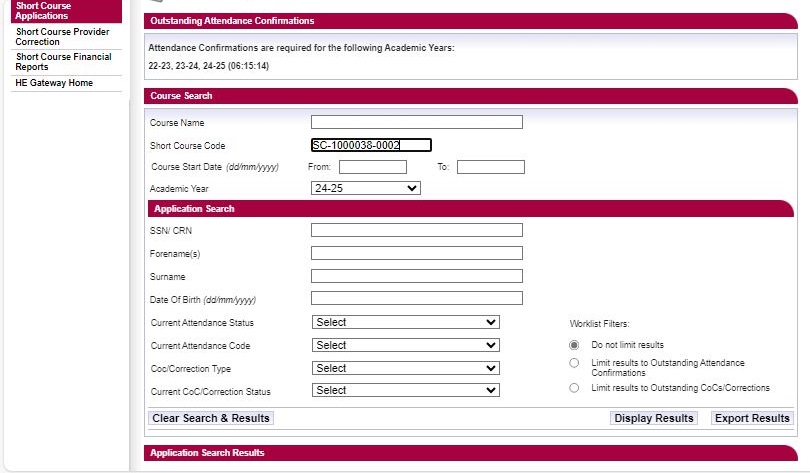
- Use the Short Course Code or Short Course Name to find the course the student is on. If you get more than one search result, use the radio buttons to select the correct course.
- Enter the Correction Effective Date for the correct course. The system will not let you submit a correction with an effective date more than 14 days from the start of the course.
- Enter the New Course Tuition Fee Amount and New Student Tuition Fee Liability.
- If you need to add additional information to this correction, you must select the checkbox after the line saying, ‘I need to include additional information so this CoC can be accurately processed. I understand that this will cause a delay as the CoC will need to be manually processed.’
- You must select a contact for the correction. This will be a registered person at your university or college whom we can contact about this CoC.
- Once you’ve entered all the information, select Submit.

- We’ll then reassess the student. After reassessment, the student will reappear in the Application Search Results section as an Outstanding Attendance Confirmation. You’ll then need to submit an A code to confirm the adjustment, or another code if it applies to the student’s circumstances.
Create a provider correction
If SIS shows the wrong university or college for a student you should use a provider correction.
- Select the Short Course Provider Correction link from the main menu.
- If the student already has an application at your university or college, you only need their Student Support Number (SSN) to find them.
- If the student has no application at your university or college, you’ll need their:
-Student Support Number (SSN)
-surname
-forename
-date of birth - Once you’ve found the student, enter the Previous Short Course Code.
- Next, enter the details of the course the student will attend. Search on the Correct Course Code or Correct Course Name to find it. If you get more than one search result, use the radio buttons to select the correct course.
- Enter the Correction Effective Date for the correct course.
- Enter the correct New Course Tuition Fee Amount. This is the full fee amount for the academic year you selected.
- Enter the correct New Course Tuition Fee Liability. This is the amount the student is liable for. For us to process the CoC automatically, the fee liability and fee amount fields must match.
- You must select a contact for the CoC. This will be a registered person at your university or college whom we can contact about this CoC if we need to.
- Once you’ve entered all the information, select Submit.
- We’ll then reassess the student. After reassessment, the student will reappear in the Application Search Results section under Outstanding Attendance Confirmations . You’ll then need to submit an A code to confirm the adjustment, or another code if it applies to the student’s circumstances.

Create an attendance correction
You should create an attendance correction if you’ve confirmed in error that a student is in attendance or has never attended.
When you create an attendance correction, the system automatically completes in the academic year, student details, course details, and change details. These fields will be greyed out and you cannot edit them.
If you originally marked the student as in attendance, with an A code in the Attendance Confirmation column, the attendance correction will automatically change this to D, for never attended.
If you originally marked the student as never attended, with a D code in the Attendance Confirmation column, the attendance correction will automatically change this to A, for in attendance.
To create an attendance correction.
- Go to the SIS Home page and select Short Course Applications.
- Use the Course Search to bring up a list of students on the course. You can also use the Application Search to find a specific student.
- Enter your search criteria, then select Display Results.
- From the Application Search Results page select the Create button for the relevant student. This will open the Change of Circumstance or Correction page.
- Select Attendance Correction from the Change Type dropdown menu.
- You must select a contact for the correction. This will be a registered person at your university or college whom we can contact about this CoC.
- Once you’ve entered all the information, select Submit.
- We’ll then reassess the student. Following reassessment, the student will reappear in the Outstanding Attendance Confirmations list. You’ll need to submit an A code to confirm the adjustment.
Create a Fee CoC
You should only use a Fee CoC when a student’s fee amount is wrong.
- Go to the SIS Home page and select Short Course Applications.
- Use the Course Search to bring up a list of students on the course. You can also use the Application Search to find a specific student.
- Enter your search criteria, then select Display Results.
- From the Application Search Results page select the Create button for the relevant student. This will open the Change of Circumstance or Correction page.
- Select Fee CoC from the Change Type dropdown. The system will complete the academic year, course details, student details, and mode of delivery. These fields will be greyed out and you cannot edit them. You can edit the fee and contact details.
- Enter the correct New Course Tuition Fee Amount. This is the full fee amount for the academic year you selected.
- Enter the correct New Course Tuition Fee Liability. This is the amount the student is liable for. For us to process the CoC automatically, the fee liability and fee amount fields must match.
- If you need to add additional information to this correction, you must select the checkbox after the line saying, ‘I need to include additional information so this CoC can be accurately processed. I understand that this will cause a delay as the CoC will need to be manually processed.’
- You must select a contact for the CoC. This will be a registered person at your university or college whom we can contact about this CoC.
- Once you’ve entered all the information, select Submit.
- We’ll then reassess the student. After reassessment, the student will reappear in the Application Search Results section as an Outstanding Attendance Confirmation. You’ll then need to submit an A code to confirm the adjustment, or another code if it applies to the student’s circumstances.

Create a Deceased CoC
Create a Deceased CoC
You should create a Deceased CoC when a student dies during their course.
- Go to the SIS Home page and select Short Course Applications.
- Use the Course Search to bring up a list of students on the course. You can also use the Application Search to find a specific student.
- Enter your search criteria, then select Display Results.
- From the Application Search Results page select the Create button next to the relevant student. This will open the Change of Circumstance or Correction
- Select Deceased from the Change Type dropdown.
- The system will automatically complete the academic year, student details, course details, and fee details. These fields will be greyed out and you cannot edit them. You can edit the Date of Last Attendance and contact details.
- The Date of Last Attendance must be after the course start date. It should mark the point from which the student is no longer in ongoing and active engagement with the course.
- You must select a contact for the correction. This will be a registered person at your university or college whom we can contact about this CoC.
- Once you’ve entered all the information, select Submit.
- We’ll begin the process of closing the account.
