Version 1.0 - Last Updated: 08 Jul 2025
Attendance confirmation
Attendance worklist
Like the registration and combined worklists, the Attendance Worklist page has tabs for Student Search and Course Search. The page defaults to the Course Search tab.
The following options are available on both tabs.
Clear Filter and Results
This clears all fields and reverts to the initial view. If you have any search results open, these will also be removed.
Filter and Display Results
This searches all student details on the system, retrieves those that match your criteria and displays them on screen.
Filter and Export Results
This searches all student details on the system, retrieves those that match your criteria and lets you save these in an export file.
Number of Records to Display per page
The number of search results per page. The default is 25, but you can change it to 50, 100 or 200.

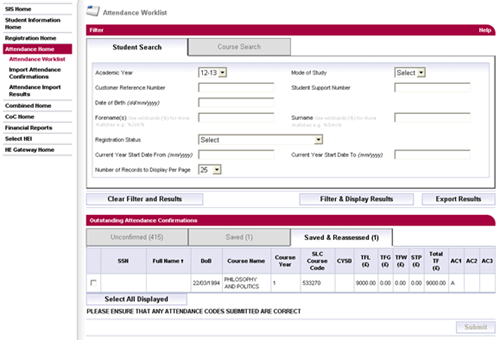
Attendance worklist – student search

The list below shows the search criteria you can use on the Student Search tab.
Academic Year
This defaults to the current academic year and is the only mandatory field you need to run a search.
Mode of Study
You can search for full-time or part-time students. If you leave this as Select, the search will return both.
Student Support Number / Customer Reference Number
Unique student identifiers.
Date of Birth
The student’s date of birth. The format is dd/mm/yyyy.
Forename/Surname
The student’s name. You can use a wildcard search for these fields. For this, you must enter at least 3 characters along with the wildcard symbol (%). If you use one of these fields, you must also use the other.
Registration Status
The student’s registration status.
Current Year Start Date From / Current Year Start Date To
This field lets you filter on the current year start date of part-time students. You cannot use it if you set the Mode of Study field to Full Time.
Level of Funding
A dropdown showing options for the level of funding or study. You can choose:
- undergraduate
- postgraduate
- postgraduate NI
Attendance worklist – course search
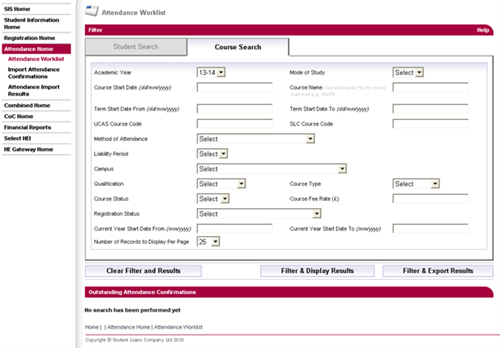
The list below shows the search criteria you can use on the Course Search tab.
Academic Year
This defaults to the current academic year and is the only mandatory field you need to run a search.
Mode of Study
You can search for full-time or part-time students. If you leave this as Select, the search will return both.
Course Start Date
The start date of full-time courses only. If you set Mode of Study to Part Time, this field will be unavailable.
Course Name
The student’s course name. You can use a wildcard search.
Term Start Date From/To
Term start date for full-time courses only. If you set Mode of Study to Part Time, this field will be unavailable.
UCAS Course Code/ SLC Course Code
Unique course identifiers.
Method of Attendance
If you set Mode of Study to Part Time, this field defaults to Part Time.
Liability Period
This field lets you filter on a specific liability period.
Campus
A dropdown with a choice of campus locations.
Qualification
A dropdown with a choice of qualifications.
Course Type
A dropdown with a choice of course types. If you set Mode of Study to Part Time, this field defaults to Part Time.
Course Fee
Enter the full course fee rate you're charging in this field.
Course Status
A dropdown that lets you search for open or closed courses.
Registration Status
The student’s registration status. This field will be unavailable if you select an academic year before 2012/13.
Current Year Start Date From/To
This field lets you filter on the current year start date of part-time students. You cannot use it if you set the Mode of Study field to Full Time.
Level of Funding
A dropdown showing options for the level of funding or study. You can choose:
- undergraduate
- postgraduate
- postgraduate NI
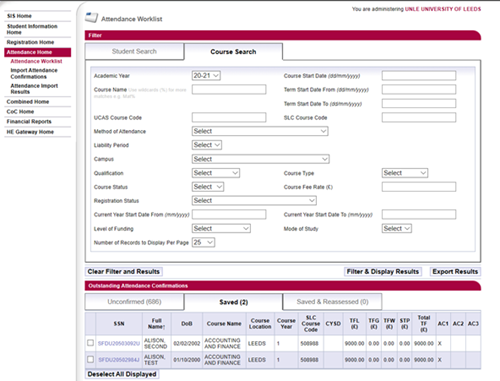
Attendance worklist search results
Once you run a search on the Attendance Worklist page, the search results will appear on screen. The top half of the page will show your search criteria. The bottom half will show the search results.
The results are split into 3 tabs:
- unconfirmed attendances – confirmations you have not yet actioned
- saved attendances – confirmations you've saved but not submitted
- saved and reassessed – confirmations you've saved and we have reassessed
The number of search results for each tab will be in brackets after the heading and the fields.
The search results will default to the Unconfirmed Attendances tab.
Once you've confirmed attendance for a student, their status will be updated to Attendance Confirmed. The student will disappear from the attendance worklist. If you submit attendance for the first liability period, they'll also disappear from the combined worklist.
Attendance worklist results – unconfirmed attendances
Each line of the Unconfirmed Attendances tab shows one student record. It includes the student’s:
- Student Support Number (SSN)
- full name
- date of birth
- course name
- course location
- course year
- SLC course code
- current year start date (for part-time students only)
- Tuition Fee Loan
- Tuition Fee Grant
- tuition fee waiver
- student to pay amount
- total tuition fee
Next to each student’s record, there is an Attendance Confirmation dropdown for each of the 3 liability periods. This will only become active when an attendance confirmation is due.
You'll see blanks under the liability points if you need to submit an attendance confirmation but the liability date has not been reached yet. If an attendance code is not applicable to the student, you'll see N/A.
- To confirm attendance, select the appropriate code from the Attendance Code dropdown.
- Select Submit if you want to submit the attendance confirmation right away.
- Select Save if you want to come back to the page and submit the attendance confirmation later.
The Save and Submit buttons will only become active once you have selected an attendance code.
Once you've submitted a student’s attendance confirmation, their status will change to Attendance Confirmed and they'll disappear from the attendance worklist. If you submitted attendance for the first liability period, they'll also disappear from the combined worklist.
If you submit a positive attendance code, this will appear in the Attendance Code column and you'll no longer be able to edit it. If you've made an error, you'll need to raise a Change of Circumstance notification (CoC) to correct it.
If you submit a negative code, this will appear in the Attendance Code column, but the dropdown will still be active so you can reverse it if you need to.
- To reverse a negative attendance code, select a positive code from the Attendance Code dropdown.
- Select Submit if you want to submit the positive attendance confirmation right away.
- Select Save if you want to come back to the page and submit the positive attendance confirmation later.
If you save an attendance confirmation but do not submit it, the saved code will appear in the Attendance Code column along with the dropdown option to amend it. The Submit button will become active. Select this to submit the confirmation when you're ready.
If a student does not need an attendance confirmation, the Attendance Code column will be blank. This might be because it is too early for the student to appear on the attendance worklist.
Sometimes, we reassess a student’s application and this affects a previous liability period. In this case, you may need to enter an attendance code for 2 liability periods at the same time.
The system will not let you submit an attendance code for the later of the 2 outstanding liability periods until you've submitted one for the earlier period. If you have only saved a code for a previous liability period, the system will consider it outstanding.
If you try to submit an attendance confirmation when there is an outstanding confirmation for an earlier liability period, you'll get an error message:
'The attendance code for the selected period cannot be submitted without submitting a code for all outstanding periods.'
Attendance worklist results – saved and reassessed
The Saved and Saved and Reassessed tabs have the same fields as the Unconfirmed tab. The only difference is that the Attendance Code field will show the code you've saved.
You cannot change the attendance code for the students on these tabs. To update a student’s confirmation, select their Student Support Number (SSN). This acts as a hyperlink that will take you to the Detailed Student Information page where you can update their attendance confirmation.
Select the checkboxes at the beginning of each row to choose the relevant codes to submit. Alternatively, choose Select All Displayed to select all records on the page. If you need to, you can deselect records individually or by selecting Deselect All Displayed. Select Submit to submit the codes.
An application may appear on both the Unconfirmed tab and the Saved tab. This will happen if the attendance confirmation for liability period 1 is still outstanding by the time liability period 2 arrives.
If you save an attendance code for liability period 1, this will move to the Saved tab. The outstanding attendance code for liability period 2 means that the record will also appear on the Unconfirmed tab. If you submit the attendance code for liability period 2, the saved code for liability period 1 will also be submitted.
You can enter and save attendance codes in any order, but our system will only let you submit them in order. You must submit liability period 1 before liability period 2 or both at the same time.
If you try to submit an attendance confirmation when there is an outstanding confirmation for an earlier liability period, you'll get an error message:
'The attendance code for the selected period cannot be submitted without submitting a code for all outstanding periods.'
When you save or submit an attendance code, the system will automatically check that the record has not been updated in the meantime. If it has, the system will not save your attendance code and you'll get a warning message. This applies to all tabs.
You'll also see a warning message when you submit attendance codes:
'Please ensure that any attendance codes are correct.'
When you've successfully submitted or saved an attendance confirmation, you'll get a message confirming this.